Backup & Restore Proxmox OS boot/root disk
Introduction
Recently I’ve received an email notification about one of my drives failing in my proxmox cluster. It turned out to be my proxmox boot drive, which is the only one not in the ZFS pool (but it just ext4). I’ve started to look through the official documentation, guides to look for what’s the best way to replace this drive and I’ve decided to share my 2-cents on in and how I did it in the end.
Disk replacement options
It turns out there isn’t really a native/easy way about this.
You could
- backup all VMs/LXc to PBS (aka proxmox backup storage), fresh install the proxmox one new disk and restore the VMs/LXc through PBS
- backup these folders somewhere external ( /etc/corosync/* /etc/pve /etc/passwd /etc/network/interfaces /etc/resolv.conf /etc/hostname /etc/hosts /var/lib/pve-cluster/config.db) -> do a fresh proxmox install -> replace these folders -> reboot
- use one of the million tools on the internet to do the step above somewhat more automatically - example
- clone the disk with (with sfdisk and dd) - guide
- or if you are well prepared and running root on ZFS, just put the new drive in and resilver the pool - guide
Then I’ve found out about existance of proxmox-backup-client tool
Proxmox backup client
Advantages
- installed on proxmox by default
- great integration with PBS (proxmox backup storage)
- easy to use
- allow us to create automatic backups of root OS disk to PBS
Disadvantages
- need to be used with PBS (maybe a deal breaker for someone not taking backups or taking backups differently)
How to backup / restore OS root disk
Take backup
Open shell on proxmox node (can be web GUI)
First we need to export some env variables to make our life using these commands easier (you could also use flag to use them in every command)
You can either use root user or dedicated user for backups. As an example I’ll show you the root user
1
2
3
export PBS_REPOSITORY=user@realm@<IP>:datastore
export PBS_PASSWORD="password"
export PBS_FINGERPRINT=""fingerprint"
Replace the user, realm, IP, datastore, password and fingerprint for your values. You can find them for example in the PBS GUI-> Datastore -> YourDatastore-> Sumarry -> Show connection information
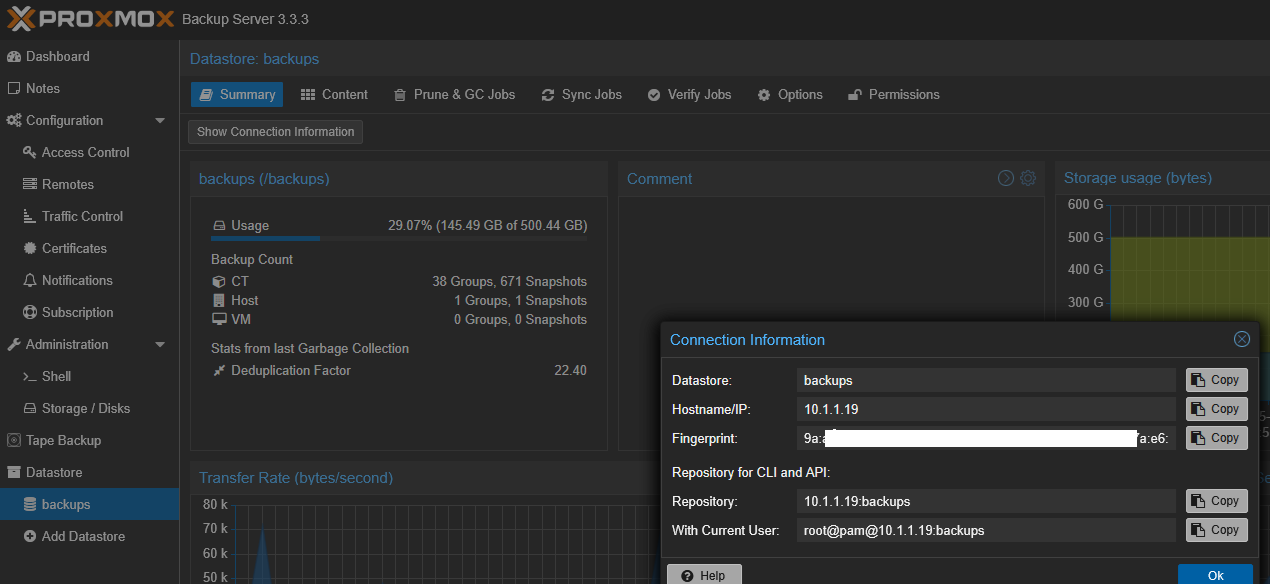
Except for the password. That you have to remember, it’s the same password you used for GUI login.
Example
1
2
3
export PBS_REPOSITORY=root@pam@10.1.1.19:backups
export PBS_PASSWORD=Password332!
export PBS_FINGERPRINT="9a:a7:19:XX:58:fb:c3:5d:XX:56:f6:4f:45:3a:XX:21:90:b8:f1:aa:e6:7c:45:12:42:e7:69:c2:17:28:a4:71"
Take backup of disk
1
proxmox-backup-client backup root.img:/dev/sdx --backup-id "gandalf"
- root.img - name of the image showing in PBS (can be anything really)
- :/ - path of what to take backup of. In our case everything root related under /
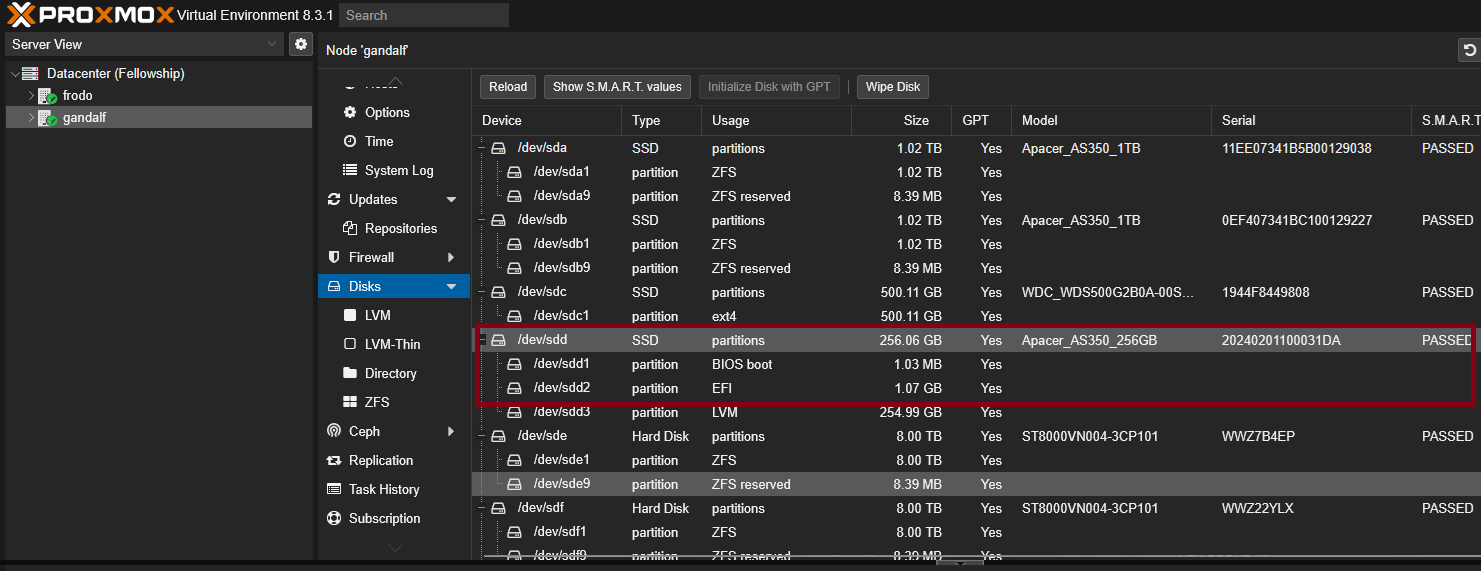
- dev/sdx - name of the disk where the proxmox OS is stored. You can find this information in proxmox GUI -> node -> disks -> look for partitions (BIOS boot, EFI, LVM). Check out the image bellow for more guidance
- -backup-id - will be used as hostname showing in PBS (can be anything really)
NOTE: This will take from few minutes to few hours depending on size of your boot disk (hopefully small), disk speeds, proxmox CPUs etc…
If it’s going correctly it should look like this
1
2
3
4
5
6
7
8
9
10
11
12
13
14
15
16
17
18
19
20
21
22
23
24
root@gandalf:~# proxmox-backup-client backup root.img:/dev/sdd --backup-id "gandalf"
Starting backup: host/gandalf/2025-06-07T10:53:31Z
Client name: gandalf
Starting backup protocol: Sat Jun  7 12:53:31 2025
storing login ticket failed: $XDG_RUNTIME_DIR must be set
No previous manifest available.
Upload image '/dev/sdd' to 'root@pam@10.1.1.19:8007:backups' as root.img.fidx
processed 9.672 GiB in 1m, uploaded 8.512 GiB
processed 22.895 GiB in 2m, uploaded 12.953 GiB
processed 38.668 GiB in 3m, uploaded 17.609 GiB
processed 56.313 GiB in 4m, uploaded 20.563 GiB
processed 69.734 GiB in 5m, uploaded 26.637 GiB
processed 88.809 GiB in 6m, uploaded 26.824 GiB
processed 108.688 GiB in 7m, uploaded 26.844 GiB
processed 128.289 GiB in 8m, uploaded 27.211 GiB
processed 148.172 GiB in 9m, uploaded 27.219 GiB
processed 168.063 GiB in 10m, uploaded 27.227 GiB
processed 184.984 GiB in 11m, uploaded 29.203 GiB
processed 204.844 GiB in 12m, uploaded 29.211 GiB
processed 224.473 GiB in 13m, uploaded 29.23 GiB
root.img: had to backup 29.284 GiB of 238.475 GiB (compressed 6.869 GiB) in 822.61 s (average 36.453 MiB/s)
root.img: backup was done incrementally, reused 209.191 GiB (87.7%)
Duration: 822.64s
End Time: Sat Jun  7 13:07:14 2025
Checkout the backup
Either by CLI
1
proxmox-backup-client snapshot list
Or in the PBS GUI under the Datastore content 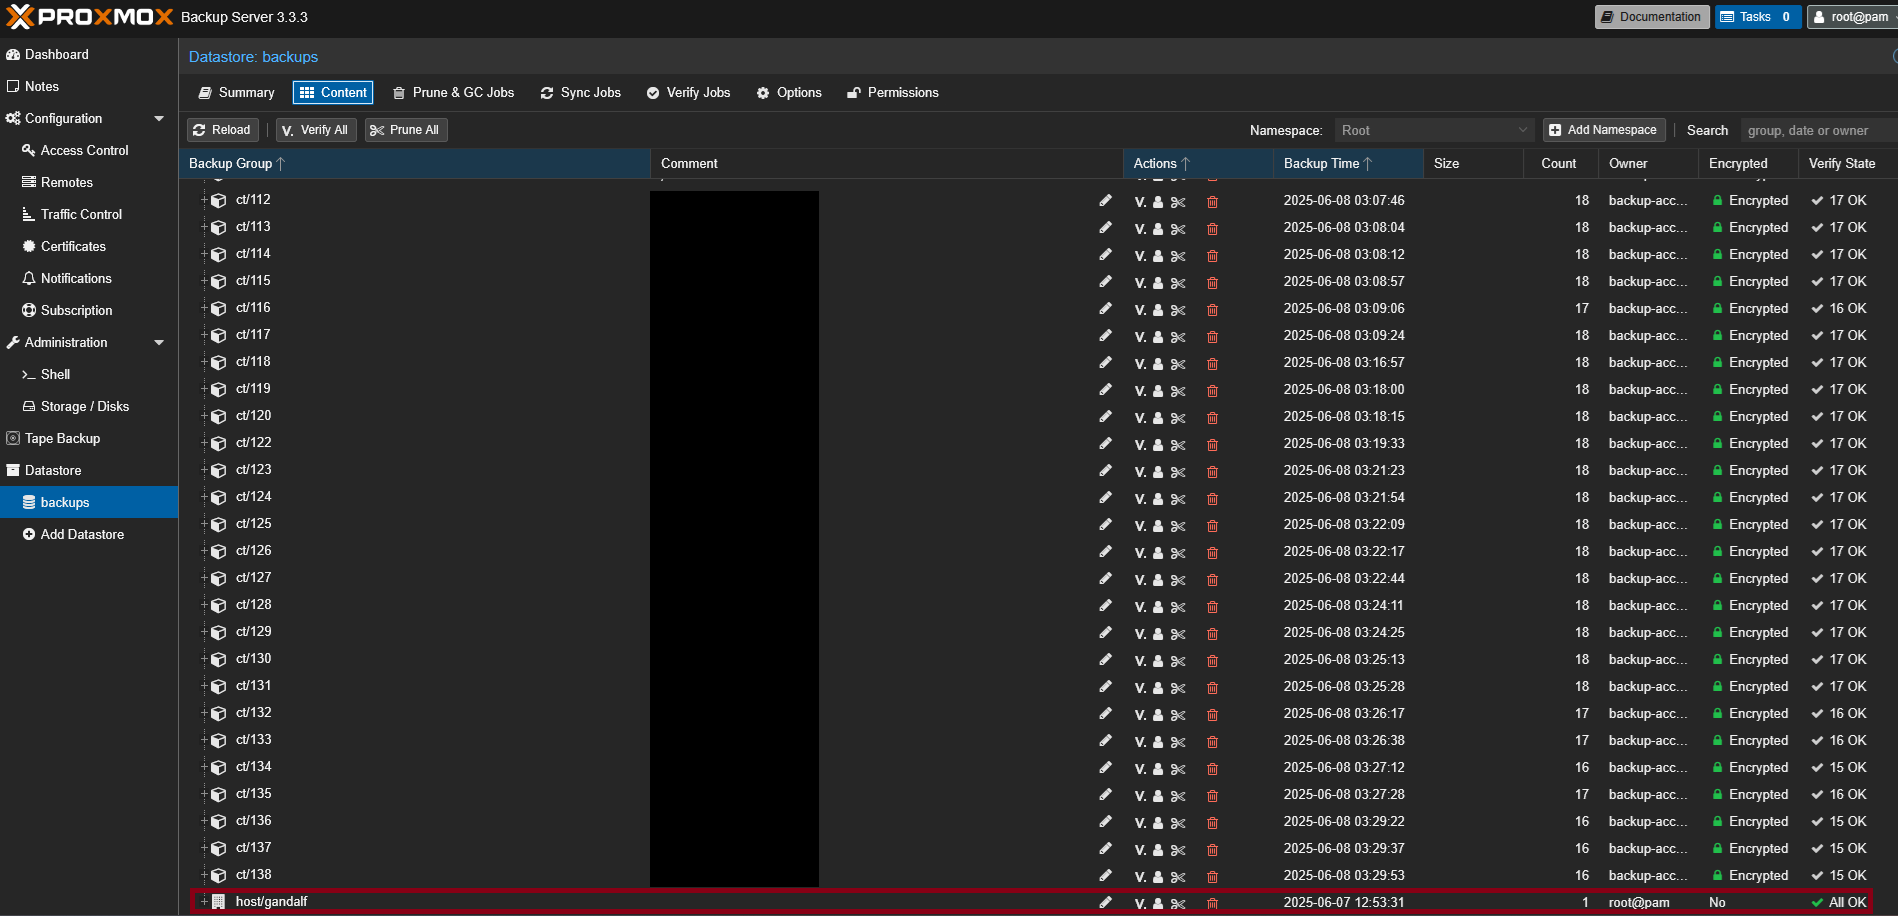
Connect new disk to proxmox
Connect the new disk to your server, and checkout it’s name either by CLI
1
lsblk
In the the proxmox GUI, again under disks as last time (don’t forget to click reload button)
Restore / clone root to a new disk
1
proxmox-backup-client restore host/gandalf/2025-06-07T10:53:31Z root.img - | dd of=/dev/sdx status=progress bs=1M
- host/gandalf/2025-06-07T10:53:31Z - name of the backup which we have listed in previous step
- root.img - name of the image showing in PBS (can be anything really)
- /dev/sdx - name of the disk WHERE WE WANT TO RESTORE/CLONE the image (new disk)
Warning Be careful not to rewrite any other disk.
Also your disk should be same or larger size, than the old one. If it’s off even slighly less, you will need to fiddle with a partion table a bit, but I’ll show you what at the end of article!
Let’s continue
- When you, are done restoring image onto new drive, shutdown the proxmox server.
- Disconnect the old failing disk.
- Start the server again and go into BIOS.
- In the BIOS set the new SSD as new boot one, save.
- Profit
Automate root disk backups backups (Optional)
Let’s automate this process, so we have relatively up to date root OS if we would want to restore it. And while we are at it, let’s create cleanup policies, so it won’t get cluttered in the PBS
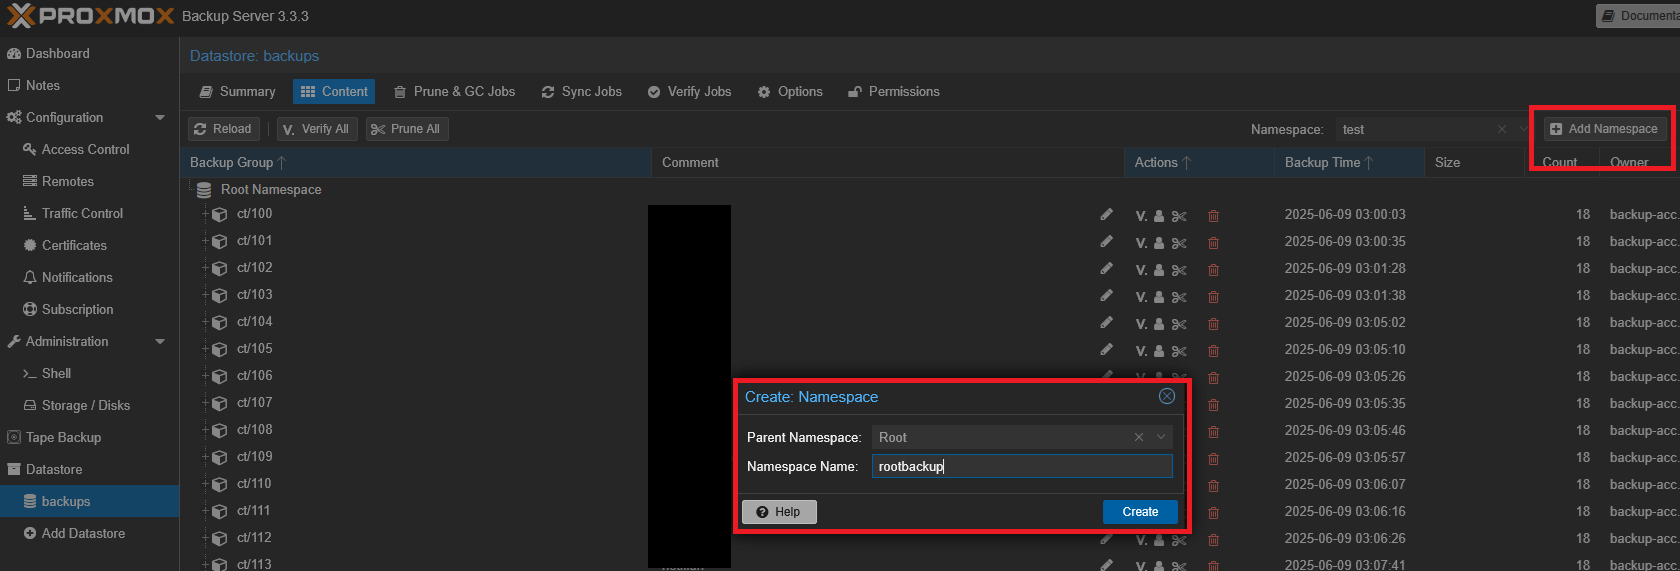
In the PBS create new namespace under datastore
Create prune job for new namespace
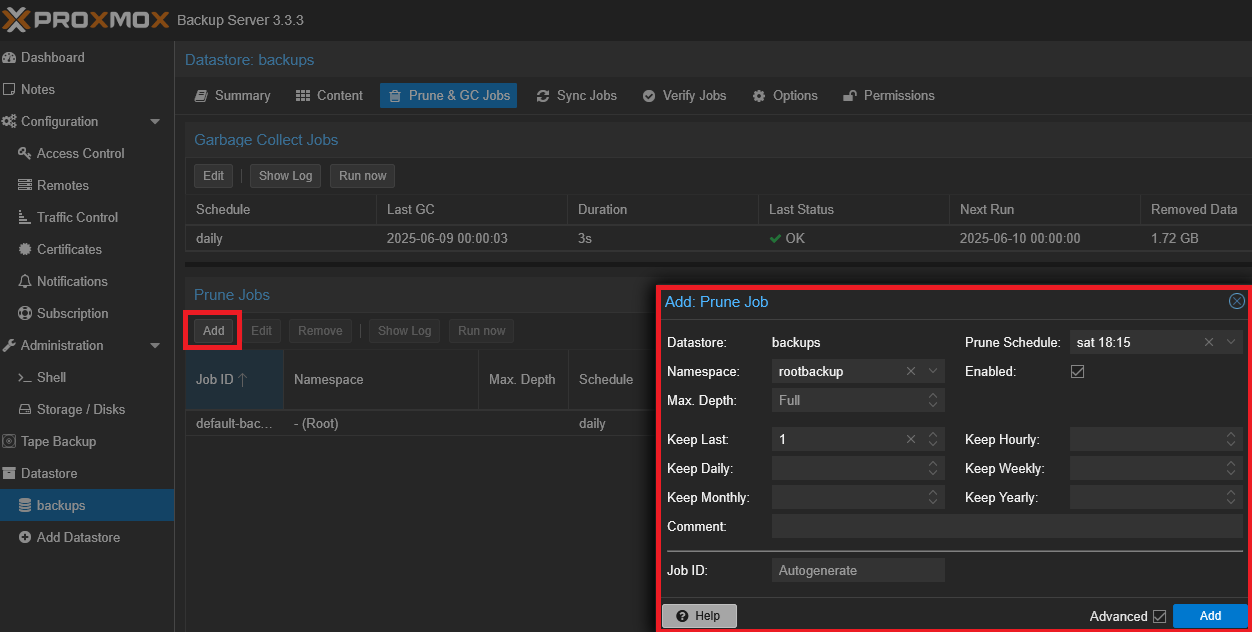
Change the values to your preferences. I’ve setup mine to only keep last backup, and run this job weekly at sunday.
Create backup service on the proxmox node
In the proxmox shell type
1
vim /etc/systemd/system/rootbackup.service
1
2
3
4
5
6
7
8
9
10
11
12
13
14
15
16
[Unit]
Description=Backup root to PBS
After=network-online.target

[Service]
#same ENVs we used in previous step
Environment=PBS_FINGERPRINT=fingerprint
Environment=PBS_PASSWORD=api_key/password
Environment=PBS_REPOSITORY=user@realm@<IP>:datastore
Type=oneshot
#change the disk name (/dev/sdx) and backup-id (gandalf) and ns (rootbackup) to your values
# ns = namespace
ExecStart=proxmox-backup-client backup root.img:/dev/sdx --backup-id "gandalf" --ns "rootbackup"

[Install]
WantedBy=default.target
1
vim /etc/systemd/system/rootbackup.timer
1
2
3
4
5
6
7
8
9
10
11
12
[Unit]
Description=Backup System Daily
RefuseManualStart=no
RefuseManualStop=no

[Timer]
# run once a month at 3 AM on the 1st
OnCalendar=*-*-1 03:00:00
Unit=rootbackup.service

[Install]
WantedBy=timers.target
Enable the service
1
2
systemctl daemon-reload
systemctl enable --now rootbackup.timer
You can test the first backup with
1
systemctl start rootbackup
If you try to list backups now, when snapshots are nested under namespace you need to include namespace name like so
1
2
3
4
5
6
root@gandalf:~# proxmox-backup-client snapshot list --ns "rootbackup"
+===================================+=============+=====================+
| snapshot                          |        size | files               |
+===================================+=============+=====================+
| host/gandalf/2026-03-01T02:00:00Z | 238.475 GiB | index.json root.img |
+===================================+=============+=====================+
And then restore
1
proxmox-backup-client restore host/gandalf/2026-03-01T02:00:00Z root.img - --ns "rootbackup" | dd of=/dev/sdh status=progress bs=1M
What to do if the new disk is smaller?
Same thing happend to me on my last recovery session.
Previosly I had 238,4 Gib disk (256GB), but I’ve switched to enterprise SSD which was smaller 223,5Gib (240GB)
Restoring image went without errors, but when I tried to actually boot with the new drive I got error
```ALERT! /dev/mapper/pve-root does not exist. Dropping to a shell!
When I tried checking LVM partition the drive was showing none.
You can check it yours by
1
2
3
4
lsblk

#or scan for LVM with
lvm pvscan
Because proxmox LVM partition also lives at the end of the drive it would’t show.
FIX
- To fix this we need to change partition table to a new size from live bootable linux drive.
You can use distro of your choice I went with debian - use rufus to flash ISO onto USB, plug the USB into PC a restart
- Go to bios, change boot to our USB
- When you are in a live distro open up a terminal and type following command to find out correct disk name
1
lsblk
Let’s call mine SDX, so you won’t just blindly copy my commands and destroy your server.
- Install gdisk (if it’s not already included in the live OS)
1
2
sudo apt update
sudo apt install gdisk -y
- Run gdisk
1
sudo gdisk /dev/sdX
Well now it’s gonna get a little complicated so bear with me
- Type d [Enter], then 3 [Enter] # This will delete old broken LVM partition
- Type n [Enter], then 3 [Enter] # To crate new LVM partition
- First sector: Press Enter to accept the default # Mine is (2099200), but your will probably differ so just go with default
- Last sector: DO NOT press Enter. # We cannot go with default with this one, because we need to fix this boundry remember? Now you need to do a little math, for my case I need to type exactly “468860000” and press [Enter] This safely fits my 468,862,128 SSD. But if you have different size, which you probably have you need to adjust the value. If you have no idea what I’m talking about just ask the AI, It will give you your exact value.
- Hex code: Type 8e00 and press [Enter]
- Now we need to Fix the GPT Headers with The Expert Menu, Type x and press [Enter]
- Type e and press [Enter] # This relocates the backup data structures to the physical end of the disk
- Type m and press [Enter] # Returns to the main menu
- Type w and press [Enter] # Writes the changes to the disk & Type Y and press [Enter] to confirm
And that’s all! You can check if it worked with
1
2
sudo partprobe /dev/sdX
lsblk
- Now Reboot the server and try again, it should be working just fine now.