My Favourite Kubernetes Tools
title: My favorite Kubernetes Tools date: 2024-04-27 20:00:00 +0100 categories: [kubernetes] tags: [kubernetes] math: false mermaid: false —
Introduction
Navigating and managing the complexities of Kubernetes can be a daunting task. Fortunately, the Kubernetes ecosystem is rich with utilities that can significantly enhance your workflow, streamline operations, and simplify cluster management.
In this blog post, I’ll show you some of my favorite “awesome Kubernetes tools,” what they help you with, and how you can install them!
kubectx / kubens
If you’ve ever experienced managing multiple clusters with multiple namespaces, you probably know the pain of always switching between them. To tackle this problem, there is a very popular piece of software called kubectx/kubens.
- kubectx is a tool to switch between contexts (clusters) on kubectl faster.
- kubens is a tool to switch between Kubernetes namespaces (and configure them for kubectl) easily.
Installation
1
2
3
4
#debian
sudo apt install kubectx
#homebrew
brew install kubectx
I like to combine it with fzf, which allows for interactive scrolling through choices.
Add autocomplition to kubectx/kubens with fzf
The only thing required is to install the fzf package.
1
2
3
4
5
6
#debian
sudo apt install fzf
#rhel
sudo dnf install fzf
#homebrew
brew install fzf
Command autocompletion with K alias
This is pretty self-explanatory. If you like using the alias “k=kubectl” and tab a lot for autocompletion, this is a must-have.
The official tutorial can be found here
First, we need to enable autocomplete for kubectl. In the terminal type
1
2
source <(kubectl completion bash) # set up autocomplete in bash into the current shell, the bash-completion package should be installed first.
echo "source <(kubectl completion bash)" >> ~/.bashrc # add autocomplete permanently to your bash shell.
And now for “k=kubectl alias,” we need to adjust ~/.bashrc
1
2
alias k=kubectl
complete -o default -F __start_kubectl k
Unfortunately, it wouldn’t work for me, so I made this workaround.
1
source <(kubectl completion bash | sed 's/kubectl/k/g')
Now you should be able to use kubectl commands in a shorter version, like so.
1
2
3
4
5
#old long way
kubectlgetpods

#short way with alias
k get pods
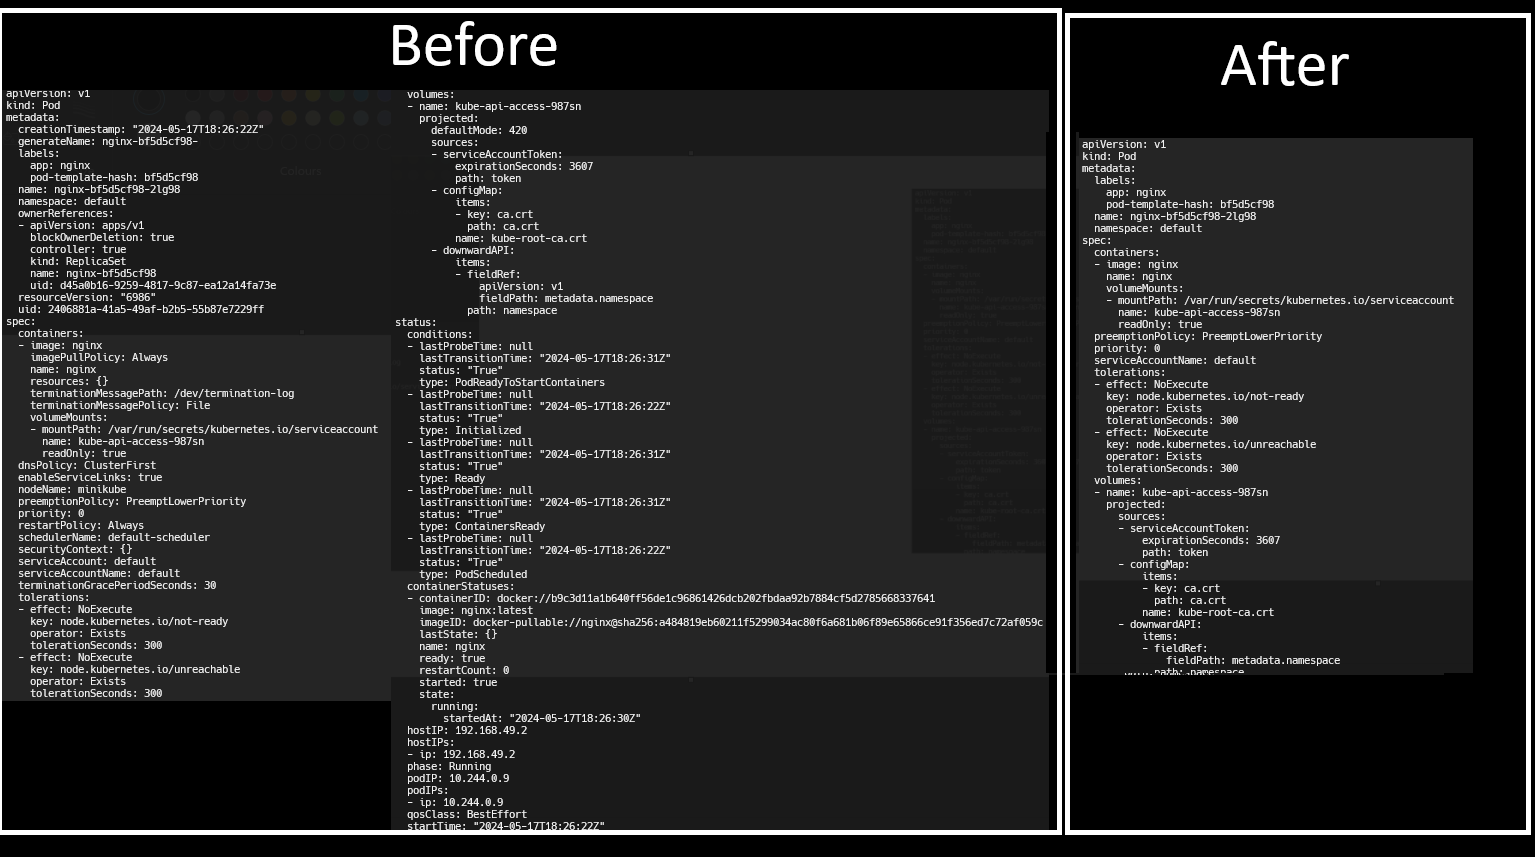
kubectl-neat - Clean manifests
This tool is great for clearing yaml manifests from unnecessary clutter you get from commands like
1
2
3
kubectl get RESOURCE_NAME/RESOURCE_IDENTIFIER -o yaml | kubectl neat
#if using alias k=kubectl
kubectl get RESOURCE_NAME/RESOURCE_IDENTIFIER -o yaml | k neat
Installation
1
2
3
4
5
6
7
8
9
10
11
12
13
14
15
16
17
#first install krew kubectl plugin manager
#(https://krew.sigs.k8s.io/docs/user-guide/setup/install/)
Use this as a one-liner to install
(
  set -x; cd "$(mktemp -d)" &&
  OS="$(uname | tr '[:upper:]' '[:lower:]')" &&
  ARCH="$(uname -m | sed -e 's/x86_64/amd64/' -e 's/\(arm\)\(64\)\?.*/\1\2/' -e 's/aarch64$/arm64/')" &&
  KREW="krew-${OS}_${ARCH}" &&
  curl -fsSLO "https://github.com/kubernetes-sigs/krew/releases/latest/download/${KREW}.tar.gz" &&
  tar zxvf "${KREW}.tar.gz" &&
  ./"${KREW}" install krew
)

#add this to ~/bashrc
export PATH="${KREW_ROOT:-$HOME/.krew}/bin:$PATH"
Now install kubeneat as a plugin
kubectl krew install neat
k9s
K9s provides a terminal UI to interact with your Kubernetes clusters. The aim of this project is to make it easier to navigate, observe, and manage your applications in the wild. 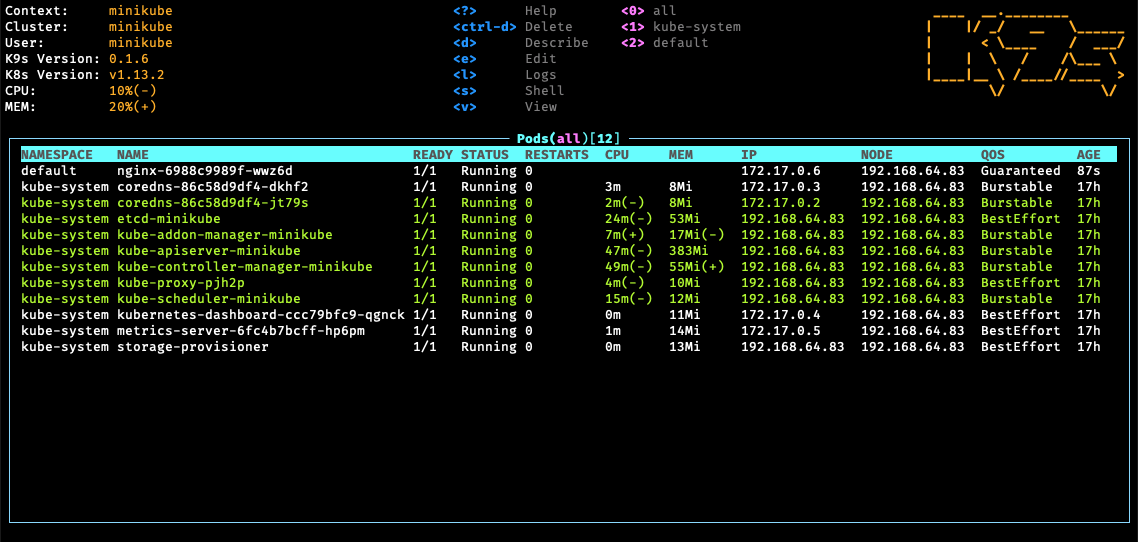
Installation
1
brew install derailed/k9s/k9s
kube-no-trouble
__Easily check your clusters for the use of deprecated APIs. __ As you may have noticed, Kubernetes tends to change and upgrade things a lot. That includes deprecating old ways of doing things, which means that sometimes an API may stop working after upgrading the cluster.
This is where kube-no-trouble (kubent) comes from. Kubent scans your cluster, checks all the resources, and reports if there are any issues.
Usage
Simply run the kubent command from your terminal. Kubent will look for the kube .config file in standard locations (you can point it to custom location using the -k switch).
1
2
3
4
5
6
7
8
9
10
11
12
13
14
15
16
17
18
19
20
$kubent
6:25PM INF >>> Kube No Trouble `kubent` <<<
6:25PM INF Initializing collectors and retrieving data
6:25PM INF Retrieved 103 resources from collector name=Cluster
6:25PM INF Retrieved 0 resources from collector name="Helm v3"
6:25PM INF Loaded ruleset name=deprecated-1-16.rego
6:25PM INF Loaded ruleset name=deprecated-1-20.rego
__________________________________________________________________________________________
>>> 1.16 Deprecated APIs <<<
------------------------------------------------------------------------------------------
KIND         NAMESPACE     NAME                    API_VERSION
Deployment   default       nginx-deployment-old    apps/v1beta1
Deployment   kube-system   event-exporter-v0.2.5   apps/v1beta1
Deployment   kube-system   k8s-snapshots           extensions/v1beta1
Deployment   kube-system   kube-dns                extensions/v1beta1
__________________________________________________________________________________________
>>> 1.20 Deprecated APIs <<<
------------------------------------------------------------------------------------------
KIND      NAMESPACE   NAME           API_VERSION
Ingress   default     test-ingress   extensions/v1beta1
Installation
1
sh -c "$(curl -sSL 'https://git.io/install-kubent')"
Starship - Cross-shell prompt
Starship is a minimal, fast customizable prompt for any shell.
With starship you can customize your shell to integrate technologies like git, kubernetes, Terraform, and many more.
I like to setup starship so I can see my current connected cluster and context in kubernetes, to see my git branch I’m currently in or see in which terraform workspace I’m currently working. All this is in one config file, which you can easily customize yourself.
The look of my current shell

My current config
1
2
3
4
5
6
7
8
9
10
11
12
13
14
15
16
17
18
19
20
21
22
23
24
25
26
27
28
29
30
31
32
33
34
35
36
37
38
39
40
41
42
43
44
45
46
47
48
49
50
51
52
53
54
55
56
57
58
59
60
61
62
63
64
65
66
67
68
69
70
71
72
73
74
75
76
77
78
79
80
81
82
83
84
85
86
87
88
89
90
91
92
93
94
95
96
97
98
99
100
101
# ~/.config/starship.toml
add_newline = false
command_timeout = 1000
#format = """$os$username$hostname$kubernetes$directory$git_branch$git_status"""
format = """$hostname$kubernetes$directory$git_branch$git_status"""
# Drop ugly default prompt characters
[character]
success_symbol = ''
error_symbol = ''
# ---
[os]
format = '[$symbol](bold white) '
disabled = false
[os.symbols]
Windows = ''
Arch = ''
Ubuntu = ''
Macos = ''
# ---
# Shows the username
[username]
style_user = 'white bold'
style_root = 'black bold'
format = '[$user]($style) '
disabled = false
show_always = true
# Shows the hostname
[hostname]
ssh_only = false
format = '[$hostname](bold yellow) '
disabled = false
# Shows current directory
[directory]
truncation_length = 1
truncation_symbol = '…/'
home_symbol = ' ~'
read_only_style = '197'
read_only = ' '
format = 'at [$path]($style)[$read_only]($read_only_style) '
# Shows current git branch
[git_branch]
symbol = ' '
format = 'via [$symbol$branch]($style)'
# truncation_length = 4
truncation_symbol = '…/'
style = 'bold green'
# Shows current git status
[git_status]
format = '[$all_status$ahead_behind]($style) '
style = 'bold green'
conflicted = '🏳'
up_to_date = ''
untracked = ' '
ahead = '⇡${count}'
diverged = '⇕⇡${ahead_count}⇣${behind_count}'
behind = '⇣${count}'
stashed = ' '
modified = ' '
staged = '[++\($count\)](green)'
renamed = '襁 '
deleted = ' '
# Shows kubernetes context and namespace
[kubernetes]
format = 'via [ $context\($namespace\)](bold purple) '
disabled = false
[terraform]
format = '[$workspace]($style) '
disabled = true
# ---
[vagrant]
disabled = true
[docker_context]
disabled = true
[helm]
disabled = true
[python]
disabled = true
[nodejs]
disabled = true
[ruby]
disabled = true
Installation
```bash #first install nerd fonts #https://www.nerdfonts.com/
#then install starship curl -sS https://starship.rs/install.sh | sh