Introduction
In this post, I’ll walk you through a complete guide for integrating an UPS (Eaton 5E 850i) with your Proxmox setup using Network UPS tools aka NUT inside LXC container.
Why is having UPS important
- you get another xy minutes to save your WORK!! (which can get potentially lost)
- avoid corrupting database, files
- avoid stress from HDDs
- avoid bricking motherboard (while flashing bios for example)
- avoid damage to hardware caused by overcurrents and voltage spikes
…many more
Disclaimer
I’m not reinventing the wheel here, this informaton can be partly found on many different blogs, but I’ve not found one which is A-Z complete and up to date.
sources proxmox forum , ltt forum
We are going to run
NUT client && NUT server on PVE itself
The server will communicate with the UPS over USB and serve data to all clients.
The client is listening to the server and take appropriate actions.
NUT client && webserver in LXC
The client will also listen to the server and show UPS information over webserver in the GUI
This is probably also possible to achieve with just one privileged LXC container running everything (without running anything on PVE), but I (and many others) have tried it and it’s complicating process a lot and introducing some unreliability, which is the last thing you want with UPS.
Hardware && software used
UPS: Eaton 5E 850i
Hypervisor: Proxmox
Shutdown process overview
Main power failure occurs »
- UPS device switches power to battery
- UPS device notifies server with a “On battery” event message
- USP battery is getting close to depletion :
- UPS device notifies server with a “Battery low” event message
- Server waits the set “Final delay” time
- Server starts his shutdown procedure :
- Sets the “Kill power” flag
- Ends all running processes
- Unmounts all file systems
- Remounts file systems as read-only
- Looks for the “Kill power” flag
- Issues the “Kill power” command to the UPS device
- Halts the system, but doesn’t power off
- UPS device receives the “Kill power” command from the server :
- UPS waits for the “Shutdown delay” time to pass
- This is to give all systems enough time to properly shut down
- UPS device cuts power on all outlets
- All connected systems lose power
- Main power supply has been restored :
- UPS device starts to reload its battery
- UPS device waits for the “Startup delay” time to pass
- This is to reload the battery to a safe minimum level
- UPS device restores power on all outlets
- All connected systems start up again
How to
Install NUT client && NUT server on PVE itself
Install necessary packages on PVE
1
2
3
4
5
6
7
8
9
10
11
12
13
14
15
16
17
18
19
20
21
22
23
| #be sure to have 2.8+ because of bug
apt-cache policy nut nut-server nut-client
nut:
Installed: 2.8.0-7
Candidate: 2.8.0-7
Version table:
*** 2.8.0-7 500
500 http://deb.debian.org/debian bookworm/main amd64 Packages
100 /var/lib/dpkg/status
nut-server:
Installed: 2.8.0-7
Candidate: 2.8.0-7
Version table:
*** 2.8.0-7 500
500 http://deb.debian.org/debian bookworm/main amd64 Packages
100 /var/lib/dpkg/status
nut-client:
Installed: 2.8.0-7
Candidate: 2.8.0-7
Version table:
*** 2.8.0-7 500
500 http://deb.debian.org/debian bookworm/main amd64 Packages
100 /var/lib/dpkg/status
|
Install them
1
| apt-get install nut nut-server nut-client
|
Connect NUT device over USB
We need to figure out which bus device is UPS using
1
2
3
4
| lsusb
Bus 002 Device 001: ID 1d6b:0003 Linux Foundation 3.0 root hub
Bus 001 Device 009: ID 0463:ffff MGE UPS Systems UPS
Bus 001 Device 001: ID 1d6b:0002 Linux Foundation 2.0 root hub
|
In my case it’s Bus 001 Device 009, but yours will probably differ.
Run nut scanner
1
2
3
4
5
6
7
8
9
10
11
12
| nut-scanner -U
#my output, but yours will differ!!
Scanning USB bus.
[nutdev1]
driver = "usbhid-ups"
port = "auto"
vendorid = "0463"
productid = "FFFF"
product = "5E"
vendor = "EATON"
bus = "001"
|
Configuration
Backup old configs (still on PVE node)
1
2
3
| cd /etc/nut
mkdir backup
mv ups* backup
|
Edit configs
1
2
3
| #vim /etc/nut/nut.conf
MODE=netserver
|
1
2
3
4
5
6
7
8
9
10
11
12
13
14
15
16
17
18
19
| #vim /etc/nut/ups.conf
pollinterval = 15
maxretry = 3
offdelay = 180
ondelay = 300
#Enter the nut-scanner -U values here
#my output, but yours will differ!!
[nutdev1]
driver = "usbhid-ups"
port = "auto"
vendorid = "0463"
productid = "FFFF"
product = "5E"
vendor = "EATON"
bus = "001"
|
Test config
1
2
3
4
5
6
| upsdrvctl start
Network UPS Tools - UPS driver controller 2.8.0
Network UPS Tools - Generic HID driver 0.47 (2.8.0)
USB communication driver (libusb 1.0) 0.43
Using subdriver: MGE HID 1.46
|
We can see the UPS is communicating and we can continue.
1
2
3
4
| #vim /etc/nut/upsd.conf
LISTEN 0.0.0.0 3493
LISTEN :: 3493
|
1
2
3
4
5
6
7
8
9
10
11
12
13
14
15
16
| #vim /etc/nut/upsd.users
[upsadmin]
# Administrative user
password = Password123!
# Allow changing values of certain variables in the UPS.
actions = SET
# Allow setting the "Forced Shutdown" flag in the UPS.
actions = FSD
# Allow all instant commands
instcmds = ALL
upsmon master
[upsuser]
# Normal user
password = Password123!
upsmon slave
|
1
2
3
4
5
6
7
8
9
10
11
12
13
14
15
16
17
18
19
20
21
22
23
24
25
26
27
28
29
30
31
32
33
34
35
36
| #vim /etc/nut/upsmon.conf
RUN_AS_USER root
MONITOR nutdev1@localhost 1 upsadmin Password123! master
MINSUPPLIES 1
SHUTDOWNCMD "/sbin/shutdown -h"
NOTIFYCMD /usr/sbin/upssched
POLLFREQ 2
POLLFREQALERT 1
HOSTSYNC 15
DEADTIME 15
MAXAGE 24
POWERDOWNFLAG /etc/killpower
NOTIFYMSG ONLINE "UPS %s on line power"
NOTIFYMSG ONBATT "UPS %s on battery"
NOTIFYMSG LOWBATT "UPS %s battary is low"
NOTIFYMSG FSD "UPS %s: forced shutdown in progress"
NOTIFYMSG COMMOK "Communications with UPS %s established"
NOTIFYMSG COMMBAD "Communications with UPS %s lost"
NOTIFYMSG SHUTDOWN "Auto logout and shutdown proceeding"
NOTIFYMSG REPLBATT "UPS %s battery needs to be replaced"
NOTIFYMSG NOCOMM "UPS %s is unavailable"
NOTIFYMSG NOPARENT "upsmon parent process died - shutdown impossible"
NOTIFYFLAG ONLINE SYSLOG+WALL+EXEC
NOTIFYFLAG ONBATT SYSLOG+WALL+EXEC
NOTIFYFLAG LOWBATT SYSLOG+WALL+EXEC
NOTIFYFLAG FSD SYSLOG+WALL+EXEC
NOTIFYFLAG COMMOK SYSLOG+WALL+EXEC
NOTIFYFLAG COMMBAD SYSLOG+WALL+EXEC
NOTIFYFLAG SHUTDOWN SYSLOG+WALL+EXEC
NOTIFYFLAG REPLBATT SYSLOG+WALL
NOTIFYFLAG NOCOMM SYSLOG+WALL+EXEC
NOTIFYFLAG NOPARENT SYSLOG+WALL
|
1
2
3
4
5
6
7
8
9
10
11
12
13
14
| #vim /etc/nut/upssched.conf
CMDSCRIPT /etc/nut/upssched-cmd
PIPEFN /etc/nut/upssched.pipe
LOCKFN /etc/nut/upssched.lock
AT ONBATT * START-TIMER onbatt 30
AT ONLINE * CANCEL-TIMER onbatt online
AT LOWBATT * EXECUTE onbatt
AT COMMBAD * START-TIMER commbad 30
AT COMMOK * CANCEL-TIMER commbad commok
AT NOCOMM * EXECUTE commbad
AT SHUTDOWN * EXECUTE powerdown
AT SHUTDOWN * EXECUTE powerdown
|
1
2
3
4
5
6
7
8
9
10
11
12
13
14
15
16
17
18
| #vim /etc/nut/upssched-cmd
#!/bin/sh
case $1 in
onbatt)
logger -t upssched-cmd "UPS running on battery"
;;
shutdowncritical)
logger -t upssched-cmd "UPS on battery critical, forced shutdown"
/usr/sbin/upsmon -c fsd
;;
upsgone)
logger -t upssched-cmd "UPS has been gone too long, can't reach"
;;
*)
logger -t upssched-cmd "Unrecognized command: $1"
;;
esac
|
Restart services
1
2
3
4
| service nut-server restart
service nut-client restart
systemctl restart nut-monitor
|
Test connection
1
2
3
4
5
6
7
8
9
10
| upsdrvctl stop && upsdrvctl start
Network UPS Tools - UPS driver controller 2.8.0
Network UPS Tools - Generic HID driver 0.47 (2.8.0)
USB communication driver (libusb 1.0) 0.43
Using subdriver: MGE HID 1.46
Broadcast message from root@gandalf (somewhere) (Sun Dec 15 21:12:43 2024):
Communications with UPS nutdev1@localhost established
|
1
2
3
4
5
6
7
8
9
10
11
12
13
14
15
16
17
18
19
20
21
22
23
24
25
26
27
28
29
30
31
32
33
34
35
36
37
38
39
40
41
42
43
44
45
| upsc nutdev1@localhost
Init SSL without certificate database
battery.charge: 100
battery.runtime: 1759
battery.type: PbAc
device.mfr: EATON
device.model: 5E 850i
device.type: ups
driver.name: usbhid-ups
driver.parameter.bus: 001
driver.parameter.pollfreq: 30
driver.parameter.pollinterval: 15
driver.parameter.port: auto
driver.parameter.product: 5E
driver.parameter.productid: FFFF
driver.parameter.synchronous: auto
driver.parameter.vendor: EATON
driver.parameter.vendorid: 0463
driver.version: 2.8.0
driver.version.data: MGE HID 1.46
driver.version.internal: 0.47
driver.version.usb: libusb-1.0.26 (API: 0x1000109)
input.voltage: 234.0
outlet.1.status: on
outlet.desc: Main Outlet
outlet.id: 1
outlet.switchable: no
output.frequency: 50.0
output.frequency.nominal: 50
output.voltage: 232.0
output.voltage.nominal: 230
ups.beeper.status: enabled
ups.delay.shutdown: 20
ups.firmware: 02.06.0017
ups.load: 18
ups.mfr: EATON
ups.model: 5E 850i
ups.power.nominal: 850
ups.productid: ffff
ups.realpower: 122
ups.start.battery: yes
ups.status: OL
ups.timer.shutdown: -1
ups.vendorid: 0463
|
Test delayed shutdown
1
2
3
4
5
| upsrw -s ups.delay.shutdown=180 nutdev1@localhost
#input credentials we defined in /etc/nut/upsmon.conf
upsadmin
Password123!
|
NUT client && webserver in LXC
Create debian lxc
I’m using proxmox community scripts to create new LXC, but you can use any method
In the proxmox node shell run
1
| bash -c "$(wget -qLO - https://github.com/community-scripts/ProxmoxVE/raw/main/ct/debian.sh)"
|
Default settings should be sufficient. You can resize storage, change IP address later without problems.
Install necessary packages
In the newly created debian LXC run
1
| apt install apache2 nut-cgi nut-client vim -y
|
Configuration
Backup configs
1
2
3
4
5
| cd /etc/nut
mv /etc/nut/hosts.conf /etc/nut/hosts.example.conf
mv /etc/nut/nut.conf /etc/nut/nut.example.conf
mv /etc/nut/upsmon.conf /etc/nut/upsmon.example.conf
mv /etc/nut/upsset.conf /etc/nut/upsset.example.conf
|
Edit nut configs
Change “" to your PVE IP, where we installed NET server
1
2
| #vim /etc/nut/nut.conf
MODE=netclient
|
1
2
3
4
| #vim /etc/nut/hosts.conf
#you can also change monitor name device "eaton 5e"
MONITOR nutdev1@<PVE-IP> "eaton 5e"
|
1
2
| #vim /etc/nut/upsset.conf
I_HAVE_SECURED_MY_CGI_DIRECTORY
|
1
2
3
| #vim /etc/nut/upsmon.conf
RUN_AS_USER root
MONITOR nutdev1@<PVE-IP> 1 upsuser Password123! slave
|
Restart NUT services
1
2
3
4
5
6
| service nut-server restart
service nut-client restart
systemctl restart nut-monitor
upsdrvctl stop && upsdrvctl start
|
1
2
| a2enmod cgi
systemctl restart apache2
|
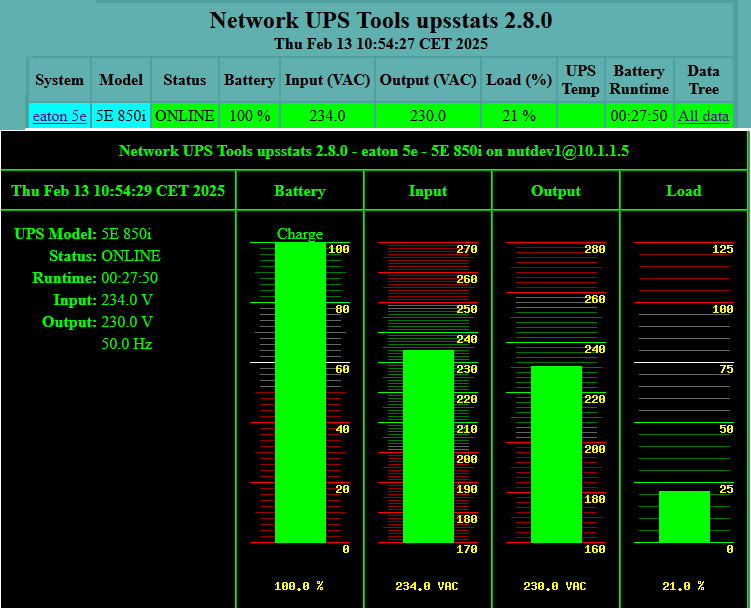
We should see UPS status now
http:///cgi-bin/nut/upsstats.cgi http:///cgi-bin/nut/upsstats.cgi?host=nutdev1@
Disable beeping
On the PVE node shell run “upscmd -l " to determine if your device even can disable beeper
1
2
3
4
5
6
7
8
9
10
11
| upscmd -l nutdev1
Instant commands supported on UPS [nutdev1]:
beeper.disable - Disable the UPS beeper
beeper.enable - Enable the UPS beeper
beeper.mute - Temporarily mute the UPS beeper
beeper.off - Obsolete (use beeper.disable or beeper.mute)
beeper.on - Obsolete (use beeper.enable)
load.off - Turn off the load immediately
load.off.delay - Turn off the load with a delay (seconds)
shutdown.stop - Stop a shutdown in progress
|
As you can see we have the option
1
| beeper.disable - Disable the UPS beeper
|
Temporary disable (wont survice reboot)
To temp disable simply run
1
2
3
4
| upscmd nutdev1 beeper.disable
Username (root): upsadmin
Password:
OK
|
Persistent disable
Create disable script
1
2
3
4
5
6
7
8
9
| vim /etc/nut/disable-ups-beeper.sh
#!/bin/bash
# Disable UPS beeper with credentials
export UPSC_USER=upsadmin
export UPSC_PASS=Passsword123!
echo "${UPSC_PASS}" | upscmd -u "${UPSC_USER}" -p "${UPSC_PASS}" nutdev1 beeper.disable
|
Make the script executable
1
| sudo chmod +x /etc/nut/disable-ups-beeper.sh
|
Create disable service
1
2
3
4
5
6
7
8
9
10
11
12
13
14
| #vim /etc/systemd/system/disable-ups-beeper.service
[Unit]
Description=Disable UPS Beeper
After=multi-user.target nut-server.service
Wants=nut-server.service
[Service]
Type=oneshot
ExecStartPre=/bin/sleep 30 # Add a 30-second delay before running the script
ExecStart=/etc/nut/disable-ups-beeper.sh
[Install]
WantedBy=multi-user.target
|
Enable service
1
2
| systemctl daemon-reload
systemctl enable disable-ups-beeper.service
|
Debug commands
1
2
| #check logs
journalctl -u nut-monitor
|
1
2
| #if you configured logs according to my settings
/var/log/nut/...
|
Conclusion
Check out other posts in the series
HOMELAB-2.0 (3 part series)