Access your Jellyfin from anywhere with tailscale and external VPS
Introduction
This is a simple guide that shows you how to access your Jellyfin server using an external VPS with a Tailscale WireGuard tunnel for as little as $10/year.
Advantages
- No public IP address needed
- Bypasses CGNAT of your ISP provider
- encrypted traffic (IPS can’t collect data and is less likely to throttle you)
- total anonymity (with use of Duck DNS)
This guide was tested using jellyfin running on the truenas, but the principle can be applied on any platform.
Quick FAQ
Why not just port-forward to proxy?
- The port-forward may not be possible if you don’t have public IP address or your IPS is using CGNAT.
Why not cloudflare tunnel?
- Streaming data from plex/jellyfin violated Cloudflare’s terms of service.
- Cloudflare also inspects your traffic, which may not really be a good combination with you streaming “all your bought movies”
- By default the bandwidth is too small for movie streaming **
** this can be overcome with some tinkering [A] (https://www.cloudflare.com/learning/cdn/what-is-a-cdn/) [B] (https://selfhosters.net/docker/plex/cloudflare/)
Why not just Wireguard, netbird, twingate?
- While all of these VPN providers use wireguard as their tunnel technology, wireguard on it’s own can be difficult to start with for beginners.
- Netbird, twingate are good alternatives to tailscale. In the end it’s all about the preference and what you are already using.
Prerequisite
Choosing VPN provider
You can find best deals using site lowendstock.com/. While these providers can be on the more “suspicious” site of things, when you compare the pricing it’s a “no-brainer” for VPN proxy like this. You can find VPS for as little as 10$/year on Black fridays/Chinese New Year.
Tips
- use linux KVM platform
- choose IPV4 = 1 (we want the public IP address)
- probably a good thing to avoid Germany and Russia as an country origin of VPS provider
Choosing Domain
We will need public domain for https traffic and ease of use. There are few options to go with
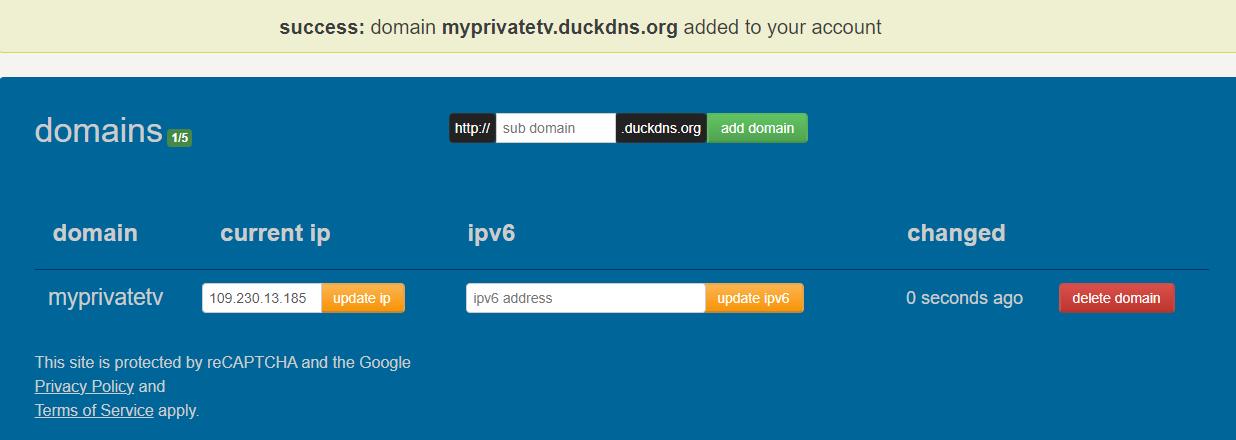
Use Duck DNS
Probably the easiest and the most anonymous way is using a Duck DNS If you are not familiar with DuckDns, it’s simple, secure way of using public DNS which will be yours for free. Sound almost to good to be true right? Well, no one will guarantee you anything, but it’s seems to be well established in the community by now. With duck dns, you can create account and domain without any back-tracing information about you.
Buy/Use an existing domain
Use cloudflare or some other domain provider and buy something cheap for few $/year. If you already own a domain, just use that. In the end we only need one A record.
How to
Buy/setup VPS and open necessary ports
I’m not going to go through everything with you, but when you choose the best deal for you, the process is very similar. Register -> Choose VPS package deal -> Run
After that we need to open some ports
- INBOUND TCP 22 for SSH
- INBOUND TCP 80/443 for http/https
- INBOUND UDP 41641 for wireguard (tailscale)
Outbound is usually all allowed by default.
Point domain to IP of your VPS
After you’ve successfully deployed your VPS, you should now know it’s public IPv4. Copy that address and point your domain to IT
Setup tailscale connection between jellyfin and VPS
I’ll be using truenas as it’s the platform hosting my jellyfin.
Truenas site
You can find whole truechart guide which gets updated ever so often here, but if not available use mine bellow which should be sufficient.
- We will need to create tailscale account
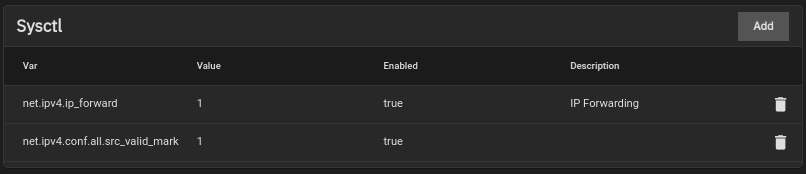
- For LAN access to your other truenas apps, you will need to set “sysctl” values in system settings. Go to System settings -> Advanced -> Add following and set them to “1” and “Enabled”
1
net.ipv4.ip_forward
1
net.ipv4.conf.all.src_valid_mark
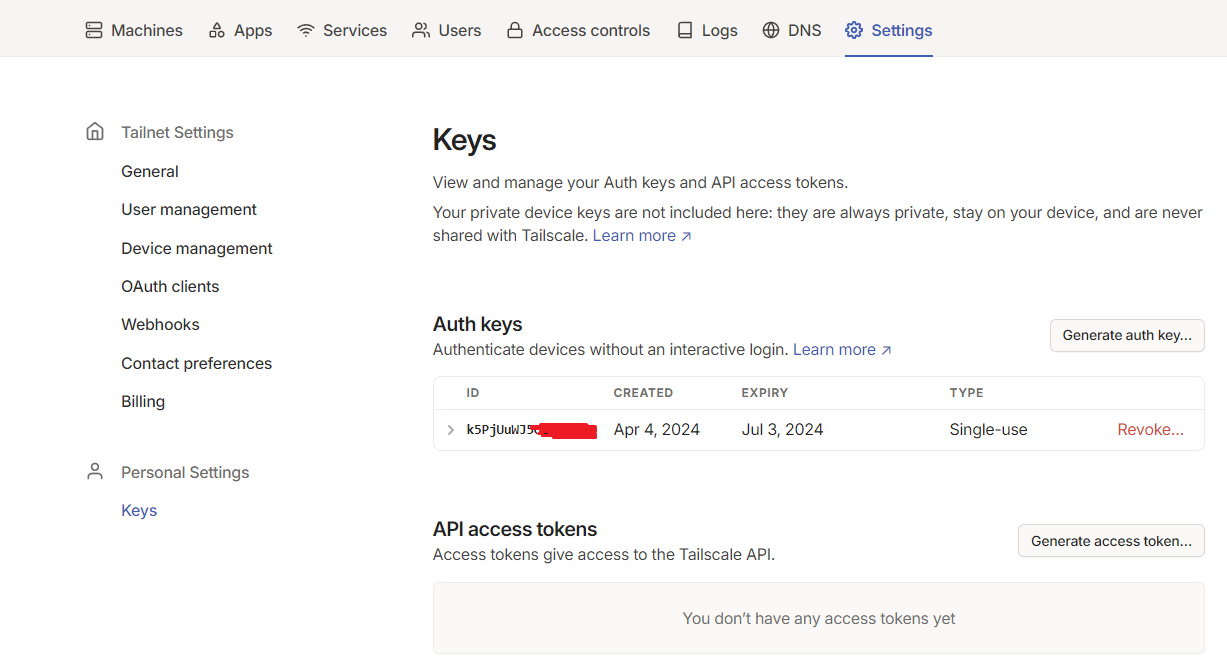
Prepare your tailscale Auth key (You can find them in your tailscale account -> Settings -> Keys )
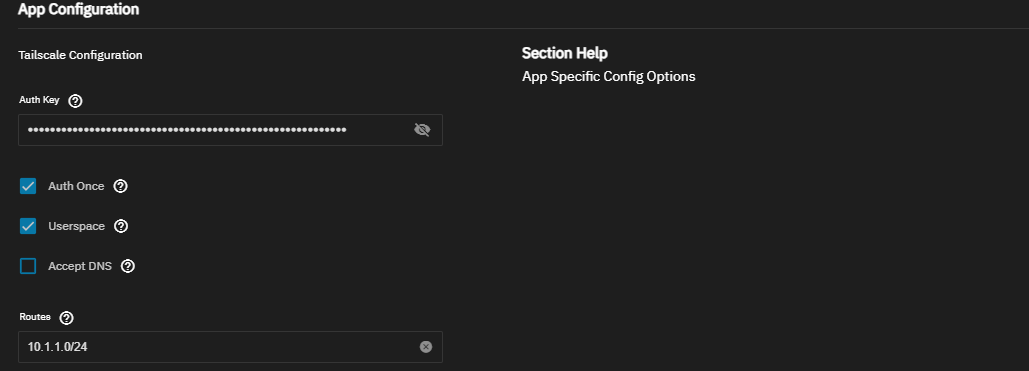
- In the truenas go to Apps -> Discover Apps -> Type in “tailscale”. (Note: You may need truecharts repo to by enabled) Leave everything default except “Auth key” “Userspace”: Needs to be checked “Routes”: “Your subnet range where jellyfin is running” (example 10.1.1.0/24)
VPS site
SSh into your new VPS and setup tailscale
1
curl -fsSL https://tailscale.com/install.sh | sh
This will prompt you to authenticate with your tailscale account. The last thing is to tell the VPS tailscale client to accept routes from different tailscale clients. Without this the VPS won’t see subnet 10.1.1.0/24 where jellyfin is running.
1
sudo tailscale up --accept-routes
Validate all necessary tailscale/wireguard ports are open
By default wireguard requires one open UDP port (most commonly 51820) and without this connection/tunnel wouldn’t work. But tailscale doesn’t require you to open any port how is that possible? Well the workaround/feature they use is called “Relayed connections” or how the call it “DERP”.
If you are interested on how it works check these posts in their documentation 1 2 You only need to know that if
- you have specific/all UDP ports blocked
- you or your IPS is using HARD NAT
DIRECT CONNECTION WILL NOT WORK and the tailscale will use DERP to relay traffic over their servers. We don’t want to relay our traffic because is significantly limits the bandwidth.
Again We don’t want to relay our traffic over DERP because is significantly limits the bandwidth.
I’ve measured the difference 5 Mbits/sec (DERP aka relayed) vs 250 Mbits/sec (direct)
To check if the connection is direct or relayed type this command into VPS
1
tailscale netcheck
1
2
3
4
5
6
7
8
9
10
11
12
13
14
15
16
17
18
19
20
21
22
23
24
25
26
27
28
29
30
31
32
33
34
Report:
        * UDP: true
        * IPv4: yes, x.x.x.72:56010
        * IPv6: yes, [x:x:x:x::1]:32781
        * MappingVariesByDestIP: false
        * HairPinning: true
        * PortMapping:
        * Nearest DERP: Frankfurt
        * DERP latency:
                - fra: 27ms    (Frankfurt)
                - ams: 29.9ms  (Amsterdam)
                - par: 36ms    (Paris)
                - lhr: 38.2ms  (London)
                - waw: 39.6ms  (Warsaw)
                - mad: 48.7ms  (Madrid)
                - nyc: 103.2ms (New York City)
                - tor: 113.1ms (Toronto)
                - ord: 123.1ms (Chicago)
                - mia: 131.7ms (Miami)
                - dfw: 134.3ms (Dallas)
                - den: 140.6ms (Denver)
                - dbi: 141.3ms (Dubai)
                - lax: 163.8ms (Los Angeles)
                - sfo: 166.4ms (San Francisco)
                - blr: 168.2ms (Bangalore)
                - sea: 172.8ms (Seattle)
                - sin: 183.2ms (Singapore)
                - nai: 186.2ms (Nairobi)
                - jnb: 202.9ms (Johannesburg)
                - sao: 217.5ms (São Paulo)
                - hnl: 220.1ms (Honolulu)
                - syd:         (Sydney)
                - tok:         (Tokyo)
                - hkg:         (Hong Kong)
We can see that “UDP: true” which means that connection with THIS client should be possible over direct connection. To further test this we will check connections between our two devices.
Validate wireguard connection between these 2 clients
You should now see both clients with their IPs in your tailscale Admin console. We can validate this connection with simple test.
Check the status and peers
1
tailscale status
1
2
100.x.x.x   reverse-proxy        test@    linux   -
100.x.x.x   truenas              test@    linux   active;
Ping device
1
ping <IP of another device>
You should see successful ping output like this
1
2
3
4
PING 100.x.x.x (100.x.x.x) 56(84) bytes of data.
64 bytes from 100.x.x.x: icmp_seq=1 ttl=64 time=48.5 ms
64 bytes from 100.x.x.x: icmp_seq=2 ttl=64 time=45.4 ms
64 bytes from 100.x.x.x: icmp_seq=3 ttl=64 time=44.9 ms
We can see connection is “direct”. If it would be otherwise it would say “relayed over”
example
1
2
3
pong from testmy (100.113.160.82) via DERP(nyc) in 130ms
pong from testmy (100.113.160.82) via DERP(nyc) in 37ms
pong from testmy (100.113.160.82) via DERP(nyc) in 50ms
And if we check tailscale status again we will see if the traffic is relayed or direct
1
2
100.x.x.x   reverse-proxy        test@    linux   -
100.x.x.x   truenas              test@    linux   active; direct 109.x.x.x:3637, tx 5082332 rx 163479060
Again we can see connection is “direct”. If it would be otherwise it would say “relayed over”.
Setup reverse proxy
This can be any reverse proxy of your choice, I’ll be had great experience lately with caddy so I’ll be using that.
I had some freezing issues with nginx so maybe don’t use that, but your experience may vary
Caddy is very easy to implement reverse proxy. By default it uses https and has build in certmanager.
Install caddy package, start and enable the service
1
2
apt-get install caddy
sudo systemctl enable --now caddy
Configure site
1
vim /etc/caddy/Caddyfile
1
2
https://<yourDOMAINpointinOnThisServer>
reverse_proxy <jellyfinIPandPort>
example
1
2
https://jellyfin.duckdns.org
reverse_proxy 10.1.1.20:8096
Note that I’m using my subnet which I’ve configured and propagated to all tailscale clients.
Verify
- Check if the site is working

- Try watching some content to see if you see any stuttering. If you do troubleshoot the bandwidth of the tunnel with “iperf3”
One one side (VPS). Stop the caddy and run
1
iperf3 -s -p 443
And on the other side (Jellyfin/truenas)
1
 iperf3 -c <yourDomain> -p 443
You should at least 50+ Mbps for 4k movies
Alternatives
- using reverse ssh tunnel with systemd service to keep it open
- using mentioned netbird, twingate
- ansible-easy-vpn