Cloudflare | Pangolin - Access your homelab from the Internet over CGNAT with help of the tunnels [Homelab 2.0]
Introduction
Running homelab behind CGNAT no longer means you have to forgo external access or create some reverse SSH with a reverse proxy combo.
In this post, I’ll show you two modern secure tunneling solutions to bridge the gap between your private network and the public internet.
Cloudflare Tunnel - pretty well known and established for DNS, zero trust, tunnels etc..
Pangolin - “self hosted Cloudflare tunnels”
Cloudflare introduction
Plenty of blog posts / videos were already made on this topic, and pretty much all the up-to-date info can be found in their docs, so I’ll just summarize the important stuff.
Cloudflare Tunnel provides you with a secure way to connect your resources to Cloudflare without a publicly routable IP address
With Tunnel, you do not send traffic to an external IP — instead, a lightweight daemon in your infrastructure (cloudflared) creates outbound-only connections to Cloudflare’s global network
This way, your origins can serve traffic through Cloudflare without being vulnerable to attacks that bypass Cloudflare
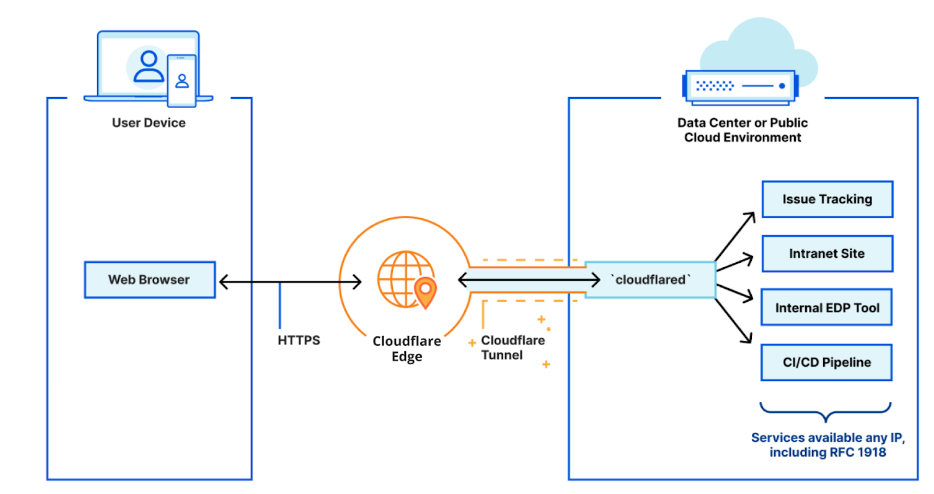
CF Pros
- No Need for Port Forwarding or a static IP
- No need for self-hosting VPS (important difference, but not that big of a problem, as you will find out later)
- 5/5 Ease of Setup and Integration
- Additional Security Layers (by default you get WAF, DDoS protection…)
CF Cons
- Require to own a domain (can get around with DuckDNS)
- Privacy Considerations (CF legally can and probably is watching your traffic/data)
- No easy TCP/UDP forwarding (for stuff like gameservers etc)
Cloudflare tunnel setup
Again, there are so many resources on this topic that I’m just not going to repeat all of it, as I want to mainly bring something new or fill out the missing information on the web.
My favorite guides being
Jim’s Garage
Christian Lempa
DB Tech
And many, many more.
Pangolin introduction
This is where the hammer really struck the nail in my opinion. I was looking for software like this for very long time. Sure, there were many solutions to CGNAT problem, but this really combines features, security, and ease of use into one package.
Pangolin is a self-hosted tunneled reverse proxy solution with access management using Gerbil && Newt (WireGuard), Traefik && Badger under the hood. All of this in very easy-to-use && configurable docker containers.
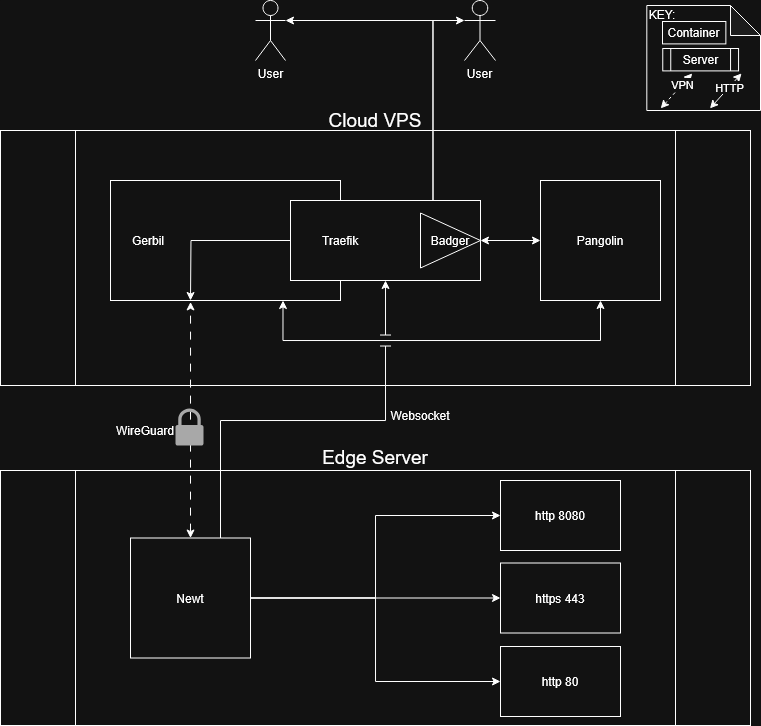
Pangolin Pros
- No port forwarding or static IP required (on your local network behind CGNAT)
- No privacy concerns (all data go through your app over encrypted tunnels)
- 4/5 Ease of Setup and Integration
- Additional Security Layers (come with the option to install CrowdSec but require some work) - both pro/con
- Easy TCP/UDP forwarding (for stuff like gameservers etc)
Pangolin Cons
- Require to own a domain (can get around with DuckDNS)
- Require self-hosting VPS with static IP
- More configuration required than using CF tunnels (still not that much)
- Additional Security Layers (come with the option to install CrowdSec but require some work) - both pro/con
As you can see, the main difference is that we NEED to have a “middleman” VPS , which will route traffic through. Sure, there are other pros/cons, but this is probably the biggest one.
But don’t worry if you don’t own one!! The oracle for years provided Free Tier VPS!!! I’ll show you how to do it down below.
Pangolin setup
Setup Free Oracle Tier VPS
Oracle may not be known for the best or most favorite company out there (hard agree), but their free tier is awesome.
This VPS comes with
- 1x vCPU (OCPU)
- 1 GB RAM
- 0.48Gbps max network bandwidth
- 200GB block storage space
- 10TB/month outbound Data Transfer
This is plenty for just sending some traffic over.
How to create free tier Oracle VPS
There are plenty videos/guides on that topic and it’s nothing difficult so I won’t go deep on commentary.
You can check this post from Ryan Harrison blog for a detailed guide.
- Go to Oracle free tier site
- Click Start for free and complete the registration.
- Once you complete the registration, in the menu, select “instances” -> Create instance
- Choose “Placement” where you want your VPS to be hosted (Frankfurt AD 2 for me)
- “Security,” select default
- “Image and Shape” select Ubuntu (or whatever you prefer)
- For “shape” select “VM.Standard.E2.1.Micro” (we dont want ARM it’s more complicated)
- Paste your SSH key and you are all ready to go
Non-free VPS alternatives [OPTIONAL]
As I’ve mentioned down bellow after few weeks of testing I’ve found out that combination of very low CPU/RAM doesn’t really work with using crowdsec. Crowdsec was just taking too much RAM from my 1GB VPS (over 30%). So If you are going with low end VPS I don’t recommend it.
Good/cheap alternatives
Hetzner Probably community most favorite VPS provider. Good price/performance tiers. Great support. Very low CPU steal. But they do a little higher prices than some cheaper, sketchier VPS providers like racknerd, contabo… (but still very very good prices)
RackNerd This one is a little sketchy, you can check them out yourself, but they tend to have high CPU steal, not great history etc… BUT they do have good deals which you can check on this community tracker
So If money is an issue go with them, you should still be OK, just don’t put anything important there.
Update VPS Security Group
By default, the network security group (NSG) will block all incoming traffic to your server apart from port port 22 (SSH).
We will add few more
- TCP 80 (http)
- TCP 443 (https)
- UDP 51820 (wireguard)
- TCP 25565 [OPTIONAL] (for TCP “gameserver” forwarding)
To change
- Go to Virtual Cloud Networks (either find it in the top bar or click over from VPS).
- In the left corner -> List scope -> Compartment -> And select your compartment (You should see your VCN)
- Click on your VCN
- In the left panel -> Security list -> Select your Security list for VPS (should be called default and should be only one)
- Click on Add Ingress Rules -> Add all the mentioned ports above according to the example below.
Example 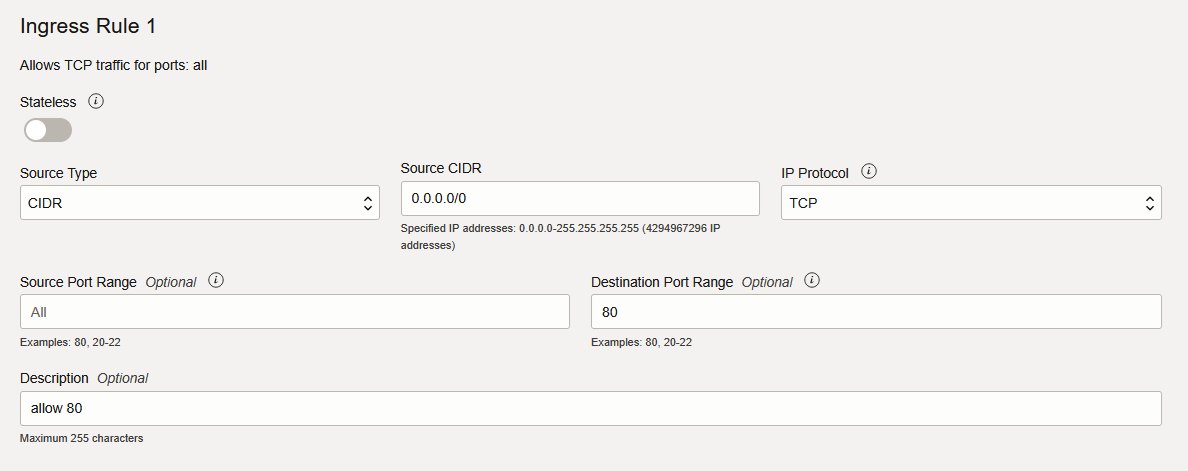
In the end it should look like this
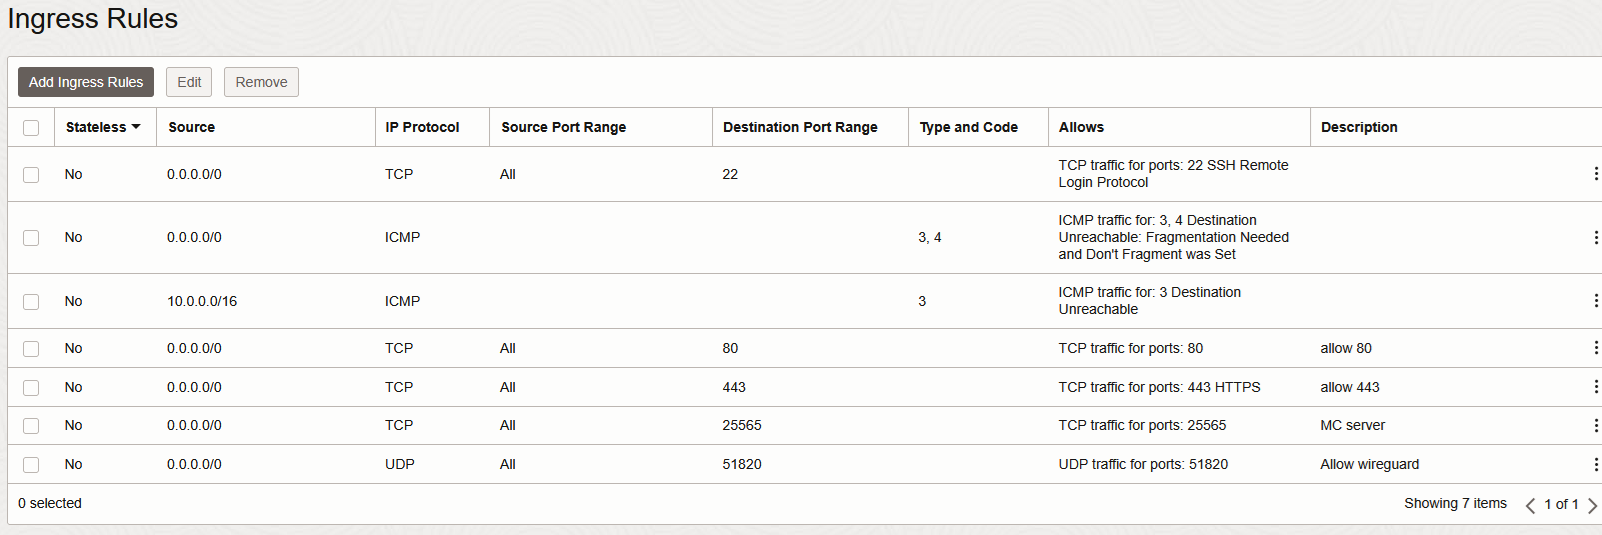
Open ports on VPS (if using virtual firewall)
In this exact case, the Ubuntu VPS from Oracle comes with an additional virtual firewall (besides the security group)
Log in to your VPS
First look at what the current ruleset actually is, because the Oracle image ships with a
REJECTrule near the bottom of theINPUTchain. YourACCEPTrules have to be inserted above it, otherwise they do nothing.
1
sudo iptables -L INPUT --line-numbers -n
- You will see something like this — note the line number of the
REJECT allrule (it is6on a stock Oracle Ubuntu image, but verify it, do not assume)
1
2
3
4
5
6
7
8
Chain INPUT (policy ACCEPT)
num  target     prot opt source     destination
1    ACCEPT     all  --  0.0.0.0/0  0.0.0.0/0    state RELATED,ESTABLISHED
2    ACCEPT     icmp --  0.0.0.0/0  0.0.0.0/0
3    ACCEPT     all  --  0.0.0.0/0  0.0.0.0/0
4    ACCEPT     udp  --  0.0.0.0/0  0.0.0.0/0    udp spt:123
5    ACCEPT     tcp  --  0.0.0.0/0  0.0.0.0/0    state NEW tcp dpt:22
6    REJECT     all  --  0.0.0.0/0  0.0.0.0/0    reject-with icmp-host-prohibited
- To open specific ports, type (replace
6with the line number you found above)
1
2
3
4
5
sudo iptables -I INPUT 6 -m state --state NEW -p tcp --dport 80 -j ACCEPT
sudo iptables -I INPUT 6 -m state --state NEW -p tcp --dport 443 -j ACCEPT
sudo iptables -I INPUT 6 -m state --state NEW -p tcp --dport 25565 -j ACCEPT
sudo iptables -I INPUT 6 -m state --state NEW -p udp --dport 51820 -j ACCEPT
sudo netfilter-persistent save
Protocol names are lowercase (
-p udp, not-p UDP). Saving once at the end is enough, you do not neednetfilter-persistent saveafter every single rule.
- Verify the rules landed above the
REJECT
1
sudo iptables -L INPUT --line-numbers -n
Oracle VPS “busyness” generator
This is very specific for the Oracle VPS free tier instances.
Explanation source
Because my VPS randomly stopped working or froze I investigated and find out that Oracle idles/reclaim free tier instances or straight-up stops them and sends you an email that they are out of free tier CPUs.
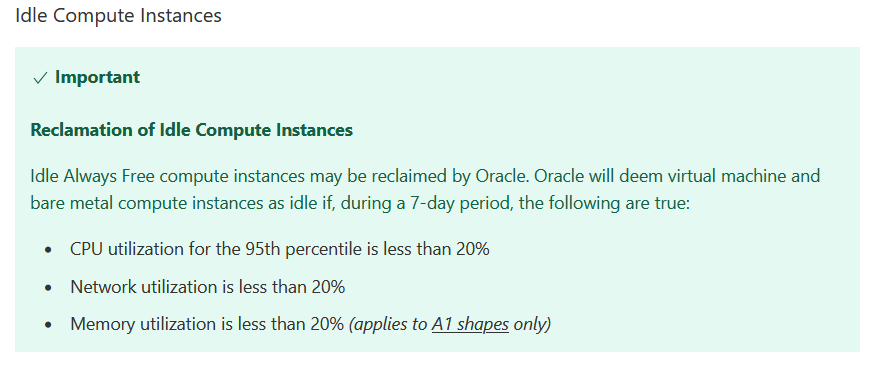
To get around this, we can create a dummy load to simulate our VPS never being idle
1
 echo "*/5 * * * * root timeout 46 nice md5sum /dev/zero" | sudo tee /etc/cron.d/dummy-load
- This cron runs every script every 5 minutes with the job runs for 46 seconds
- During that 46 seconds time it generates a 100% load on 1 vCPU
- The timeout command kills the job after 46 seconds, the nice command is used to decrease the priority of the job, so it should not get in the way of real work. The md5sum command is used to generate the CPU load, without using much memory or other resources.
All credit goes to reddit user “u/eric0e”.
Alternative stress script [If script above didn’t help]
Script and tutorial created from TechTulege, but I’m going to change up values, because oracle changed 15% threshold to 20% and our instance is much smaller.
I don’t like this script that much, because it put much more stress on the CPU and takes up 20% of our already small RAM space, but it’s an option you can do if you don’t want to switch to pay-as-you-go (read down bellow)
Test values
1
2
3
4
5
6
7
8
9
10
sudo su -
apt update
apt install supervisor stress-ng


#to put 20% of stress CPU
stress-ng --cpu 2 --cpu-load 20

#RAM dummyload
stress-ng --vm 1 --vm-bytes 20% --vm-hang 0
1
2
#create config
vim /etc/supervisor/conf.d/stress.conf
1
2
3
4
5
6
7
8
9
10
11
12
13
14
15
16
17
[program:cpu_stress]
command=/usr/bin/stress-ng --cpu 2 --cpu-load 20
directory=/usr/bin/
user=root
autostart=true
autorestart=true
redirect_stderr=true
stdout_logfile=/var/log/stress.log

[program:memory_stress]
command=/usr/bin/stress-ng --vm 1 --vm-bytes 20%% --vm-hang 0
directory=/usr/bin/
user=root
autostart=true
autorestart=true
redirect_stderr=true
stdout_logfile=/var/log/stress.log
1
2
3
4
5
#Reload configuration for supervisor
supervisorctl reread
supervisorctl reload
supervisorctl status
[OPTIONAL] Change from free tier to PAYG (pay as you go) subscription
There is another trick that can help if dummy load is not enough. In my case creating dummy load helped to reduce freezes from multiple a week to once a week. But this was not enough for me.
You can switch from free tier to a pay-as-you-go subscription. But because you still uses same VM instance CPU you still won’t pay anything, but your VM will much less/or never goes to idle.
- Go to the Oracle Cloud website -> Upgrade and Manage Payment -> Pay as you go Upgrade account button.
This can be potentially dangerous, AND I DON’T RECOMMEND IT, as it can charge you WHATEVER amount. Even hundreds or thousands of eurs/dollars. Although I think it’s relatively safe now, Oracle can change free tier quotas anytime.
To make it safer, we can create a budget and alert that will email us if we are going to be charged.
- Go to the Oracle Cloud website -> Budgets -> Create budget
- Set name to “budget_alert” (or whatever you like)
- Set description to “budget alert” (or whatever you like)
- Set “Target Compartment” to the compartment where you are running your VM instance (you probably only have one)
- Set “Schedule” to “Monthly”
- Set “Budget amount” to “1Eur/1dollar”
- Set “Threshold Metric” to “Actual Spend”
- Set Threshold Type” to “Percentage of budget”
- Set “Percentage of budget threshold” to “1%”
- Add your email to email recipients.
Install && Configure Pangolin (1.2.0)
Everything here applies to version 1.2.0. To get up to date information, follow pangolin docs. The documentation moved from
docs.fossorial.iotodocs.pangolin.net, old links may not resolve.
Do not deploy 1.2.0 today and leave it there. Pangolin
v1.6.2and earlier are affected by CVE-2025-56332, an authentication bypass caused by an insecure default configuration. The steps below still describe the install flow accurately, but install a current release and follow the update guide afterwards.
Installation is very simple (props to pangolin devs).
First, we need to establish what’s going to be our
- base domain name
- Dashboard domain name
Base domain name
An example of base domain could be
1
appletest.com
That means EVERYTHING not declaratively stated in DNS records will be used by pangolin, because in our DNS we are going to declare
1
*.appletest.com
I feel like this is unnecessary, and although Pangolin states not to use any subdomains, it working perfectly fine for me, so you decide.
I’m going to use “public” subdomain for my base domain. But this can be anything, really.
1
public.appletest.com
And in DNS records I’ll declare
1
*.public.appletest.com
Dashboard domain name
This is where we access panel with all the information and configuration and where we create tunnels.
Depending on what you choose as your basedomain just add pangolin (or whatever you want to call it)
1
pangolin.public.appletest.com
Add DNS records to your DNS provider
When you decided on domain names
- go to your DNS provider (CF in my case) and add these DNS records

Don’t forget to change NAMES and IP to YOURS!
If you are using CF don’t forget to turn off proxying (orange) cloud icon. (can cause problems)
Make sure the wildcard record actually resolves before you go hunting for problems in Pangolin. A resource that returns a bare
404 page not foundfrom Traefik usually means either DNS is missing or no router matched — not that the app behind it is broken.
Continue with the install
On our newly created free VPS (or whatever VM with public IP) type
1
2
3
4
#as root
mkdir pangolin && cd pangolin
wget -O installer "https://github.com/fosrl/pangolin/releases/download/1.2.0/installer_linux_$(uname -m | sed 's/x86_64/amd64/;s/aarch64/arm64/')" && chmod +x ./installer
sudo ./installer
For base domain
1
2
#type
public.appletest.com
For dashboard domain name
1
2
#type
pangolin.public.appletest.com
For email
Choose the email with which you want to connect as admin to the Pangolin dashboard.
1
2
#example
eathe@apple.com
The password you set here is written to
config/config.ymlin plaintext and stays there. Change the admin password from the dashboard after first login, and never paste that file into a chat, issue, gist or forum post — it also containsserver.secret, which signs session tokens. Anyone holding that secret can forge a valid session for any protected resource.
When asked if you want to install crowdsec [Option A | Option B]
I would suggest you to “Type yes”, I’ll show how to properly configure it. Crowdsec is a great security tool that gives you many security benefits like
- Automated Real-Time Remediation (IP blocking or CAPTCHA challenges)
- Reduced Attack Surface (By filtering out malicious traffic using CrowdSec’s curated blocklists)
But if you don’t want to use I’ll show you both options with and without it.
!!!!!! UPDATE !!!!!!!!!! After few weeks of testing I’ve found out that combination of very low CPU/RAM doesn’t really work with using crowdsec. Crowdsec was just taking too much RAM from my 1GB VPS (over 30%). So If you are going with low end VPS I don’t recommend this combination. Either update VPS or go without crowdsec.
[Option A]
YES
[Option B]
No
[Option B] - without the crowdsec
I’ll show you this one first because it’s easier.
Start the containers [Option B]
1
docker compose up -d
And that’s it. You should now have access to pangolin panel, you have chose earlier.
If the panel isn’t working, the problem most likely lies in ports not beeing open or domain.
1
2
#example for me
https://pangolin.public.appletest.com
Debug
For more debug check pangolin docs, their discord which you can find in their docs as well.
Tool to check open ports
https://www.yougetsignal.com/tools/open-ports/
[Option A] - With the CrowdSec
Start the containers [Option A]
1
docker compose up -d
Before anything else, understand how config changes get picked up. This trips up almost everyone, myself included.
config/traefik/dynamic_config.ymlis dynamic — Traefik watches the file and reloads it on its own.config/traefik/traefik_config.ymlis static — it is read once at process start. Editing it does nothing until the container restarts.docker compose up -dwill not restart a container just because you edited a bind-mounted file. Compose only recreates containers when the service definition, image or env changed. You will seeContainer traefik Runninginstead ofStarted, and wonder why nothing happened.When in doubt, force it:
Link CrowdSec with traefik (optional if you didn’t go with crowdsec) [Option A]
UPDATE It looks like the bottom part was automated as well. To check if you have to do bottom part check for bouncer
1
docker exec crowdsec cscli bouncers list
The presence of the bouncer is not enough — check the
Last API pullcolumn. This is the single most misleading thing about the whole setup. The installer registers a bouncer, so it shows up in the list and looks fine, but if Traefik has never authenticated against it the row stays empty and CrowdSec is doing absolutely nothing for you.
This is what a broken setup looks like. Registered, valid, and completely inert:
1
2
3
4
5
6
root@pangolin-public:~# docker exec crowdsec cscli bouncers list
-----------------------------------------------------------------------------
 Name             IP Address  Valid  Last API pull  Type  Version  Auth Type
-----------------------------------------------------------------------------
 traefik-bouncer              ✔️                                   api-key
-----------------------------------------------------------------------------
And this is what a working setup looks like — IP, timestamp, type and version all populated:
1
2
3
4
5
6
root@pangolin-public:~# docker exec crowdsec cscli bouncers list
---------------------------------------------------------------------------------------------------------------
 Name             IP Address  Valid  Last API pull         Type                             Version  Auth Type
---------------------------------------------------------------------------------------------------------------
 traefik-bouncer  172.18.0.4  ✔️     2026-08-03T18:18:19Z  Crowdsec-Bouncer-Traefik-Plugin  1.X.X    api-key
---------------------------------------------------------------------------------------------------------------
If yours looks like the first one, work through the next three sections in order.
1
2
3
4
5
6
7
8
9
10
11
12
13
14
15
16
17
18
19
#bcs by defauly crowdsec is not configured by default we need extra steps (in 1.2.0 atleast)
#https://hhf.technology/snippets/pangolin-commands#bouncer-management
#https://github.com/fosrl/pangolin/issues/463


#First we need "bouncer"
#we have none now, to check type
docker exec crowdsec cscli bouncers list

#to add bouncer
docker exec crowdsec cscli bouncers add traefik-bouncer
#you get code like xKYHxtg54ukkgssdamk23n24k242l6fCD1nc

#add key to dynamic_config.yml


vim config/traefik/dynamic_config.yml #relative path depending on where you have installed pangolin
#replace "crowdsecLapiKey: <add key here>" for bellow
crowdsecLapiKey: xKYHxtg54ukkgssdamk23n24k242l6fCD1nc
If you ever regenerate the key,
cscli bouncers delete traefik-bouncerfirst — adding a bouncer that already exists will fail, and a stale key indynamic_config.ymlmakes the plugin fail authentication silently.
1
2
#restart docker containers
docker compose down && docker compose up -d --force-recreate
Attach the CrowdSec middleware to the routers [Option A]
This step is missing from most guides and it is the reason a lot of people end up with a bouncer that never pulls. The installer defines the crowdsec middleware but does not necessarily use it. A middleware that is not referenced by any router is never instantiated, so the plugin never connects to the LAPI.
Open config/traefik/dynamic_config.yml and look at the routers section:
1
grep -n -A3 'middlewares:' config/traefik/dynamic_config.yml
If you only see - security-headers, the middleware is not wired up. Add - crowdsec above it on api-router, next-router and ws-router:
1
2
3
4
5
6
7
8
9
10
11
12
13
14
15
16
17
18
19
20
21
22
23
24
25
26
27
28
29
30
31
  routers:
    api-router:
      entryPoints:
        - websecure
      middlewares:
        - crowdsec
        - security-headers
      rule: Host(`pangolin.public.appletest.com`) && PathPrefix(`/api/v1`)
      service: api-service
      tls:
        certResolver: letsencrypt
    next-router:
      entryPoints:
        - websecure
      middlewares:
        - crowdsec
        - security-headers
      rule: Host(`pangolin.public.appletest.com`) && !PathPrefix(`/api/v1`)
      service: next-service
      tls:
        certResolver: letsencrypt
    ws-router:
      entryPoints:
        - websecure
      middlewares:
        - crowdsec
        - security-headers
      rule: Host(`pangolin.public.appletest.com`)
      service: api-service
      tls:
        certResolver: letsencrypt
CrowdSec goes before security-headers so blocked requests are dropped before Traefik bothers decorating the response. Leave main-app-router-redirect alone — that one only does the HTTP to HTTPS redirect.
The dashboard login page is exactly what gets brute-forced, so leaving these routers unprotected defeats most of the point of running CrowdSec at all.
1
2
3
docker restart traefik
docker logs traefik 2>&1 | grep -i crowdsec | tail -20
docker exec crowdsec cscli bouncers list
If the log only ever says Loading plugins... and Plugins loaded. with nothing after it, the middleware still is not attached. Once it is wired correctly you get log lines from the bouncer itself and a populated Last API pull.
Register with the Central API [Option A]
The installer does not always complete CAPI registration, and when it fails it never retries. Without it you get none of the community blocklist — which is most of what you installed CrowdSec for. You are left detecting only what you catch in your own logs.
The symptom is a container that runs fine but is permanently unhealthy, because the healthcheck is cscli capi status:
1
2
docker ps --filter name=crowdsec --format '\t'
# crowdsec	Up 2 months (unhealthy)
and every log line carries:
1
level=warning msg="can't load CAPI credentials from '/etc/crowdsec/online_api_credentials.yaml' (missing login field)"
Fix it:
1
2
3
4
docker exec crowdsec cscli capi register
docker restart crowdsec
sleep 20
docker exec crowdsec cscli capi status
You want to see:
1
2
3
You can successfully interact with Central API (CAPI)
Sharing signals is enabled
Pulling community blocklist is enabled
Then confirm the blocklist actually landed — this should go from empty to thousands of entries within a few minutes:
1
docker exec crowdsec cscli decisions list -o human | head
Do not
rm -rf config/crowdsecto “start clean”. That directory holdsonline_api_credentials.yaml. Deleting it silently unregisters you from CAPI, the container comes back up looking healthy enough to ignore, and you quietly run without the community blocklist for months. If you do wipe it, re-runcscli capi registerimmediately afterwards.
Optionally enroll into the free CrowdSec console for extra curated blocklists and a view of what is hitting you. Get the key from app.crowdsec.net:
1
docker exec crowdsec cscli console enroll <your-enroll-key>
Fix the X-Forwarded-For trust setting [Option A]
Check what the installer left you with:
1
grep -n -A2 'forwardedHeadersTrustedIPs' config/traefik/dynamic_config.yml
If it says 0.0.0.0/0, fix it now. This tells the bouncer to trust the X-Forwarded-For header from any source, which means an attacker sets X-Forwarded-For: 8.8.8.8 and CrowdSec bans Google instead of them. It also lets them walk straight past every ban you already have. Your blocklist is decorative until this is corrected.
If Traefik is directly internet-facing (no Cloudflare proxy in front):
1
2
          forwardedHeadersTrustedIPs:
            - 127.0.0.1/32
If you run behind Cloudflare’s orange cloud, put the Cloudflare IP ranges there instead — and nothing else.
Leave clientTrustedIPs as it is. That one lists your private ranges plus the Gerbil WireGuard subnet, and it is intentional.
Verify from another machine, not from the VPS — a request from the VPS comes over loopback, which you just told the bouncer to trust, so it would give you a false pass:
1
2
# from your laptop
curl -I -H "X-Forwarded-For: 1.2.3.4" https://jellyfin.public.appletest.com
1
2
# on the VPS, at the same time
tail -5 config/logs/access.log
ClientHost must show your laptop’s real IP, not 1.2.3.4.
Close the Traefik dashboard [Option A]
The installer ships api.insecure: true, which serves the Traefik dashboard on port 8080 with no authentication whatsoever. If that port is published, anyone can read your full routing table, backend addresses and service names.
1
grep -n 'insecure' config/traefik/traefik_config.yml
Set the one under api: to false (leave serversTransport.insecureSkipVerify alone, that is a different setting for reaching your backends):
1
2
3
api:
  dashboard: true
  insecure: false
This is static config, so it needs a real restart:
1
2
docker restart traefik
curl -s -o /dev/null -w '%{http_code}\n' http://127.0.0.1:8080/dashboard/   # expect 000
Test if CrowdSec is working [Option A]
1
2
3
4
5
6
7
8
9
10
11
12
13
14
15
16
17
18
19
#check for bouncer - and check the Last API pull column, not just the name
docker exec crowdsec cscli bouncers list

#add your public IP to see if you are blocked in pangolin dashboard panel
#check connection to pangolin panel
#your dashboard IP #example of mine https://pangolin.public.appletest.com


docker exec -it crowdsec /bin/bash
cscli decisions list
cscli decisions add --ip <your-public-ip> #example cscli decisions add --ip 109.212.10.173
#connection to pangolin panel should stop working


#re-enable
cscli decisions delete --ip <your-public-ip> #example cscli decisions delete --ip 109.212.10.173

#check metrics
docker exec -it crowdsec cscli metrics
The subcommand is
decisions, plural.cscli decision listwill just error out.
In cscli metrics, look at the acquisition section. If the parser row for the Traefik access log shows zeros, CrowdSec is not reading your logs at all and no amount of scenarios will help — check config/crowdsec/acquis.yaml and that the log path is mounted into the container.
Also worth turning on so CrowdSec can see failed Pangolin logins rather than only HTTP anomalies — in config/config.yml:
1
2
app:
  save_logs: true
Enable automatic CrowdSec updates [Option A]
CrowdSec regularly updates list of malicious IPs etc…
1
2
3
#type crontab -e
#add
30 4 * * * docker exec crowdsec cscli hub update && docker exec crowdsec cscli hub upgrade && docker restart crowdsec
Two things worth knowing here:
- The cron schedule matters — a crontab line without the five time fields is not a valid entry and will be rejected.
30 4 * * *runs it daily at 04:30, which is plenty. The hub does not change hourly. hub upgradealone is not enough. It downloads new parsers, scenarios and AppSec rules to disk, but the running process does not load them. Without thedocker restart crowdsecat the end you can run for months on whatever ruleset was loaded at your last restart, while the cron happily reports success every night.
This only updates the hub content. The CrowdSec container image is pinned in docker-compose.yml and will not move on its own — see the update section below.
And that’s it. You should now have access to pangolin panel, you have chose earlier.
1
2
#example for me
https://pangolin.public.appletest.com
If the panel isn’t working, the problem most likely lies in ports not being open or your domain, or CrowdSec!!
Try to fall back to option B above.
If you enabled AppSec with
crowdsecAppsecUnreachableBlock: true, be aware that once the middleware is genuinely attached, an unreachable AppSec service will start blocking everything — including your own dashboard login. Keep SSH access open and a backup ofdynamic_config.ymlso you can roll back.
Debug
For more debug check pangolin docs, their discord which you can find in their docs as well.
Tool to check open ports
https://www.yougetsignal.com/tools/open-ports/
Keeping Pangolin and CrowdSec updated
The installer pins exact image tags, so docker compose pull on its own upgrades nothing. You have to bump the tags yourself.
1
grep -E 'image:' docker-compose.yml
1
2
3
4
    image: crowdsecurity/crowdsec:v1.7.7
    image: fosrl/gerbil:1.4.0
    image: fosrl/pangolin:1.18.4
    image: traefik:v3.5.2
Always back up before an upgrade. Downgrading is not supported once a database migration has run, so the backup is your only way out:
1
2
cp -r ./config ./config.bak.$(date +%Y%m%d-%H%M)
tar czf ./config-pre-upgrade.tar.gz ./config
Then bump and pull:
1
2
3
sed -i 's|fosrl/pangolin:1\.18\.4|fosrl/pangolin:<new-version>|' docker-compose.yml
docker compose pull && docker compose up -d
docker logs -f pangolin        # migrations run on first boot, watch them succeed
Things to check in the release notes before jumping versions:
- 1.13 introduced a new networking model (private resources, user devices) with a database migration. Do not skip blindly across it.
- 1.19 requires Newt 1.13.0 or newer for the browser-based SSH/RDP/VNC features, and host resources with SSH configured have to be converted to the new SSH resource type.
- 1.21 adds same-network detection, which expects updated clients and sites.
- Check whether the Pangolin release expects a newer Gerbil tag and bump it in the same pass.
For CrowdSec, upgrade the image the same way. Patch releases here are frequently security fixes — for example v1.7.8 fixes a high-severity AppSec/WAF bypass — so do not let this one drift:
1
2
3
sed -i 's|crowdsecurity/crowdsec:v1\.7\.7|crowdsecurity/crowdsec:v1.7.8|' docker-compose.yml
docker compose pull crowdsec && docker compose up -d crowdsec
docker exec crowdsec cscli version | head -2
Do not pin newt to a floating image: fosrl/newt either — use an explicit tag so your tunnel does not silently change under you.
Authentication and mobile apps — a gotcha worth knowing
Pangolin’s built-in auth (SSO login, PIN, password) puts a login page in front of the resource. That works fine in a browser. It does not work with most native mobile apps — Home Assistant Companion, Nextcloud, Jellyfin clients and similar — because those apps make REST and WebSocket calls outside the login webview, so they never carry the Pangolin session cookie and just fail to connect.
Path-based “bypass auth” rules are not a reliable workaround; there are open issues where they either do not apply on protected resources or effectively disable auth for the whole resource. Your realistic options:
- Private resource + client — expose the app only inside the WireGuard overlay and reach it from the Pangolin mobile client. The app is not on the public internet at all. Cleanest, at the cost of needing the client running.
- Leave the resource unprotected in Pangolin and harden the app itself — strong password plus TOTP in the app, correct reverse-proxy trust configuration so the app’s own rate limiting sees the real client IP, plus a geo/IP deny rule in Pangolin and CrowdSec in front.
For Home Assistant specifically, the second option needs this, or its built-in ban system will lock out the proxy instead of the attacker:
1
2
3
4
5
6
http:
  use_x_forwarded_for: true
  trusted_proxies:
    - <your gerbil subnet, e.g. 100.89.0.0/20>
  ip_ban_enabled: true
  login_attempts_threshold: 3
Check the actual source IP in the Home Assistant log and put that range in trusted_proxies — guessing here is how you lock yourself out.
Whatever you do, do not leave resources set to “Not Protected” by accident. Check the Authentication column on the resources list every once in a while.
Create a tunnel to you homelab in the Pangolin
- go to your pangolin dasboard site
1
2
#example for me
https://pangolin.public.appletest.com
Create organization.
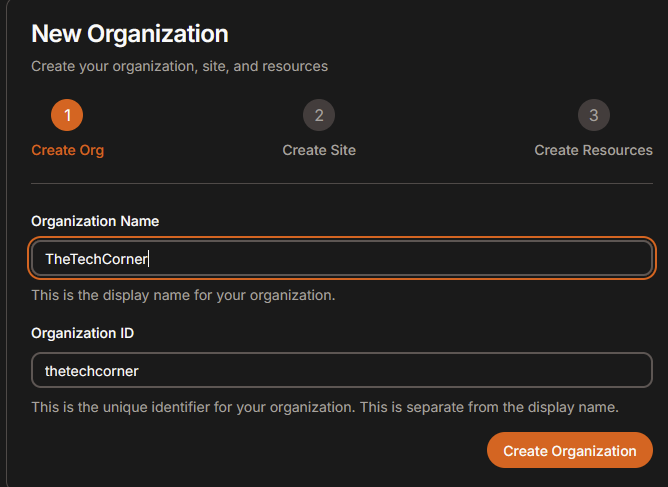
Create site
After you’ve successfully created orgnization
- click on “Create Site”
- Choose name “homelab” (or whatever you like)
- You will be prompted with set of credentials (as shown bellow)
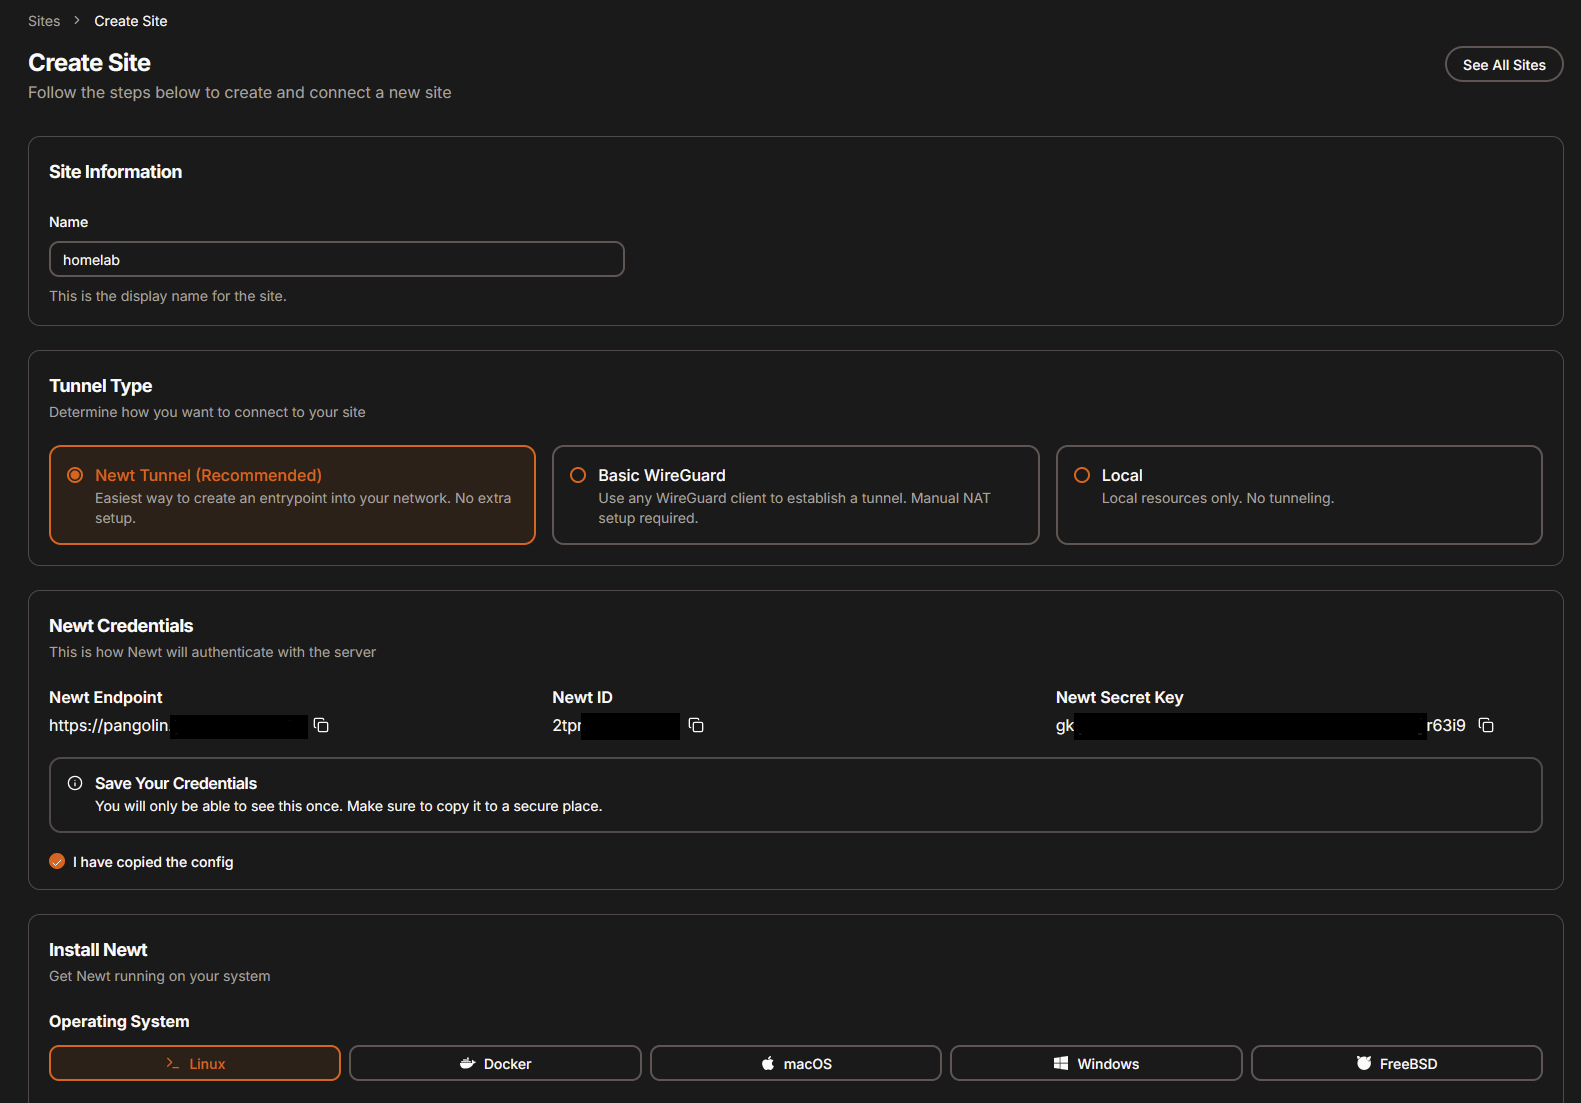
These credentials are used to find/authenticate from the other side of this tunnel (which his our homelab in this case).
Because I’m running proxmox I’ll
- choose docker compose
- create a separate LXC container with docker installed with the help of community scripts
1
bash -c "$(curl -fsSL https://raw.githubusercontent.com/community-scripts/ProxmoxVE/main/ct/docker.sh)"
2CPU and 2GB RAM should be plenty
- After the container is created type in the commands we got eaerlier
1
2
3
4
5
6
7
8
9
10
11
12
#example, your WILL DIFFER
vim docker-compose.yaml

services:
  newt:
    image: fosrl/newt:1.13.0
    container_name: newt
    restart: unless-stopped
    environment:
      - PANGOLIN_ENDPOINT=https://pangolin.public.appletest.com
      - NEWT_ID=tg2zau2faqzdd2ty
      - NEWT_SECRET=ahhhgaob5jxxxwdnx2qimnm32t5ec4fv1f4h9gi8g7h46bjy
NEWT_SECRETis a credential. Treat that compose file the same way you treatconfig.yml— do not paste it anywhere. If it leaks, delete the site in the dashboard and create a new one.
And start the container
1
docker compose up -d
After everything is done, you should see your site (tunnel) with green online status in pangolin dashboard

Create resource (HTTP/HTTPS)
Let’s create for example tunnel to our jellyfin instance. But this can be whatever app using http/https.
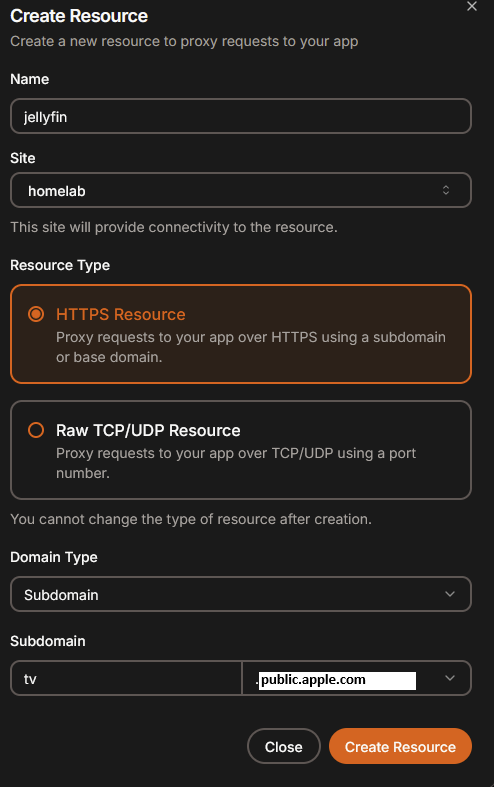
And now point it to app local IP in your homelab.
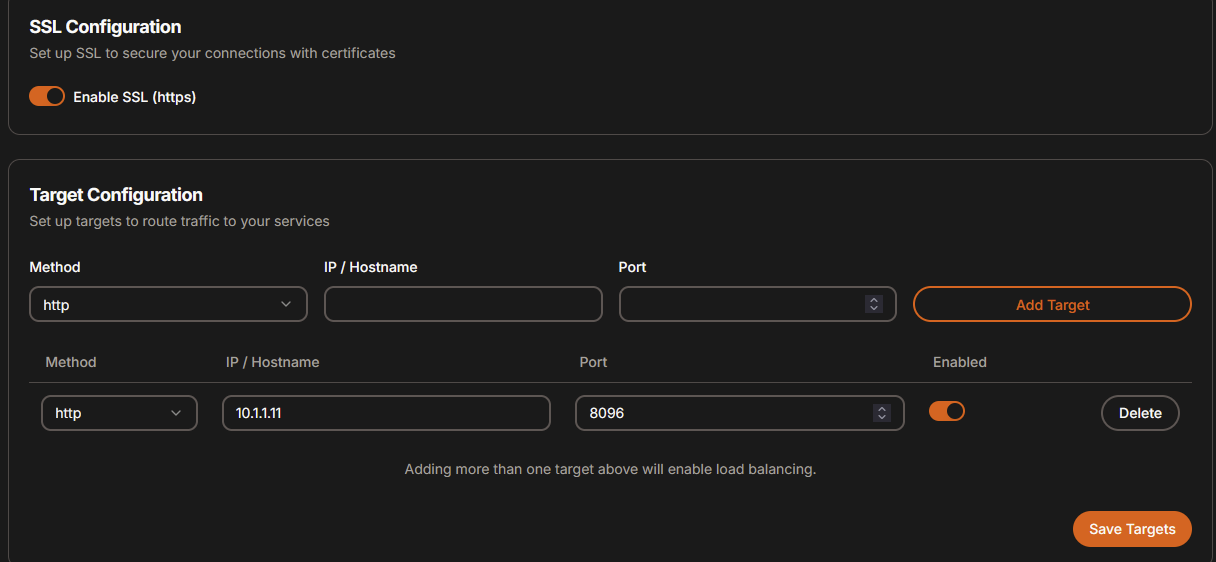
Create resource (TCP/UDP - gameserver)
This requires a little more manual work (alteast for now in pangolin 1.2.0). Check out their video guide
As previously created, create a resource and now choose TCP/UDP.
Choose whatever port you want to use, I’ll go with 25565 as that is default minecraft one.
If you go with a different port you have to add it to Oracle NSG and allow it in virtual firewall.
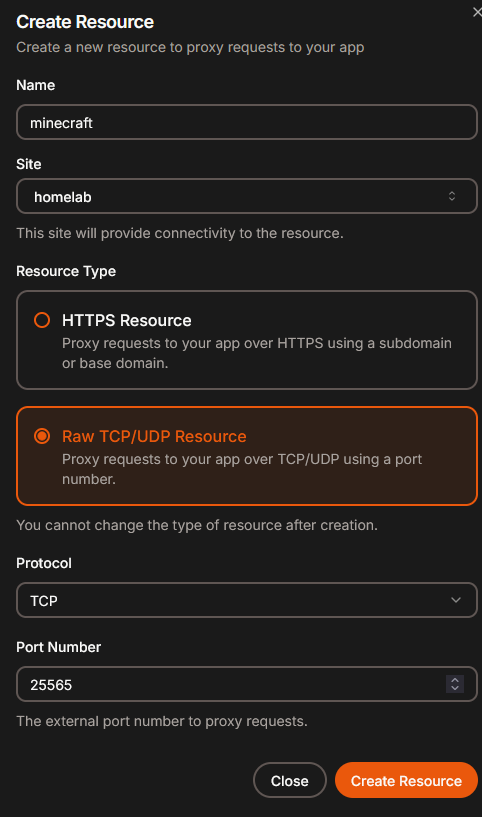
You will be prompted with
1
2
3
4
5
6
7
8
9
#Traefik: Add Entrypoints
entryPoints:
  tcp-25565:
    address: ":25565/tcp"


#Gerbil: Expose Ports in Docker Compose
ports:
  - 25565:25565
We need to manually add these into configs in our VPS.
Merge these into the existing keys, do not paste them as new blocks.
traefik_config.ymlalready has anentryPoints:section and the gerbil service already has aports:list. A secondentryPoints:key at the same level is a duplicate YAML key and Traefik will refuse to start. The examples below show the merged result.
1
2
3
4
5
6
7
8
9
10
11
12
13
14
15
16
17
18
19
20
vim /root/pangolin/config/traefik/traefik_config.yml   #or whatever path you have to pangolin

#add tcp-25565 INTO the existing entryPoints block, like shown bellow

....
certificatesResolvers:
  letsencrypt:
    acme:
      caServer: https://acme-v02.api.letsencrypt.org/directory
      email: blabla@gmail.com
      httpChallenge:
        entryPoint: web
      storage: /letsencrypt/acme.json
entryPoints:
  tcp-25565:
    address: ":25565/tcp"
  web:
    address: :80
  websecure:
....
And for the gerbil ports
1
2
3
4
5
6
7
8
9
10
11
12
13
14
15
16
17
18
19
20
21
22
23
24
25
26
27
28
29
vim /root/pangolin/docker-compose.yaml  #or whatever path you have to pangolin

#add
ports:
  - 25565:25565
#into the existing ports list like shown bellow (lowercase "ports", it is a YAML key)

  gerbil:
    cap_add:
      - NET_ADMIN
      - SYS_MODULE
    command:
      - --reachableAt=http://gerbil:3003
      - --generateAndSaveKeyTo=/var/config/key
      - --remoteConfig=http://pangolin:3001/api/v1/gerbil/get-config
      - --reportBandwidthTo=http://pangolin:3001/api/v1/gerbil/receive-bandwidth
    container_name: gerbil
    depends_on:
      pangolin:
        condition: service_healthy
    image: fosrl/gerbil:1.0.0
    ports:
      - 51820:51820/udp
      - 443:443
      - 80:80
      - 25565:25565
    restart: unless-stopped
    volumes:
      - ./config/:/var/config
Restart containers, and you are good to go.
1
docker compose down && docker compose up -d --force-recreate
config/keyis generated by Gerbil (--generateAndSaveKeyTo=/var/config/key) and is a WireGuard key. Do not delete or regenerate it casually — leave it out of anything you share, and back it up along with the rest ofconfig/.
Conclusion
In summary, both Cloudflare Tunnel and Pangolin offer robust solutions for accessing your homelab from behind CGNAT.
Both have their own pros/cons. Peronally I’m using both for different use cases in my holelab, but I really like where the pangolin is going, so I may switch entirely.
One closing thought after running this for a while: the install is genuinely easy, but “installed” and “actually protecting you” are two different states. A bouncer with an empty Last API pull, an unregistered CAPI, a middleware nobody references, and forwardedHeadersTrustedIPs: 0.0.0.0/0 all look completely fine from the dashboard. Go through the verification steps above once, and then re-check them after every upgrade.
Check out other posts in the series
- Hardware/software choices/alternatives [Homelab 2.0] Setting up Hardware && BIOS [Homelab 2.0] Install && Configure Proxmox [Homelab 2.0] UPS proxmox setup (+ disable UPS beeping) [Homelab 2.0] Combine NPM reverse proxy && Pi-hole DNS for Secure, seamless app local access [Homelab 2.0] Cloudflare | Pangolin - Access your homelab from the Internet over CGNAT with help of the tunnels [Homelab 2.0] Replace Google Photos with Immich and Pangolin/CF tunnels [Homelab 2.0] Qbittorrent LXC with ProtonVPN and port forwarding enabled Visualize Qbittorrent metrics in the Grafana Visualize Unifi metrics in the Grafana Self-hosted Rustdesk over pangolin tunnels