Cloud-Init Proxmox Templates
Ever wondered how VPS providers configure your VMs, add your SSH-keys, create users and install packages every time you spin up a new VM in the ‘cloud’?
Well, the answer for most vendors is cloud images with cloud-init package.
1
Cloud images are operating system templates and every instance starts out as an identical clone of every other instance. It is the user data that gives every cloud instance its personality and cloud-init is the tool that applies user data to your instances automatically.
The job of cloud-init is to initialize the VM or LXC and talk to the hosting provider’s data source and get the configuration information which it then uses to configure the VM.
The configuration information can include user-data like
- SSH keys
- hostname, IP, Gateway, DNS
- user and password,
- packages that user wants to be installed
- any other command that the user would like to run
Generally, “cloud images” are configured to run in a IaaS (infrastructure as a service), but we can use them as an easy jumping point for VM deployment in our own homelab.
What’s even the difference between your homelab and Cloudflare for example, right?!
What OS to choose?
The major ones are usually cloudInit supported (ubuntu,debian, CentStream, almaLinux). You can find some of them on these sites, but you can just google around as well.
Or you can also create them yourself, but that’s for future tutorials!
1
2
3
https://cloud-init.io/
https://cloud.debian.org/images/cloud/
https://wiki.almalinux.org/cloud/Generic-cloud-on-local.html#almalinux-guest-os-support
I’m gonna go with debian 11 which you can find here.
Installation
SSH into your Proxmox node (in which you want to hold the template)
1
ssh 192.x.x.x
Download the selected image (technically speaking the OS is already installed, so it’s not ISO, but disk/image)
1
wget https://cloud.debian.org/images/cloud/bullseye/daily/latest/debian-11-genericcloud-amd64-daily.qcow2
Create empty VM shell in proxmox with VirtIO bridge
1
qm create 7000 --memory 1024 --core 1 --name debian-cloud --net0 virtio,bridge=vmbr0
We can modify this image and we can, for example, install desired packages, like “qemu tools”, but you can add any package you want.
For that we need to do one time installation of libguestfs-tools on our proxmox node and then run the command below
1
2
apt install libguestfs-tools
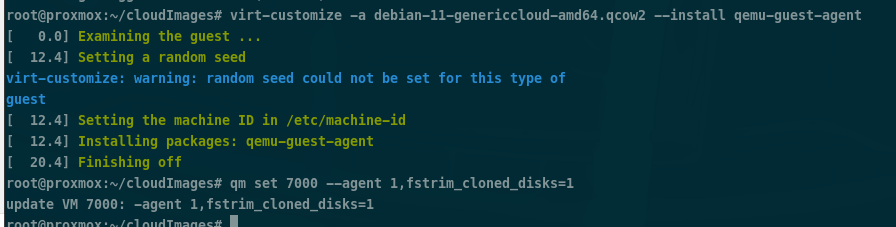
virt-customize -a debian-11-genericcloud-amd64.qcow2 --install qemu-guest-agent
And don’t forget to enable the agent in the settings to be able to see the IP of your newly created VM
1
qm set 7000 --agent 1,fstrim_cloned_disks=1
1
2
3
4
5
6
7
8
# Import the downloaded Debian disk to local-lvm storage (or whatever the storage are you using on proxmox)
qm importdisk 7000 debian-11-genericcloud-amd64.qcow2 local-lvm

# Attach the new disk to the VM as a scsi drive on the scsi controller
qm set 7000 --scsihw virtio-scsi-pci --scsi0 local-lvm:vm-7000-disk-0

# Add cloud-init CD-ROM drive, which will be used to pass the Cloud-Init data to the VM.
qm set 7000 --ide2 local-lvm:cloudinit
To be able to boot directly from the Cloud-Init image, set the boot parameter to order=scsi0 to restrict BIOS to boot from this disk only. This will speed up booting, because VM BIOS skips the testing for a bootable CD-ROM.
1
qm set 7000 --boot c --bootdisk scsi0
According to proxmox documentation, we need to add serial port as well
For many Cloud-Init images, it is required to configure a serial console and use it as a display.
It cost me many hours of troubleshooting kernel panics on boot after I’ve finally learned to ALWAYS add a serial interface.
1
qm set 7000 --serial0 socket --vga serial0
Now when all of this is done, the VM should look something like this 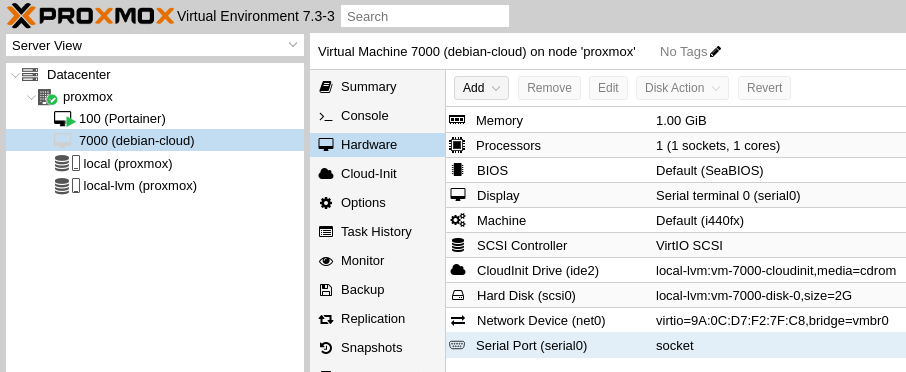
We don’t want to start it yet. As you can see we have a whole new section “Cloud-Init” in which we can configure, everything we need.
Full clone / link clone ?
We have several options how to move forward configure cloud-init config now then create template (If you know all of your VMs will share the same settings)
- create template and then configure cloud-init config
These 2 options also come with 2 different sub-options and that is using Full clone or Linked clone
Full Clone A full clone VM is a complete copy and is fully independent of the original VM or VM Template, but it requires the same disk space as the original.
But they are slower to create and less efficient when making many copies of the same VM.
Linked Clone A linked clone VM requires less disk space but cannot run without access to the base VM Template.
Linked Clones works for theses storage: files in raw, “qcow2, vmdk format (either on local storage or nfs); LVM-thin, ZFS, rbd, sheepdog, nexenta and It’s not supported with LVM & ISCSI” storage.
Benefits of linked clones
- Save disk space: the base OS files aren’t copied to the clone, they are read from the template instead, if they are changed in a clone a new copy will be made just for that clone
- Saves build time
- Save on RAM usage: Kernel Same-page Merging (KSM) works best when there are more common resources shared between VMs
Drawbacks of linked clones
- Templates cannot be deleted or modified if any clones exist, so you can’t install updates or add configuration to the template for future clones, you’d have to make a new template, this can lead to many templates cluttering your VM list as OS releases come out and your “pre-configuration” grows
- “KSM” can increase the attack surface for side-channel memory attacks
Because I know all of my VMs will share the same settings (like user,ssh keys, DNS) and I’m not really gonna benefit from the space efficiency and faster speed deployment, I’m going to configure cloud-init now and use full-clone.
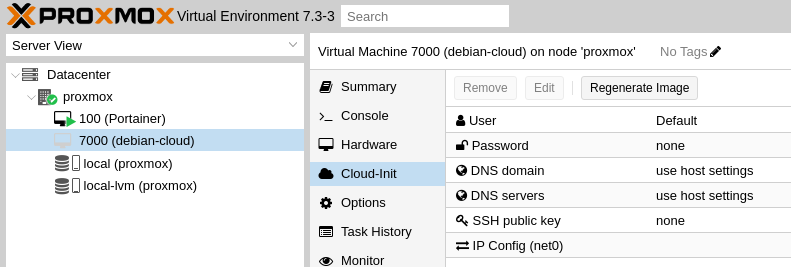
Configure user, password, ssh-keys, DNS, IP address and the gateway
1
2
3
4
5
6
7
8
9
10
11
#user with sudo privilages / password
qm set 7000 --ciuser=root --cipassword=YourPassoword

#you need to specify the path to the key, in my case I've my public key already in authorized_keys file on the proxmox node so I can use that, but your case may differ
qm set 7000 --sshkey ~/.ssh/authorized_keys

#my IP address and gateway, so your case will almost certainly differ
qm set 7000 --ipconfig0 ip=192.168.100.100/24,gw=192.168.100.1

#google and cloud flare DNS
qm set 7000 --nameserver="1.1.1.1 8.8.8.8"
Finally, turn the VM into the template
1
qm template 7000
Making a FULL clone and using the new VM
Finally, clone the template to a new machine. Keep in mind that the name of the VM becomes its hostname.
1
2
3
4
5
#For full clone
qm clone 7000 101 --name sauron --full

# For linked clone
qm clone 7000 101 --name sauron
Configure the IP it will use or keep the default one we used
1
qm set 101 --ipconfig0 ip=192.168.100.100/24,gw=192.168.100.1
Resize the disk to a size it will take up on this VM. I should note that in the cloud-init images, the space is automatically allocated to the / on every boot of the VM.
1
qm resize 101 scsi0 +20G
Turn the VM on
1
qm start 101
Wait until the VM starts and ssh with the public key
1
$ ssh -l root 192.168.100.100
Success! When cloud-init first goes up, it will install some packages, so 1st boot takes a little longer to release apt. But besides that, everything is set a ready for future quick and easy deployment.