Introduction
Matrix is an open standard for decentralized and end-to-end encrypted communication. It federates using homeservers that communicate with each other over the internet. Meaning it using
Matrix is built on a decentralized network of servers and clients, which allows users to communicate securely without relying on a central authority.
Why use matrix ?
- Decentralization
- Open Source
- End-to-end encryption
- Interoperability (meaning you can use bridges to connect to other apps like whatsupp…)
Why this guide ?
In this guide
- I’ve combined tutorials on how to deploy matrix and element the easiest, but still reliable way
- Researched the right settings and the best practices for the performance
- Added own separate TURN server for proper voice and video calls
- Used token based User registration, provisioned by the chat-bot for easy management
Prerequisites
- debian 12 instance (VPS or selfhosted)
- public IPv4 (or cloudflare tunnel but I won’t cover that here)
- 3 DNS subdomains pointing to your public IP (matrix.example.com, turn.example.com, element.example.com)
- Open ports (I’ll explain which ones and why down bellow)
Installation
Add Matrix apt repo
1
2
| sudo wget -O /usr/share/keyrings/matrix-org-archive-keyring.gpg https://packages.matrix.org/debian/matrix-org-archive-keyring.gpg
echo "deb [signed-by=/usr/share/keyrings/matrix-org-archive-keyring.gpg] https://packages.matrix.org/debian/ $(lsb_release -cs) main" | sudo tee /etc/apt/sources.list.d/matrix-org.list
|
Install Matrix Synapse
1
2
| sudo apt update
sudo apt install matrix-synapse-py3
|
You will be promted to fill your matrix homeserver name. In this example we are going to use “matrix.example.com”
Setup PostgreSQL
By default, Matrix synapse uses SQlite, but it’s recommended to use PostgreSQL for better performance.
Install
1
| sudo apt install postgresql
|
Switch to postgres user
Create user and db
1
2
3
| createuser --pwprompt synapse
createdb --encoding=UTF8 --locale=C --template=template0 --owner=synapse synapse
exit
|
Open ports
If you are using cloud instance, you will most likely need to allow these port in the firewall.
Or maybe you are just using linux firewall, so just allow those ports with ufw.
We will need
- 80,443 for http/s
- 8448 for matrix federation communication with other servers
- 3478, 5349, 49152:65535 udp/tcp for TURN (voip of matrix)
1
2
3
4
5
6
7
8
| sudo ufw allow 80
sudo ufw allow 443
sudo ufw allow 8448
sudo ufw allow 3478
sudo ufw allow 5349
sudo ufw allow 49152:65535/udp
sudo ufw allow 49152:65535/tcp
|
Setup Nginx
By default matrix doesn’t come with any reverse proxy so we need to install one by ourselves. Because of how easy is to use nginx and certbot together I’m going with them.
Install
1
| apt install nginx certbot python3-certbot-nginx
|
Certbot TLS for matrix domain
1
| sudo certbot certonly --nginx -d matrix.example.com -d example.com
|
Create new nginx site
1
| vim /etc/nginx/sites-available/synapse
|
By default matrix synapse API in nginx template is available only on localhost, but I’ve changed it so we can play with the API later.
Source 1
Source 2
Synapse documentation on reverse proxy
1
2
3
4
5
6
7
8
9
10
11
12
13
14
15
16
17
18
19
20
21
22
23
24
25
26
27
28
29
30
31
32
33
34
35
| server {
server_name matrix.example.com;
# Client port
listen 80;
listen [::]:80;
return 301 https://$host$request_uri;
}
server {
server_name matrix.example.com;
# Client port
listen 443 ssl http2;
listen [::]:443 ssl http2;
# Federation port
listen 8448 ssl http2 default_server;
listen [::]:8448 ssl http2 default_server;
# TLS configuration
ssl_certificate /etc/letsencrypt/live/matrix.example.com/fullchain.pem;
ssl_certificate_key /etc/letsencrypt/live/matrix.example.com/privkey.pem;
ssl_protocols TLSv1.2 TLSv1.3;
ssl_prefer_server_ciphers on;
location / {
proxy_pass http://localhost:8008;
proxy_set_header X-Forwarded-For $remote_addr;
proxy_set_header X-Forwarded-Proto $scheme;
proxy_set_header Host $host;
client_max_body_size 50M;
}
}
|
Change all 4 occurences of matrix.example.com to your domain.
Enable and reload new site
1
2
| sudo ln -s /etc/nginx/sites-available/synapse /etc/nginx/sites-enabled
sudo systemctl reload nginx.service
|
We are going to add all new changes to “/etc/matrix-synapse/conf.d/” directory, but you can also add them directly to “/etc/matrix-synapse/homeserver.yaml”.
But this is just cleaner way to do it and you won’t get prompted every time you update the system, if you really want to over-ride the config.
Create new DB
1
| vim /etc/matrix-synapse/conf.d/database.yaml
|
1
2
3
4
5
6
7
8
9
| database:
name: psycopg2
args:
user: synapse
password: 'your_password'
database: synapse
host: localhost
cp_min: 5
cp_max: 10
|
Change ‘your_password’ for your actuall password you have used.
Create registration key
With this key you (or anyone if API is open) can register new accounts.
1
| echo "registration_shared_secret: '$(cat /dev/urandom | tr -cd '[:alnum:]' | fold -w 256 | head -n 1)'" | sudo tee /etc/matrix-synapse/conf.d/registration_shared_secret.yaml
|
Restart the matrix service
1
| systemctl restart matrix-synapse.service
|
Create Synapse admin account
We will need this account later for API uses as well
1
| register_new_matrix_user -c /etc/matrix-synapse/conf.d/registration_shared_secret.yaml http://localhost:8008
|
I’ll call mine “test”.
Get access token of this user
We will need token for later use
1
2
3
4
5
| curl -X POST --header 'Content-Type: application/json' -d '{
"identifier": { "type": "m.id.user", "user": "test" },
"password": "your_password",
"type": "m.login.password"
}' 'http:/localhost:8008/_matrix/client/r0/login'
|
Change user, password, and domain to yours.
You will get response looking like this
1
| {"user_id":"@test:matrix.example.com","access_token":"syt_cmVnaXN0css9uLWJvdA_rIWGddmIVnQoaYgZUqcq_15eW1E","home_server":"matrix.example.com","device_id":"MNSSSEWQAZ"}
|
Save the token access_token.
Disable presence (optional)
For better performance, you can disable presence (the green dot showing presence). By default this is enabled, but takes up a lot of resources and I just think it’s not that necessary.
1
| vim /etc/matrix-synapse/conf.d/presence.yaml
|
1
2
| presence:
enabled: false
|
Enable token requirement for registration new account
If you don’t want to manually create every account for your friend, but you also don’t want to let server open for anyone to just register and possibly DDOS you, well I have solution for you.
The solution is to make registration token based, and only people who will know this token are going to be able to register. Later in this guide I’ll also show you how to make it easier with chat bot.
1
| sudo vim /etc/matrix-synapse/conf.d/registration.yaml
|
1
2
| enable_registration: true
registration_requires_token: true
|
Restart Matrix Synapse server
1
| sudo systemctl restart matrix-synapse.service
|
Verify the matrix site is running
- Simply type your matrix domain to the browser
- use federation tester tool to see if your server can communicate with other servers
Setup VOIP
By default VOIP on matrix is not a great experience. Often it’s very slow and it’s dropping connection.
The main and simplified reason is that NAT, firewall, and compliance network policies, the process of reaching the other peer becomes complex.
Default config on your synapse would use the matrix.org turn server. Turn is only used for opening the call if a user is behind a NAT or Firewall. The call itself is done via “web-RTC” which is always encrypted.
Why use coturn as a TURN server?
InternetSource
Synapse documentation
Install coturn
1
| sudo apt install coturn -y
|
Create TLS certificate for TURN coturn server
1
| certbot certonly --nginx -d turn.example.com
|
Generate an authentication secret
1
| echo "static-auth-secret=$(cat /dev/urandom | tr -cd '[:alnum:]' | fold -w 256 | head -n 1)" | sudo tee /etc/turnserver.conf
|
Edit the config
1
| vim /etc/turnserver.conf
|
1
2
3
4
5
6
7
8
9
10
11
12
13
14
15
16
17
18
19
20
21
22
23
24
25
26
27
28
29
30
31
32
33
34
35
36
37
| use-auth-secret
realm=turn.example.com
cert=/etc/letsencrypt/live/turn.example.com/fullchain.pem
pkey=/etc/letsencrypt/live/turn.example.com/privkey.pem
# VoIP is UDP, no need for TCP
no-tcp-relay
# Do not allow traffic to private IP ranges
no-multicast-peers
denied-peer-ip=0.0.0.0-0.255.255.255
denied-peer-ip=10.0.0.0-10.255.255.255
denied-peer-ip=100.64.0.0-100.127.255.255
denied-peer-ip=127.0.0.0-127.255.255.255
denied-peer-ip=169.254.0.0-169.254.255.255
denied-peer-ip=172.16.0.0-172.31.255.255
denied-peer-ip=192.0.0.0-192.0.0.255
denied-peer-ip=192.0.2.0-192.0.2.255
denied-peer-ip=192.88.99.0-192.88.99.255
denied-peer-ip=192.168.0.0-192.168.255.255
denied-peer-ip=198.18.0.0-198.19.255.255
denied-peer-ip=198.51.100.0-198.51.100.255
denied-peer-ip=203.0.113.0-203.0.113.255
denied-peer-ip=240.0.0.0-255.255.255.255
denied-peer-ip=::1
denied-peer-ip=64:ff9b::-64:ff9b::ffff:ffff
denied-peer-ip=::ffff:0.0.0.0-::ffff:255.255.255.255
denied-peer-ip=100::-100::ffff:ffff:ffff:ffff
denied-peer-ip=2001::-2001:1ff:ffff:ffff:ffff:ffff:ffff:ffff
denied-peer-ip=2002::-2002:ffff:ffff:ffff:ffff:ffff:ffff:ffff
denied-peer-ip=fc00::-fdff:ffff:ffff:ffff:ffff:ffff:ffff:ffff
denied-peer-ip=fe80::-febf:ffff:ffff:ffff:ffff:ffff:ffff:ffff
# Limit number of sessions per user
user-quota=12
# Limit total number of sessions
total-quota=1200
|
Change all 3 occurences of turn.example.com to your domain.
Restart coturn service
1
| sudo systemctl restart coturn.service
|
Implement coturn into matrix Synapse config
1
| sudo vim /etc/matrix-synapse/conf.d/turn.yaml
|
1
2
3
4
| turn_uris: [ "turn:turn.example.com?transport=udp", "turn:turn.example.com?transport=tcp" ]
turn_shared_secret: 'static-auth-secret'
turn_user_lifetime: 86400000
turn_allow_guests: True
|
Change all 2 occurences of turn.example.com to your domain.
Restart synapse to apply the new TURN server
1
| sudo systemctl restart matrix-synapse.service
|
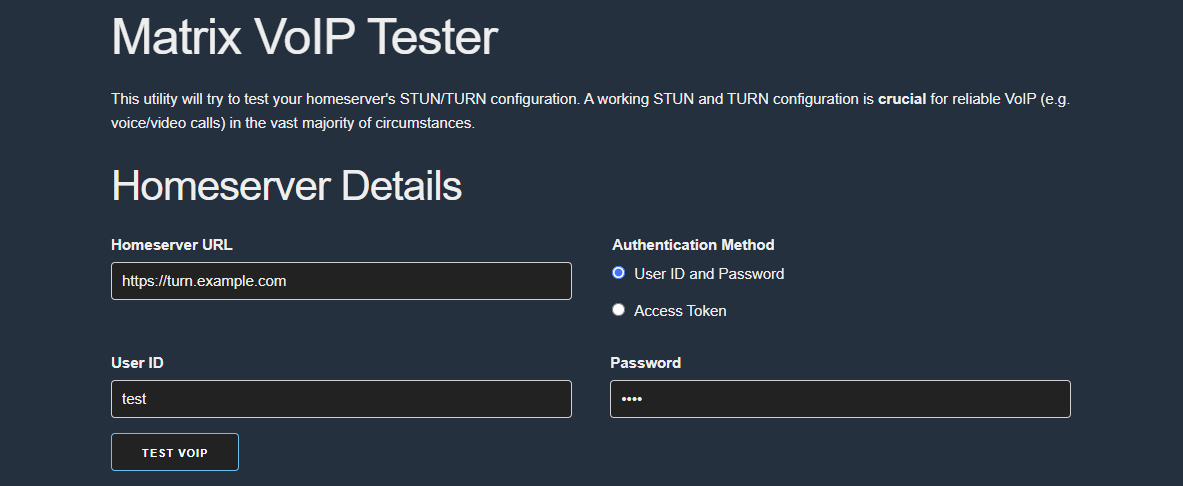
Check if new TURN server is working
“test.voip.librepush.net”
You can use this test voip open-source online tool. Just type in your
- Homeserver URL: https://turn.example.com
- user ID & password: admin account we have created with register_new_matrix_user
Test.voip.librepush.net is great, but not that reliable, so if you get some errors, it wont necesarrly means that your TURN server doesnt work.
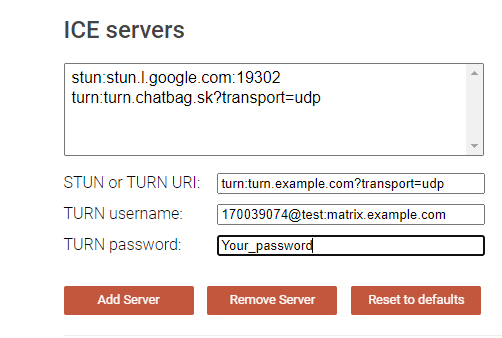
Webrtc
More complex and useful site to check TURN server is webrtc.github.io
To get the right credentials you will need to use this command in the terminal of matrix.
1
2
| curl -X POST --header "Authorization: Bearer syt_YOUR_TOKEN_HERE" -d {} -X GET http://127.0.0.1:8008/_matrix/client/r0/voip/turnServer
|
Change syt_YOUR_TOKEN_HERE for YOUR TOKEN that we got earlier in this guide, while creating synapse matrix admin account.
And you will receive
- TURN username
- TURN password
- TURN URI
1
| {"username":"1700394074:@test:matrix.example.com","password":"YOUR_pasword,"ttl":86400,"uris":["turn:turn.example.com?transport=udp","turn:turn.example.com?transport=tcp"]}root@matrix:~#
|
And finally feed these into WEB UI.
If the TURN server is working correctly, you should see at least one relay entry in the results.
Element (web interface)
Setup
We have successfully created a backend for our chat application and we can already connect to it with some public clients like Element
But because we want everything private and selfhosted, we are going to install element on our server as well.
Install “jq”
Create working dir
1
| sudo mkdir -p /var/www/element
|
Create a script for regular Element updates
1
| vim /var/www/element/update.sh
|
1
2
3
4
5
6
7
8
9
10
11
12
13
14
15
16
17
18
19
20
21
22
23
24
25
26
27
28
29
30
31
32
33
34
35
36
37
38
39
40
41
42
43
44
45
46
47
48
| #!/usr/bin/env bash
set -euo pipefail
# Configuration
install_location="/var/www/element"
api_repo="element-hq/element-web"
api_url="https://api.github.com/repos/${api_repo}/releases/latest"
# Fetch latest release tag name (fail on non-2xx, no output on HTTP >=400)
latest="$(curl -sSfL "${api_url}" | jq -r .tag_name)"
if [[ -z "${latest}" || "${latest}" == "null" ]]; then
echo "Error: Unable to fetch latest release tag from ${api_url}" >&2
exit 1
fi
cd "${install_location}"
# Prepare archive directory
mkdir -p archive
# Remove any existing archives for this version
rm -rf "archive/element-${latest}" \
"archive/element-${latest}.tar.gz"
# Download release tarball (curl preferred, fall back to wget)
download_url="https://github.com/${api_repo}/releases/download/${latest}/element-${latest}.tar.gz"
if command -v curl >/dev/null 2>&1; then
curl -fSL -o "archive/element-${latest}.tar.gz" "${download_url}"
else
wget -O "archive/element-${latest}.tar.gz" "${download_url}" \
|| { echo "Error: Download failed for ${download_url}" >&2; exit 1; }
fi
# Verify download
if [[ ! -f "archive/element-${latest}.tar.gz" ]]; then
echo "Error: Tarball missing after download" >&2
exit 1
fi
# Extract the archive
tar -xzf "archive/element-${latest}.tar.gz" -C archive
# Atomically update 'current' symlink
ln -sfn "${install_location}/archive/element-${latest}" "${install_location}/current"
# Ensure the config persists
ln -sfn "${install_location}/config.json" "${install_location}/current/config.json"
|
Make file executable
1
| sudo chmod +x /var/www/element/update.sh
|
Start the script
To download element for the first time just run the script.
1
| sudo /var/www/element/update.sh
|
To update Element in the future, re-run the command, or setup cron like so
Add the script to crontab
1
| 0 0 * * 0 /bin/bash /var/www/element/update.sh
|
Copy the config template
1
| sudo cp /var/www/element/current/config.sample.json /var/www/element/config.json
|
Change it to your server name
1
| sudo vim /var/www/element/config.json
|
1
2
3
4
| "m.homeserver": {
"base_url": "https://matrix.example.com",
"server_name": "example.com"
},
|
Change both matrix.example.com and example.com to your domain.
Create new element nginx site
1
| vim /etc/nginx/sites-available/element
|
1
2
3
4
5
6
7
8
9
10
11
12
13
14
15
16
17
18
19
20
21
22
23
24
25
26
27
28
| server {
listen 80;
listen [::]:80;
server_name element.example.com;
return 301 https://$host$request_uri;
}
server {
listen 443 ssl http2;
listen [::]:443 ssl http2;
server_name element.example.com;
root /var/www/element/current;
index index.html;
add_header Referrer-Policy "strict-origin" always;
add_header X-Content-Type-Options "nosniff" always;
add_header X-Frame-Options "SAMEORIGIN" always;
# TLS configuration
ssl_certificate /etc/letsencrypt/live/element.example.com/fullchain.pem;
ssl_certificate_key /etc/letsencrypt/live/element.example.com/privkey.pem;
ssl_protocols TLSv1.2 TLSv1.3;
ssl_prefer_server_ciphers on;
}
|
Create TLS certificate for element site
1
| sudo certbot certonly --nginx -d element.example.com
|
Enable the new element site
1
| sudo ln -s /etc/nginx/sites-available/element /etc/nginx/sites-enabled
|
1
2
| nginx -t
sudo systemctl reload nginx.service
|
Congratulation, you can now access your element web interface!
Automatic certification renewal
Because we don’t want to one day find out that our app is not working because we forgot to update “FreeTlS” certificate, we are going to set up automatic renewal with crontab.
Type in the terminal
1
| 0 12 * * * /usr/bin/certbot renew --quiet
|
Token user registration
As I’ve mentioned before, in this post we are going to setup matrix & element in token user registration.
Meaning. Registration is allowed, as long as user has registration token. Which can be 1-time use, 3-time user, never expire etc..
Usually, these tokens are managed with synapse API . For example to create new token we type.
1
| curl -X POST --header "Authorization: Bearer syt_YOUR TOKEN" -d {} -X POST http://127.0.0.1:8008/_synapse/admin/v1/registration_tokens/new
|
This is very inconvenient for regular non-tech user, or just for the user who doesn’t want to SSH into his machine every single time.
Matrix-registration-bot
DEPRECATED. I’ve switched to synapse-admin instead.
Synapse-admin
Previously as I’ve mentioned I’ve used Matrix-registration-bot. But the bot didn’t worked that well, often I needed to restart the service and in general it just didn’t got any more updates. Because of that I’ve decided to switch to synapse-admin which has many more great features like:
- create, delete, manage and edit users (activated, guests, locked, deactivated…)
- create, delete, manage and edit rooms
- export info about users, rooms to CSV
- manager users media
- manage tokens
- manage federation …
Create admin account for synapse-admin
Or you can just use account admin, but I prefer when all accounts have their own purpose.
1
2
| register_new_matrix_user -c /etc/matrix-synapse/conf.d/registration_shared_secret.yaml http://localhost:8008
|
1
2
3
4
5
6
| New user localpart [root]: synapse-admin
Password:
Confirm password:
Make admin [no]: yes
Sending registration request...
Success!
|
Get an access token from a bot account
1
2
3
4
5
6
| curl -X POST --header 'Content-Type: application/json' -d '{
"identifier": { "type": "m.id.user", "user": "registration-bot" },
"password": "YOURpassword",
"type": "m.login.password"
}' 'https://matrix.example.com/_matrix/client/r0/login'
{"user_id":"@synapse-admin:matrix.example.com","access_token":"syt_YOURTOKEN","home_server":"matrix.example.com","device_id":"RVVCPTXXYH"}
|
Install synapse-admin
There are 3 options on how to install synapse-admin:
- Download the tarball and serve with any webserver
- Download the source code from github and run using nodejs
- Run the Docker container
I’m gonna go with first one, but feel free to use which one you prefer. YOu can find info on their github
Download the latest release here
[releases] (https://github.com/etkecc/synapse-admin/releases)
1
2
| #current latest release as 7.1.2025
wget https://github.com/etkecc/synapse-admin/releases/download/v0.10.3-etke35/synapse-admin.tar.gz
|
Untar the file
1
| tar -xvzf synapse-admin.tar.gz
|
Mope file to web root directory
1
| mv synapse-admin /var/www/
|
Create new synapse-admin nginx site
1
| vim /etc/nginx/sites-available/synapse-admin
|
1
2
3
4
5
6
7
8
9
10
11
12
13
14
15
16
17
18
19
20
21
22
23
24
25
26
27
28
29
30
31
32
33
34
35
36
37
| server {
listen 80;
listen [::]:80;
server_name synapse-admin.example.com;
return 301 https://$host$request_uri;
}
server {
listen 443 ssl http2;
listen [::]:443 ssl http2;
server_name synapse-admin.example.com;
root /var/www/synapse-admin;
index index.html;
location / {
try_files $uri $uri/ /index.html;
}
location ~* \.(?:css|js|jpg|jpeg|gif|png|svg|ico|woff|woff2|ttf|eot|webp)$ {
expires 30d; # Set caching for static assets
add_header Cache-Control "public";
}
gzip on;
gzip_types text/plain application/javascript application/json text/css text/xml application/xml+rss;
gzip_min_length 1000;
# TLS configuration
ssl_certificate /etc/letsencrypt/live/synapse-admin.example.com/fullchain.pem;
ssl_certificate_key /etc/letsencrypt/live/synapse-admin.example.com/privkey.pem;
ssl_protocols TLSv1.2 TLSv1.3;
ssl_prefer_server_ciphers on;
}
|
Create TLS certificate for synapse-admin
1
| sudo certbot certonly --nginx -d synapse-admin.example.com
|
Enable the new synapse-admin site
1
| sudo ln -s /etc/nginx/sites-available/synapse-admin /etc/nginx/sites-enabled
|
1
2
| nginx -t
sudo systemctl reload nginx.service
|
Congratulation
You’ve successfully deployed matrix synapse server with an element interface with VOIP over your own TURN server and synapse-admin for user,room management.
Useful
ADMIN API commands
All can be done both
- locally http://127.0.0.1:8008/_synapse/admin…
- remotely https://matrix.example.com/_synapse/admin…
Create token
1
| curl -X POST --header "Authorization: Bearer syt_YOURTOKEN" -d {} -X POST http://127.0.0.1:8008/_synapse/admin/v1/registration_tokens/new
|
List all Users
1
| curl -X POST --header "Authorization: Bearer syt_YOURTOKEN" -d {} -X GET http://127.0.0.1:8008/_synapse/admin/v2/users?from=0&limit=10&guests=false
|
Delete specific user
1
| curl -X POST --header "Authorization: Bearer syt_YOURTOKEN" -d {} -X POST http://127.0.0.1:8008/_synapse/admin/v1/deactivate/@test:matrix.example.com
|
All synapse ADMIN API commands
Can be found on synapse documentation website