Combine NPM reverse proxy && Pi-hole DNS for Secure, seamless app local access [Homelab 2.0]
Introduction
In this post, I’ll walk you step-by-step through setting up your own secure local environment, allowing seamless and encrypted local access to your self-hosted applications. No more security warnings, no more DNS headaches—just simple, secure and efficient local networking.
Advantages of hosting your own DNS and reverse proxy
- Enhanced Security: SSL encryption ensures your data stays private and secure
- Faster Resolution: Local DNS significantly reduces lookup times
- Improved Privacy: Pi-hole provides ad blocking and tracker filtering at the DNS level
- Easy Management: Centralized configuration simplifies application and domain management
- Reliable Access: Maintain reliable local connectivity even when internet outages occur
- …many more
30,000 foot overview
We are going to run 2x LXC containers on the proxmox PVE
NPM (nginx proxy manager) - reverse proxy The NPM main purpose is to provide domain names to our selfhosted local apps. This significantly creates more human friendliness for admin and the users. Additionally NPM will also help us with securing our traffic with TSL/SSL.
Pi-hole - DNS
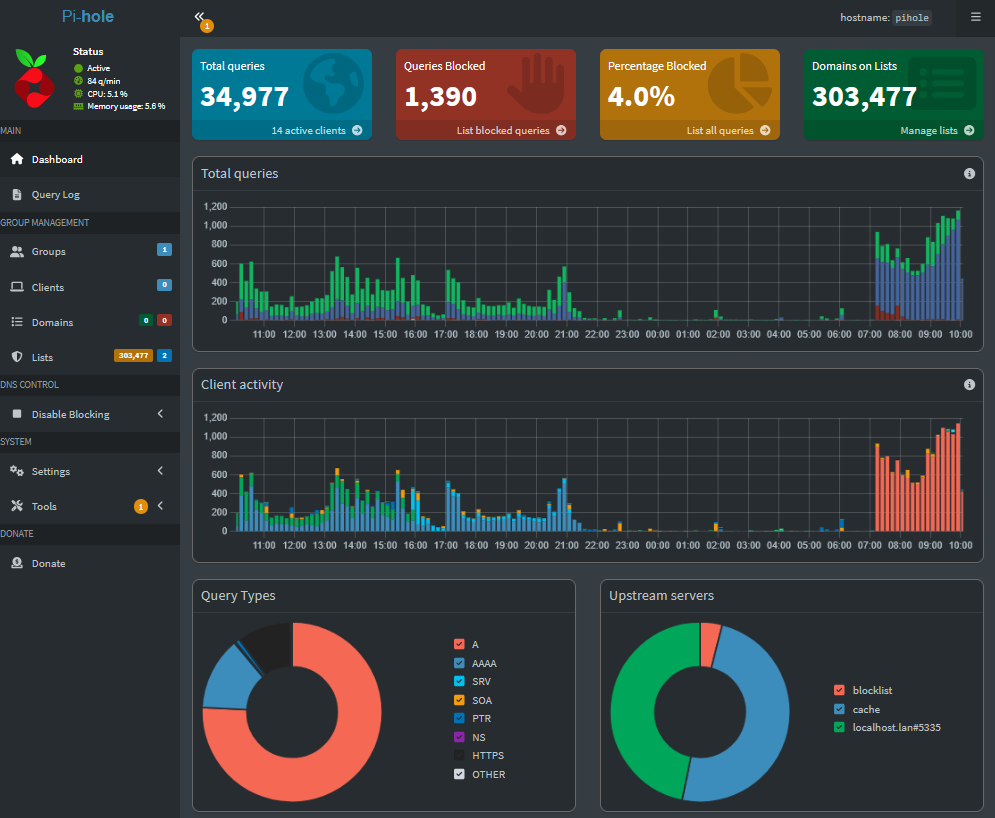
The Pi-hole server will serve as our primary homelab DNS, responding to all DNS queries for all devices in our homelab and at home. It will also filter all unwated ADs, telemetry and malicious websites.
With a combination of these 2 we can create something called SPLIT DNS.
Split DNS allows us to directly access internal (local network) and external (internet-based) requests differently for the same domain. This means that devices on our local network can quickly access applications using internal IP addresses, while external users see a separate public-facing address (or none at all). We will use this feature later with apps like nextcloud, immich, bookstack etc..
Example
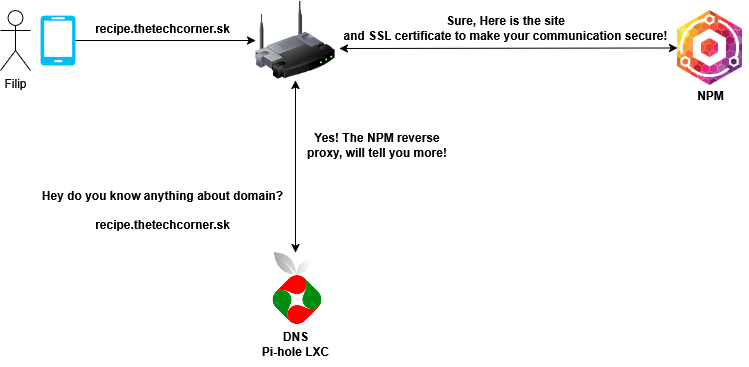
Let’s showcase this with real life example.
- User named Filip wants to access his recipe app, which he is self-hosting
- He is accessing the app from his phone, from his home WIFI
- Filip writes the app domain name into phone browser “recipe.thetechcorner.sk”
- Because we configured our router to use our DNS pi-hole server, the router will immediately ask the DNS server for information.
- DNS server will point users to NPM - Nginx proxy manager
- NPM points user to the site with the SSL certificate to create a secure connection
- User Filip sees the recipe app!!
Setup DNS server [Pi-Hole]
Install LXC container
The easiest solution is to install container with comunity scripts
Simply run bellow command in PVE GUI node shell
1
bash -c "$(wget -qLO - https://github.com/community-scripts/ProxmoxVE/raw/main/ct/pihole.sh)"
Don’t forget to set PI-Hole to static ip!
My LXC config as an example
1
2
3
4
5
6
7
8
9
10
11
12
arch: amd64
cores: 6
features: keyctl=1,nesting=1
hostname: pihole
memory: 2048
net0: name=eth0,bridge=vmbr0,gw=10.1.1.1,hwaddr=BC:24:11:A1:4C:21,ip=10.1.1.8/24,type=veth
onboot: 1
ostype: debian
rootfs: pool-fast:subvol-105-disk-0,size=2G
swap: 512
tags: 10.1.1.8
unprivileged: 1
Configure Pi-Hole
Change password
To set your password, log in to the container, and type the following:
1
2
3
4
pihole setpassword

#or try
sudo pihole -a -p
Login
After that we can access the Pi-Hole interface by typing the IP you’ve chosen in the browser
1
<Pi-Hole-IP:admin/login>
Where do you find DNS blocking lists?
There are many DNS block list providers. My favorite one was created be hagezi, you can check it out here
You can choose many different levels. These levels represent how many domains is being blocked.
Be careful, the more you block, the bigger the possibility of breaking your day-to-day use of the internet. I found best just to go with normal/relaxed
Setup Ad blocking list
In the new Pi-Hole version 6, the AD blocking lists and many other got reworked.
Check out all new changes here on pi-hole website
To now find the blocklists in version 6 go to Group management -> Lists -> Add allowlist
Add the URL to the blocklist and to which group you want to assign to blocklist to. (I simply go with default group.)
The groups is new feature which allows you to assign different settigns, AD blocking lists to different clients.
Proxmox NTP error in Pi-Hole 6
If you are getting NTP error in proxmox LXC container pi-hole. It’s a known issue and it’s due to nature of lxc container being unprivileged.
1
2
Error in NTP client:
Failed to adjust time during NTP sync: Insufficient permissions
To fix this either
- make LXC privileged
- Disable NTP in pihole (From the web pi-hole web GUI, under Settings -> All Settings -> Network Time Sync. Uncheck the ntp.ipv4.active and ntp.ipv6.active settings)
Setup new DNS server in your home router
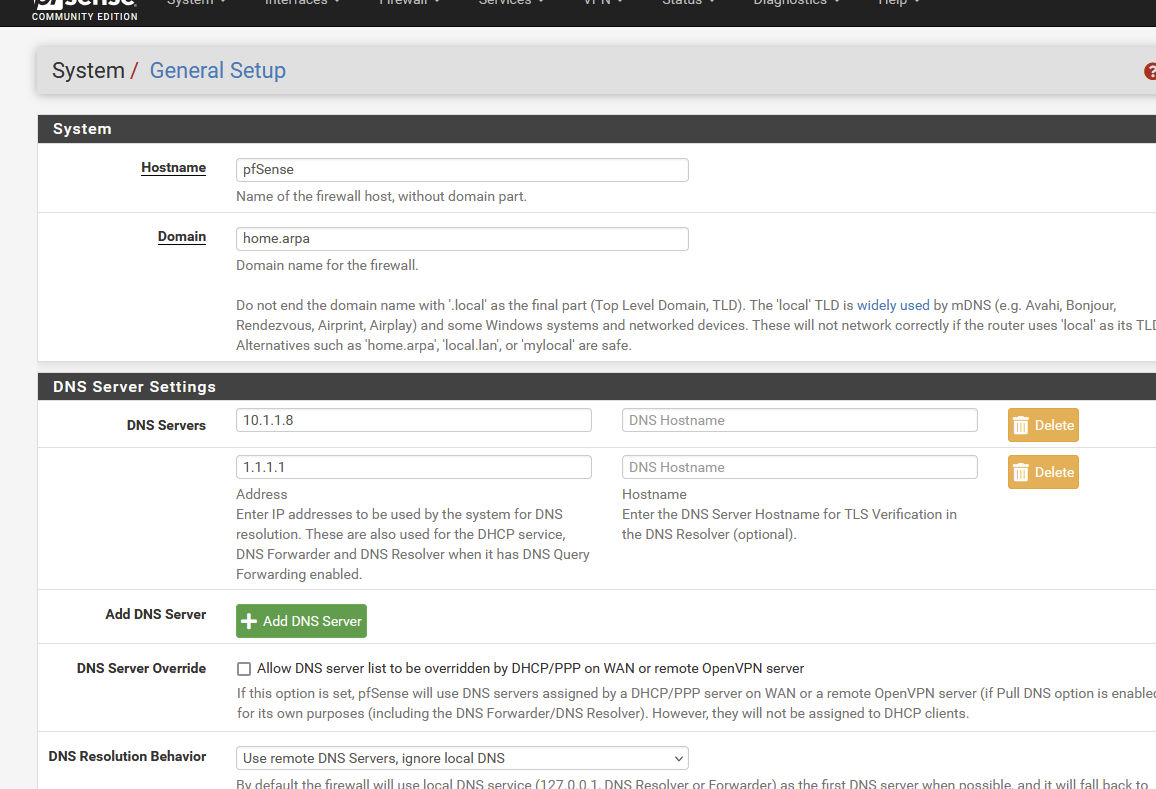
We need to configure our main router in a way that it uses pi-hole for DNS queries.
I’m using pfSens, but the name always is something like “DNS Server settings”
In pfSens go to System -> General Setup -> DNS server Settings -> And add the IP of pi-hole (in my case 10.1.1.8)
Save it, reload.
Flush DNS from PC
You can either wait few minutes or make the transition to new DNS faster by flushing your DNS and forcing new DNS server to be recognized.
Windows
1
2
3
4
5
#open CMD
    Type "ipconfig /release" and press Enter.
    Type "ipconfig /renew" and press Enter.
    Type "ipconfig /flushdns" and press Enter.
#Restart the computer.
Linux
1
2
3
4
buntu: sudo systemd-resolve –flush-caches
NCSD: sudo /etc/init.d/nscd restart
Dnsmasq: sudo /etc/init.d/dnsmasq restart
BIND: sudo /etc/init.d/named restart
Android
1
#Open browser -> in the URL section type "chrome://net-internals/ -> Select DNS -> Clear host cache
Test AD blocking
Useful site for testing ad blocking
Setup reverse proxy [NPM]
Install LXC container
1
bash -c "$(wget -qLO - https://github.com/community-scripts/ProxmoxVE/raw/main/ct/nginxproxymanager.sh)"
My LXC config as example
1
2
3
4
5
6
7
8
9
10
11
12
arch: amd64
cores: 2
features: keyctl=1,nesting=1
hostname: nginxproxymanager
memory: 1024
net0: name=eth0,bridge=vmbr0,gw=10.1.1.1,hwaddr=BC:24:11:69:FB:11,ip=10.1.1.6/24,type=veth
onboot: 1
ostype: debian
rootfs: pool-fast:subvol-117-disk-0,size=4G
swap: 512
tags: 10.1.1.6
unprivileged: 1
Configure NPM
NPM is using friendly web browser interface to configure everything. To access it type in the IP of LXC container where NPM is installed with the port 81.
1
<NPM-IP:81>
Install certbot plugin
In the LXC container run
1
/app/scripts/install-certbot-plugins
Default login Credentials
1
2
Username: admin@example.com
Password: changeme
Authenticate your domain
I’m using cloudflare provider and domain “thetechcorner” for my split DNS setup.
Authenticating in NPM with CF is pretty straightforward:
- Go to your Cloudflare profile and generate API token. Here is offical how to from cloudflare blog post
- Go to NPM -> SSL Certificates -> Add SSL Cert -> Let’s encrypt -> Type in your domain.
- Check Use DNS Challenge -> DNS Provider: Cloudflare
- Type in the DNS_CLOUDFLARE_API_TOKEN
- Agree with the Let’s encrypt terms and SAVE
You should now have valid SSL certificates for your APPS.
Test with the recipe app [EXAMPLE]
Create app in LXC container
1
bash -c "$(wget -qLO - https://github.com/community-scripts/ProxmoxVE/raw/main/ct/tandoor.sh)"
My LXC config as example
1
2
3
4
5
6
7
8
9
10
11
12
arch: amd64
cores: 4
features: keyctl=1,nesting=1
hostname: tandoor
memory: 4096
net0: name=eth0,bridge=vmbr0,gw=10.1.1.1,hwaddr=BC:24:11:C2:54:90,ip=10.1.1.34/24,type=veth
onboot: 1
ostype: debian
rootfs: pool-fast:subvol-129-disk-0,size=10G
swap: 512
tags: 10.1.1.34;community-script;recipes
unprivileged: 1
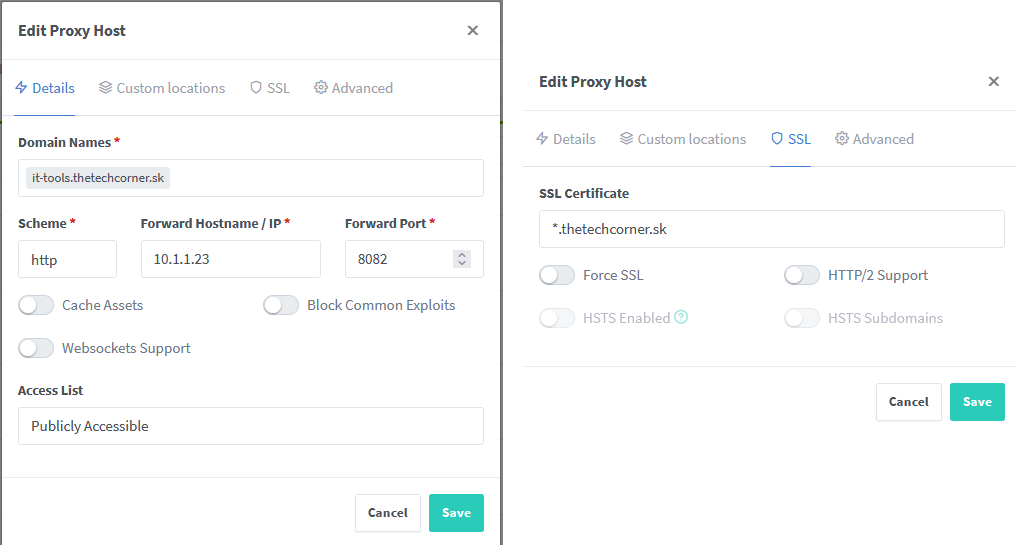
Add app to the NPM reverse proxy
- NPM -> Hosts -> Proxy Hosts -> Add proxy host
- Choose the Domain name, for example “recipes.thetechcorner.sk”
- Forward Hostname/IP -> Put the IP of recipes LXC container
- Forward Port -> 80
There are many features that NPM provides, like Cache assets, block common exploits or web sockets, but we dont need to use those now.
- Go to SSL category -> SSL Certificate -> Choose the cert we’ve created in the last step
- Click Save
Add the domain name to our local DNS records
- Go to Pi-Hole (version 6) web interface -> Settings -> Local DNS records
- On the left site, you should see “List of local Dns recods” -> To the domain add:
and the IP of the NPM reverse proxy - On the right site, you should see “List of local CNAME records” -> To the domain add: recipes.example.com and the Target domain: npm.example.com
Example of my Pi-hole setup 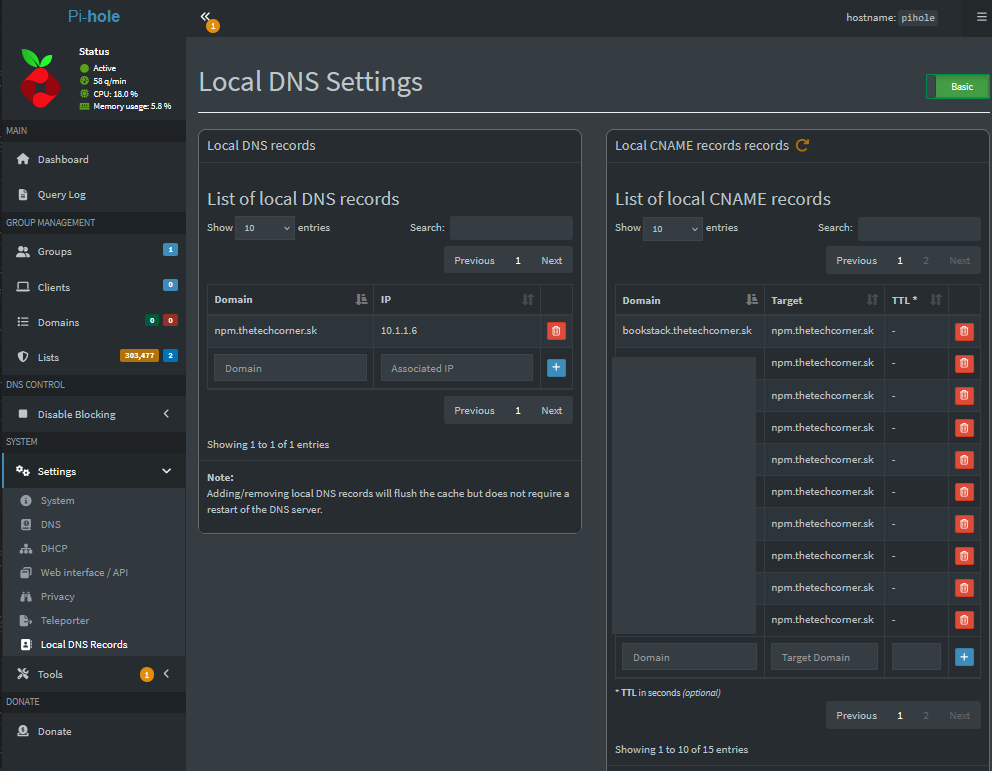
Add more Apps
If you want to add more Apps, simply
- create domain for the APP in NPM again
- In the pi-hole nn the right site “List of local CNAME records” -> To the domain add: app-name.example.com and the Target domain: npm.example.com
For all the future records we are going to use CNAME records pointing to our NPM instnance.
Conclusion
We’ve successfully created configured and NPM with the pi-hole for our local DNS.
In the future I’ll show you how we can go even futher and create split DNS, so we can also access our apps from the internet as well. Spoiler alert - with help of the Cloudflare tunnels!
Check out other posts in the series
- Hardware/software choices/alternatives [Homelab 2.0] Setting up Hardware && BIOS [Homelab 2.0] Install && Configure Proxmox [Homelab 2.0] UPS proxmox setup (+ disable UPS beeping) [Homelab 2.0] Combine NPM reverse proxy && Pi-hole DNS for Secure, seamless app local access [Homelab 2.0] Cloudflare | Pangolin - Access your homelab from the Internet over CGNAT with help of the tunnels [Homelab 2.0] Replace Google Photos with Immich and Pangolin/CF tunnels [Homelab 2.0] Qbittorrent LXC with ProtonVPN and port forwarding enabled Visualize Qbittorrent metrics in the Grafana Visualize Unifi metrics in the Grafana Self-hosted Rustdesk over pangolin tunnels