Qbittorrent LXC with ProtonVPN and port forwarding enabled
Introduction
A simple guide for Qbitorrent with VPN (ProtonVPN) in the proxmox which allows for port forwarding and massively increase the downloads/uploads
All of this is obviously a guide for sharing Linux ISOs!
Why do we need VPN in torrenting?
- Privacy.
- ISPs sometimes throttle people using torrents (P2P)
To get around these and multiple other issues, we can just hide the traffic.
Why do we need port forwarding in torrenting?
Very simply put in torrenting (P2P), between the “two” parties sharing the data, at least one party has to have their ports open.
If no one has their ports open then, no one can connect to each other to seed/download.
Surprisingly, most people don’t or can’t have ports open. You can use this to your advantage and get better download/upload speeds. The upload speeds allow for better seed ratios in private trackers (where we share Linux ISOs)
With port forwarding enabled on your side you are becoming an active node, and you are increasing the number of peers you can communicate with with passive nodes.
If you have port forwarding enabled, then incoming connections can find your torrent node. Otherwise, the only connections made will be outbound ones.
What VPN to choose ?
If you want port forwarding feature in your VPN, there are actually not that many choices
The main VPN providers with port forwarding enabled
- airvpn
- Ivpn
- Proton VPN
- Private Internet Access
If you already have some other VPN service, maybe free nordVPN from revolut, you can use that as well otherwise I would stick to these.
Proton VPN ended up being my choice, but do your research and choose one you prefer.
2000 feet overview
I’ve checked several guides and videos on the topic, but they all seem a little overcomplicated or unclear to me.
I think the best setup for proxmox is using Qbitorrent LXC and installing WireGuard into that LXC.
Second-best option would be using docker and premade backed images with VPN and qbitorrent already setted up. Checkout these 1 2
You could also create dedicated LXC just for VPN, but that complicates things a lot, but it may be useful if you want to use VPN for some other service as well.
Installation
Qbitorrent LXC
To install qbitorrent we use proxmox community scripts
1
bash -c "$(curl -fsSL https://raw.githubusercontent.com/community-scripts/ProxmoxVE/main/ct/qbittorrent.sh)"
After that I would suggest using Trash Guides for qbitorrent and integrate it according to your setup.
Get a WireGuard config from Proton VPN
First we need to generate the WireGuard config.
For that visit the proton VPN site -> Downloads -> GNU/Linux
- Choose device name to your liking
- Select platform: Gnu/Linux
- Select VPN options: No filter
- Uncheck Moderate NAT
- Check NAT-PMP (Port Forwarding) and VPN Accelerator
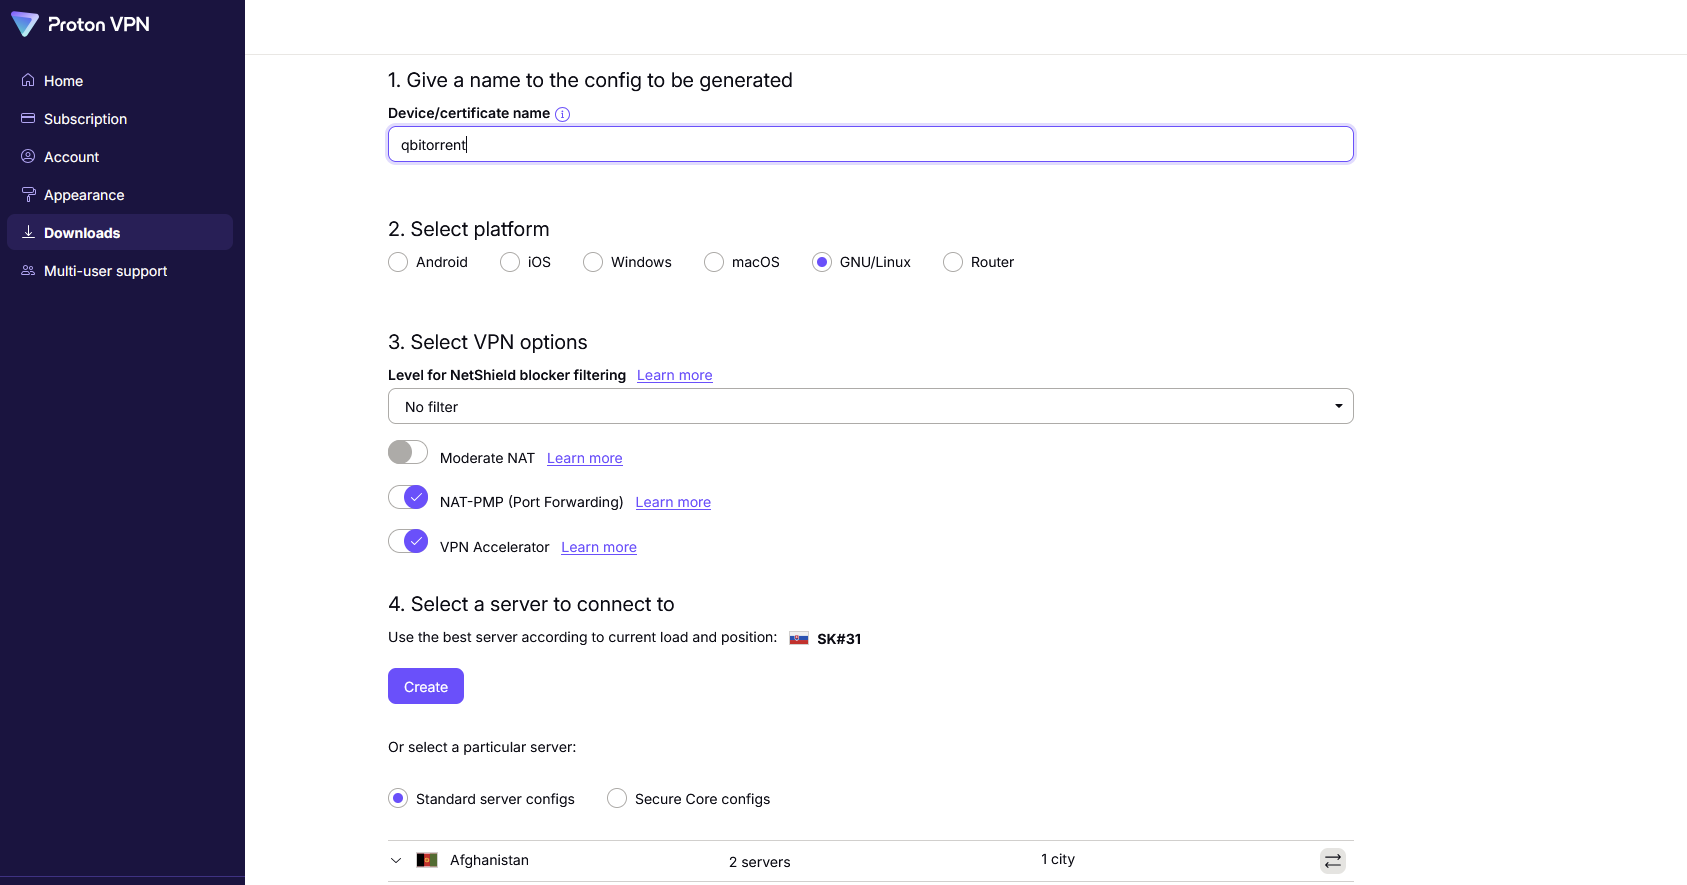
Copy/download the WireGuard config.
Install WireGuard on the qBittorrent LXC
In the qBittorrent LXC download the packages
1
apt install -y wireguard resolvconf natpmpc curl jq git
Add the WireGuard config
Paste your config into the WireGuard
1
vim /etc/wireguard/wg0.conf
1
2
3
4
5
6
7
8
9
10
11
12
13
14
15
16
17
[Interface]
# Key for torrent1
# Bouncing = 0
# NetShield = 1
# Moderate NAT = off
# NAT-PMP (Port Forwarding) = on
# VPN Accelerator = on
PrivateKey = xxxxxxxxxxxxxxxxxxxxxxxxxx
Address = 10.2.0.2/32
DNS = 10.2.0.1


[Peer]
# SK#35
PublicKey = xxxxxxxxxxxxxxxxxxxxxxxxxxxxxxxxx
AllowedIPs = 0.0.0.0/0, ::/0
Endpoint = 138.xxx.xx.1xx:51820
Start the wireguard
1
2
3
4
5
6
7
8
9
10
#check your IP before starting so we can compare public IPs
curl ifconfig.me


wg-quick up wg0
systemctl enable wg-quick@wg0
Test the connectivity
1
2
3
4
5
6
7
8
9
10
11
12
#check wireguard connection
wg show


#check the public IP again, it should differ
curl ifconfig.me


#check if port forwarding is enabled and what port we have
natpmpc -g 10.2.0.1 -a 1 0 tcp 60
It should looks like this
1
2
3
4
5
6
7
8
9
10
11
initnatpmp() returned 0 (SUCCESS)
using gateway : 10.2.0.1
sendpublicaddressrequest returned 2 (SUCCESS)
readnatpmpresponseorretry returned 0 (OK)
Public IP address : 138.199.xx.xxx
epoch = 467931
sendnewportmappingrequest returned 12 (SUCCESS)
readnatpmpresponseorretry returned 0 (OK)
Mapped public port 56657 protocol TCP to local port 0 liftime 60
epoch = 467931
closenatpmp() returned 0 (SUCCESS)
Configure QBittorrent
I’m just going to mention settings needed for this VPN pass-through setup, but keep your environment in mind and that, there are many more settings to play with.
Change network interface to WireGuard VPN
Go to Tools -> Options -> Advanced -> Network interface -> Choose wg0
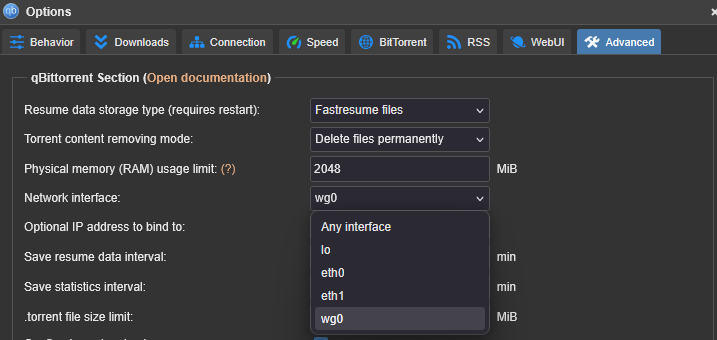
If you don’t see wg0, restart LXC so it’s picked up.
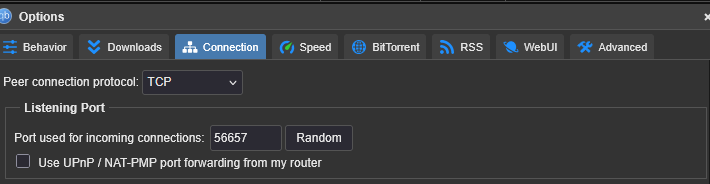
Disable UPnP / NAT-PMP
Go to Tools -> Options -> Connection -> Uncheck “Use UPnP / NAT-PMP port forwarding from my router”
Test if qBittorrent using VPN
To check if qBittorrent is correctly using VPN and not leaking of real IP, we can use ipleak.net
GO to ipleak.net -> Torrent Address detection -> Right click on the “This magnet link” and copy the link into Qbitorrent -> File -> Add torrent link
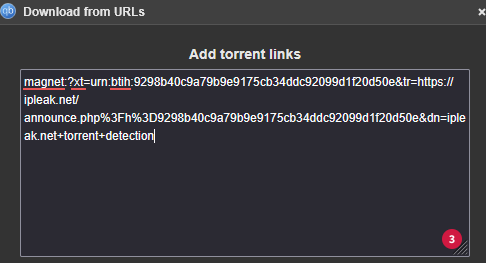
After a few seconds go back to ipleak.net -> And check what it detected. You should see the VPN IP address 
Port Renewal script
The last piece of the puzzle is port renewal script.
What’s that, and why do we need that?
ProtonVPN’s port forwarding requires a persistent loop to keep the port open. It’s the one we saw with command “natpmpc -g 10.2.0.1 -a 1 0 tcp 60” above.
ProtonVPN give’s 60s NAT-PMP leases, in which we get specific port open and after that it frees it up for someone else and give us a new port. If the qBittorrent client is not updated with this new port, we again became passive node without port being open.
We can get around this with the renewal script in which we create a loop that regularly syncs the listening qBittorrent port with current NAT-PMP forward port from the VPN. Because we ask for a new lease, while being the old one we should get the same port. But if for some reason we don’t get the same port (for example we restart the server while upgrading) so the lease won’t renew in the time, the script sync the new port with qbitorrent.
Change the IP, port, username, password according to your needs. I’ve set some defaults, but yours probably differs.
1
vim /usr/local/bin/proton-qbit-pmp.sh
1
2
3
4
5
6
7
8
9
10
11
12
13
14
15
16
17
18
19
20
21
22
23
24
25
#!/usr/bin/env bash
set -euo pipefail
WG="${WG_INTERFACE:-wg0}"
QH="${QBITTORRENT_HOST:-127.0.0.1}"
QP="${QBITTORRENT_PORT:-8090}"
QU="${QBITTORRENT_USERNAME:-admin}"
QW="${QBITTORRENT_PASSWORD:-adminadmin}"
G="${NATPMP_GATEWAY:-$(awk -F= '/^\s*DNS/{print $2}' /etc/wireguard/${WG}.conf 2>/dev/null | awk '{print $1}')}"


COOKIE=/run/qb-sid; LAST=""
login(){ curl -sS -c "$COOKIE" -X POST -d "username=$QU&password=$QW" "http://$QH:$QP/api/v2/auth/login" >/dev/null; }
set_port(){ curl -sS -b "$COOKIE" -d "json={\"listen_port\":$1,\"upnp\":false}" "http://$QH:$QP/api/v2/app/setPreferences" >/dev/null; }


while sleep 45; do
  OUT=$(natpmpc -g "${G:-10.2.0.1}" -a 1 0 tcp 60 2>/dev/null || true)
  PORT=$(grep -oE 'Mapped public port [0-9]+' <<<"$OUT" | awk '{print $4}')
  natpmpc -g "${G:-10.2.0.1}" -a 1 0 udp 60 >/dev/null 2>&1 || true
  [[ -n "$PORT" && "$PORT" != "$LAST" ]] || continue
  login || continue
  set_port "$PORT"
  echo "$(date) Proton NAT-PMP port -> qBittorrent: $PORT"
  LAST="$PORT"
done
Make the script executable
1
chmod +x /usr/local/bin/proton-qbit-pmp.sh
Systemd service
To keep the script persisent we need to create systemd service
1
2
3
4
5
6
7
8
9
10
11
12
13
14
15
16
# /etc/systemd/system/proton-qbit-pmp.service
[Unit]
Description=Proton NAT-PMP -> qBittorrent listen_port sync
After=network-online.target wg-quick@wg0.service
Wants=network-online.target


[Service]
Type=simple
ExecStart=/usr/local/bin/proton-qbit-pmp.sh
Restart=always
RestartSec=5


[Install]
WantedBy=multi-user.target
Reload daemon and start the service
1
2
systemctl daemon-reload
systemctl enable --now proton-qbit-pmp
Check the logs
You should see something simular after a few minutes
1
2
3
root@qbittorrent2:~# journalctl -u proton-qbit-pmp -f
Oct 06 10:21:36 qbittorrent2 systemd[1]: Started proton-qbit-pmp.service - Proton NAT-PMP -> qBittorrent listen_port sync.
Oct 06 10:22:21 qbittorrent2 proton-qbit-pmp.sh[625]: Mon Oct  6 10:22:21 AM CEST 2025 Proton NAT-PMP port -> qBittorrent: 56657
I should also mention this git project which I’ve found after I’ve finished, but I thought it’s kinda cool. Checkout Simon-CR git for Simon-CR/qbittorrent-wireguard-pmp
He is solving the same problem with similar, more robust script!
Other good guides/solutions
https://talhamangarah.com/blog/how-to-port-forward-with-proton-vpn-and-gluetun/
https://blog.evm9.dev/posts/00_prox_vpn/
https://www.reddit.com/r/ProtonVPN/comments/1fugw09/qbittorrent_with_protonvpn_and_port_forwarding/
Happy self‑hosting!
Check out other posts in the series
- Hardware/software choices/alternatives [Homelab 2.0] Setting up Hardware && BIOS [Homelab 2.0] Install && Configure Proxmox [Homelab 2.0] UPS proxmox setup (+ disable UPS beeping) [Homelab 2.0] Combine NPM reverse proxy && Pi-hole DNS for Secure, seamless app local access [Homelab 2.0] Cloudflare | Pangolin - Access your homelab from the Internet over CGNAT with help of the tunnels [Homelab 2.0] Replace Google Photos with Immich and Pangolin/CF tunnels [Homelab 2.0] Qbittorrent LXC with ProtonVPN and port forwarding enabled