Replace Google Photos with Immich and Pangolin/CF tunnels [Homelab 2.0]
Introduction
If you would like to degoogle yourself a little, or you’ve just run out of cloud space, but you still has plenty of free Gb of storage in your homelab, don’t think twice I’ve got solution for you!
Immich introduction
Immich is selfhosted Google Photos alternative. It’s easy back up, organize, and manage your photos on your own serve.
The goal of devs behind the project give great introduction on what are the goals and reasons behind the project. You can check it out here
It’s by far the most popular of all selfhosted photo photo/gallery apps with over 63k to this day!!!
Check out the comparison
Immich Pros
- Open source, offering full transparency and the ability to audit/modify the code
- Self-hosted for complete data control and privacy (no google spying on ya)
- free of cost (aside from running on your HW)
- many great features (backups, face recognition, duplicates detection…) and more coming (checkout their (roadmap)[https://immich.app/roadmap])
- can be easily pair with tunnels (Cloud flare, pangolin)
The last one is my favorite. I can easily get around CGNAT in my home network and the immich app is safe behind token authorization! (I’ll show you how to do it in this guide)
Immich Cons
- requires more expertise than just having a google photos
- still misses few features that google photos provides (but nothing major imo)
- bigger risk of losing your data (you should always do (3-2-1 rule)[https://www.veeam.com/blog/321-backup-rule.html])
- possible bugs (let’s be fear google had little more time and money to fix stuff)
Immich setup
For most up-to-date info follow immich docs
Because this homelab 2.0 series is build upon proxmox with LXC containers, we are again going to istall immich with the help of proxmox community scripts.
At least I would want to say so, but immich is natively run on docker. We could probably get around that, but running docker in LXC is fine for me as well.
Install LXC with docker
Let’s install debian with docker with community script from here
Go at least with (and much more if possible). Immich official requirements
- 2 CPU (4 would be better)
- 4Gb RAM (6 would be better)
- unprivileged
- no portainer needed
Install installation
1
2
3
4
5
6
7
8
9
10
11
12
13
14
15
16
17
18
19
20
21
22
23
24
25
26
27
28
29
30
31
32
33
34
35
36
37
38
39
40
41
#create directories and download the files
mkdir ./immich-app
cd ./immich-app


wget -O docker-compose.yml https://github.com/immich-app/immich/releases/latest/download/docker-compose.yml
wget -O .env https://github.com/immich-app/immich/releases/latest/download/example.env


#edit the .env file
vim /root/immich-app/.env


# You can find documentation for all the supported env variables at https://immich.app/docs/install/environment-variables


# The location where your uploaded files are stored
UPLOAD_LOCATION=/library
# The location where your database files are stored
DB_DATA_LOCATION=./postgres


# To set a timezone, uncomment the next line and change Etc/UTC to a TZ identifier from this list: https://en.wikipedia.org/wiki/List_of_tz_database_time_zones#List
# TZ=Etc/UTC


# The Immich version to use. You can pin this to a specific version like "v1.71.0"
IMMICH_VERSION=release


# Connection secret for postgres. You should change it to a random password
# Please use only the characters `A-Za-z0-9`, without special characters or spaces
DB_PASSWORD=postgres


# The values below this line do not need to be changed
###################################################################################
DB_USERNAME=postgres
DB_DATABASE_NAME=immich
Don’t start the containers yet, first we need to mount the folder with all the photos/videos.
Mount the storage folder
Proxmox LXC way (my setup)
From proxmox bash console we can just change LXC config and add mountpoints like so
1
vim /etc/pve/lxc/137.conf  #change the lxc number according to your LXC number (you can see it in the GUI right to lxc name)
1
2
3
4
5
6
7
8
9
10
11
12
13
arch: amd64
cores: 8
features: keyctl=1,nesting=1
hostname: immich
memory: 6144
mp0: /pool-01/immich,mp=/library        #this is the added mount point line
net0: name=eth0,bridge=vmbr0,gw=10.1.1.1,hwaddr=BC:24:11:8B:A4:59,ip=10.1.1.36/24,type=veth
onboot: 1
ostype: debian
rootfs: pool-fast:subvol-131-disk-0,size=15G
swap: 512
tags: 10.1.1.36;172.17.0.1;172.18.0.1
unprivileged: 1
You can start containers now
1
docker compose up -d
Check the URL if immich is working correctly
1
http://<machine-ip-address>:2283
Immich Configuration
Database Backups
By default, database backups are created every day at 2:00 AM and stored under UPLOAD_LOCATION/backups (which we have declared in .env file above).
The database backup is necessary for full immich recovery in a case of failure (you would not lose your photos, just app would not work)
For all the details about backups/restores checkout immich docs
I also take daily diff proxmox snapshot backups, so these database dumps are also protected that way.
Hardware transcoding [OPTIONAL]
If you would like to add a little more juice to immich so It can fully take advantage of AI features, you can add external GPU.
Immich is going to work just fine without that, but it’s useful to do so if you already have GPU in the server (like myself)
I’m not going to provide you with the tutorial on how to integrate GPU into your LXC containers, for that you can check out Gim’s Garage video
Edit lxc config
1
vim /etc/pve/lxc/137.conf  #change the lxc number according to your LXC number (you can see it in the GUI right to lxc name)
1
2
3
4
5
6
7
8
9
10
11
12
13
14
15
16
17
18
19
20
21
22
arch: amd64
cores: 8
features: keyctl=1,nesting=1
hostname: immich
memory: 6144


#add these 2 lines depending in your GPU info
dev0: /dev/dri/card0,gid=44
dev1: /dev/dri/renderD128,gid=104


mp0: /pool-01/immich,mp=/library
net0: name=eth0,bridge=vmbr0,gw=10.1.1.1,hwaddr=BC:24:11:8B:A4:59,ip=10.1.1.36/24,type=veth
onboot: 1
ostype: debian
rootfs: pool-fast:subvol-131-disk-0,size=15G
swap: 512
tags: 10.1.1.36;172.17.0.1;172.18.0.1
unprivileged: 1
Edit immich yaml files
In the folder where you have immich docker-compose.yaml create new yaml file hwaccel.transcoding.yml. The template for the file can be found in their docs.
What it does, it mount’s /dev/dri devices (which we mounted in LXC from main host to /dev/dri) on /dev/dri devices in docker
1
vim hwaccel.transcoding.yml
1
2
3
4
5
6
7
8
9
10
11
12
13
14
15
16
17
18
19
20
21
22
23
24
25
26
27
28
29
30
31
32
33
34
35
36
37
38
39
40
41
42
43
44
45
46
47
48
49
50
51
52
53
54
55
56
57
58
59
60
61
62
63
# Configurations for hardware-accelerated transcoding


# If using Unraid or another platform that doesn't allow multiple Compose files,
# you can inline the config for a backend by copying its contents
# into the immich-microservices service in the docker-compose.yml file.


# See https://immich.app/docs/features/hardware-transcoding for more info on using hardware transcoding.


services:
  cpu: {}


  nvenc:
    deploy:
      resources:
        reservations:
          devices:
            - driver: nvidia
              count: 1
              capabilities:
                - gpu
                - compute
                - video


  quicksync:
    devices:
      - /dev/dri:/dev/dri                  #because I've intel GPU I'll add line here mounting /dev/dri devices on /dev/dri devices in docker


  rkmpp:
    security_opt: # enables full access to /sys and /proc, still far better than privileged: true
      - systempaths=unconfined
      - apparmor=unconfined
    group_add:
      - video
    devices:
      - /dev/rga:/dev/rga
      - /dev/dri:/dev/dri
      - /dev/dma_heap:/dev/dma_heap
      - /dev/mpp_service:/dev/mpp_service
      #- /dev/mali0:/dev/mali0 # only required to enable OpenCL-accelerated HDR -> SDR tonemapping
    volumes:
      #- /etc/OpenCL:/etc/OpenCL:ro # only required to enable OpenCL-accelerated HDR -> SDR tonemapping
      #- /usr/lib/aarch64-linux-gnu/libmali.so.1:/usr/lib/aarch64-linux-gnu/libmali.so.1:ro # only required to enable OpenCL-accelerated HDR -> SDR tonemapping


  vaapi:
    devices:
      - /dev/dri:/dev/dri


  vaapi-wsl: # use this for VAAPI if you're running Immich in WSL2
    devices:
      - /dev/dri:/dev/dri
      - /dev/dxg:/dev/dxg
    volumes:
      - /usr/lib/wsl:/usr/lib/wsl
    environment:
      - LIBVA_DRIVER_NAME=d3d12
Now eddit main docker-compose.yaml and in the services section under image add “extends” category with “file” and “service” as shown down bellow
1
vim docker-compose.yml
1
2
3
4
5
6
7
8
9
10
11
12
13
14
15
16
17
18
19
name: immich


services:
  immich-server:
    container_name: immich_server
    image: ghcr.io/immich-app/immich-server:${IMMICH_VERSION:-release}
    extends:
       file: hwaccel.transcoding.yml
       service: quicksync # set to one of [nvenc, quicksync, rkmpp, vaapi, vaapi-wsl] for accelerated transcoding
    volumes:
      # Do not edit the next line. If you want to change the media storage location on your system, edit the value of UPLOAD_LOCATION in the .env file
      - ${UPLOAD_LOCATION}:/usr/src/app/upload
      - /etc/localtime:/etc/localtime:ro
    env_file:
      - .env
.
.
.
Restart containers
1
docker compose down && docker compose up -d
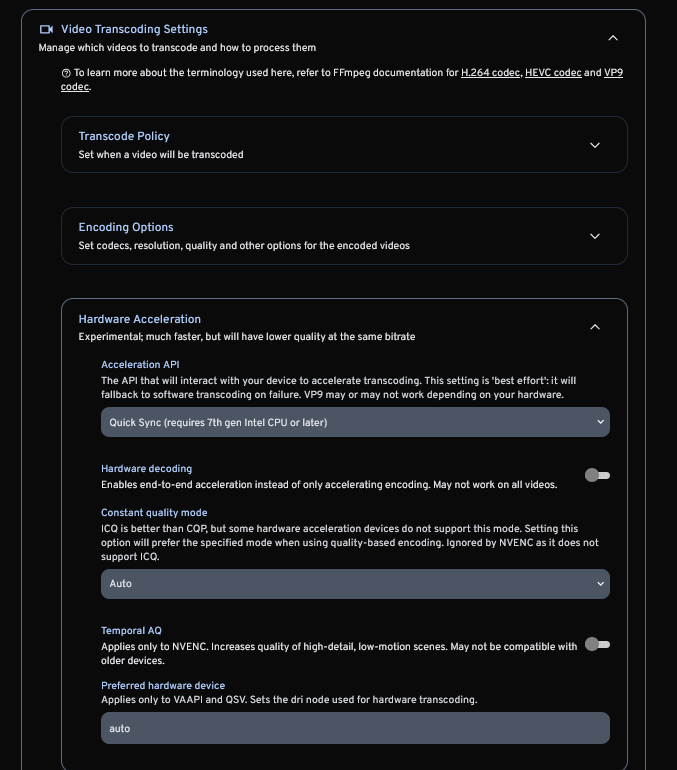
In the Immich app settings go to Administration -> Video Transcoding Settings
I’ve only changed the Acceleration API to “Quick Sync” (because I’m using intel GPU, for nvidia choose NVENC etc..) and I’ve left everything else default, but if you know what you are doing you can fiddle with that.
Android/IoS app usage
For app usage you can check out post-install guide
Connect your immich instance over tunnel
If you want to seamlessly connect to your immich over internet (not only your local network) you have few choices
(A) create public DNS, point to your server, portfoward etc…
- I don’t think this is safe as you are making your immich instance publicly available to all the internet, which is OK with some apps but definitely not my precious dog photos!!
- second main reason I won’t go with this route is that I don’t have static public IP and I’m behind CGNAT so I can’t really do it at all.
(B) Cloudflare tunnel
- This is great option, because app is only available to you! (with how Cloudflare tunnels with auth works)
- you can easily get around CGNAT.
- setup is very easy as well! I’ll show down bellow.
How to CF tunnel + immich
Great videos on this topic from Thomas Wilde 1 2 Also great article on how to integrate SSO/oAuth with immich
My tldr
- go to Cloudflare zero trust website -> Network -> Tunnels -> Create tunnel Create tunnel according to your preference, either run in the VM where immich is, or run it in special own LXC, you can easily set up it up with proxmox community scripts
- In tunnel -> public hostname -> point the tunnel to immich
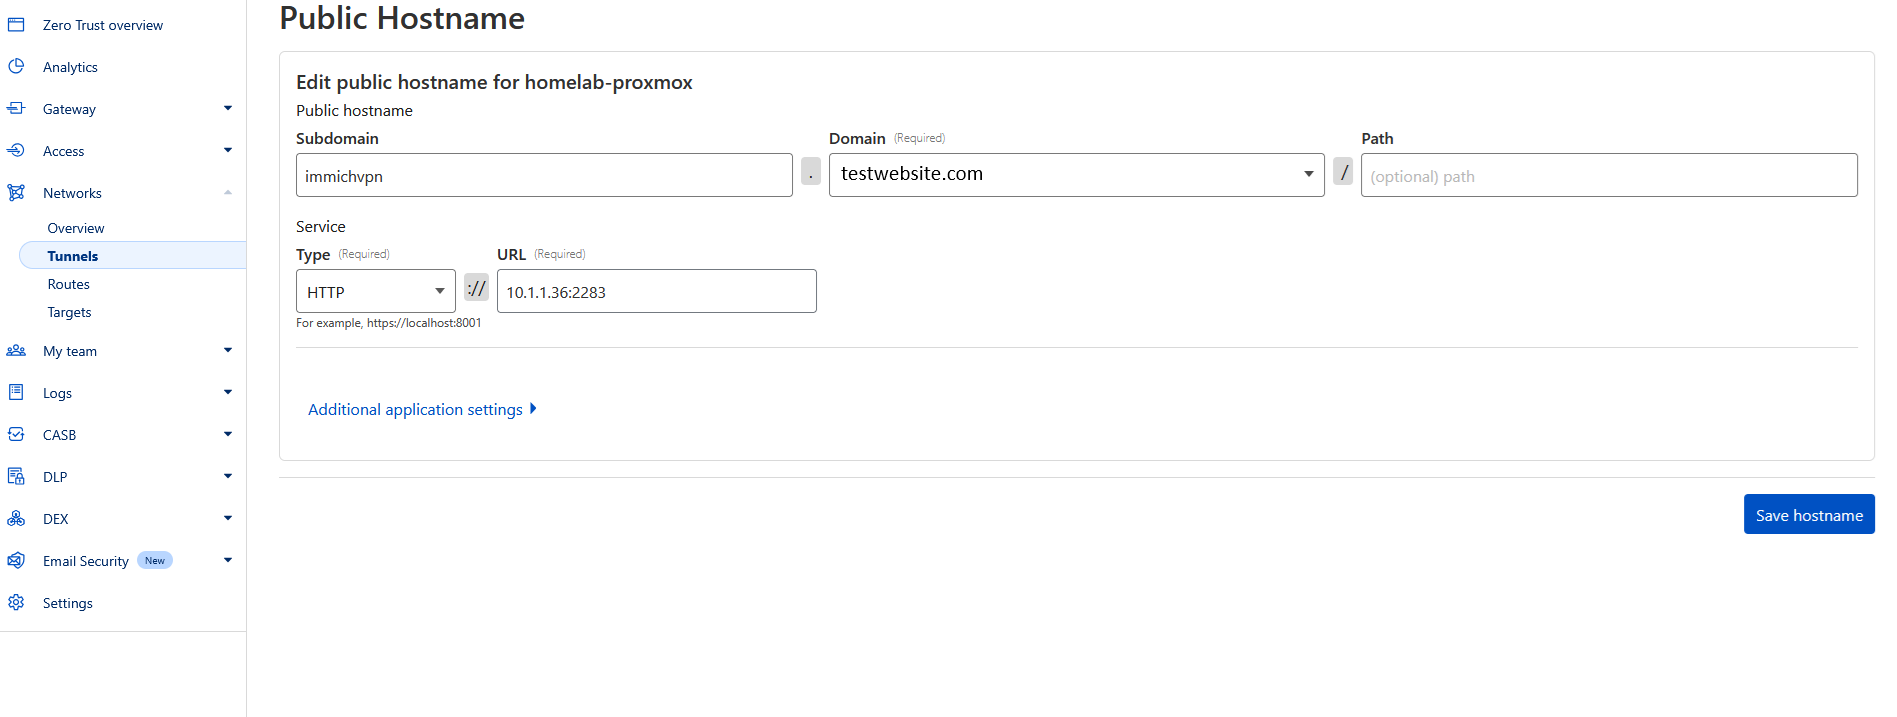
Few notes:
- No additional http settings needed.
- I’ve named immich “immichvpn”, I’ll later use regex to make this host not available for everyone with that “tag”
- Change URL to “localhost:2283” if running tunnel on the same LXC/VM where immich is installed
- Go to Zero trust CF website -> Access -> Application -> Add application
- As mentioned above I’ll use regex to match all my tunnels which have “VPN” tag in the name, so you must authenticate to be available to access them
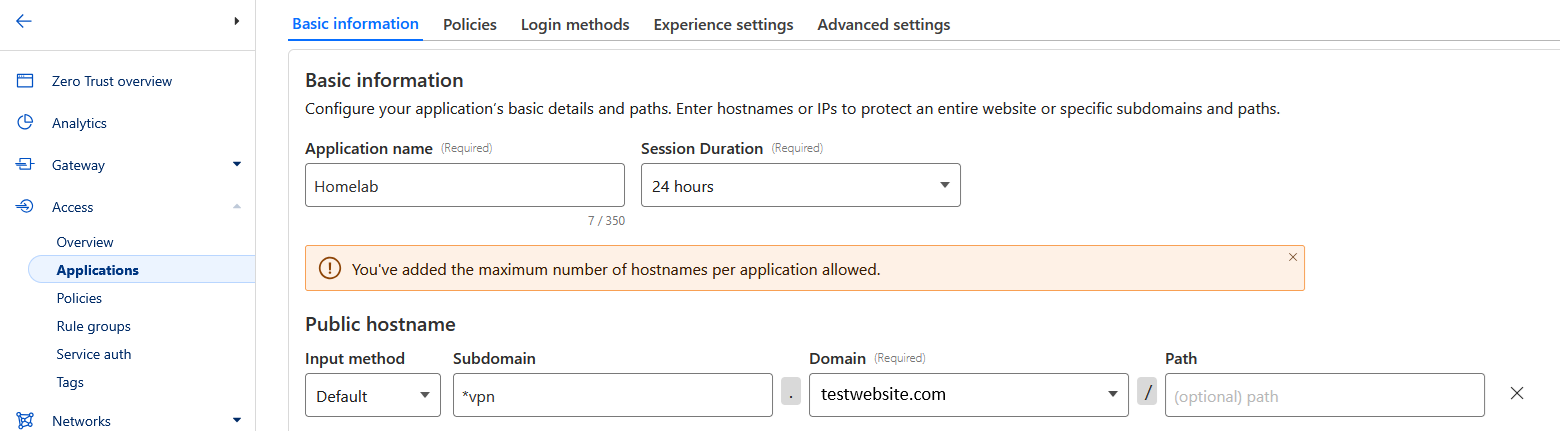
- As mentioned above I’ll use regex to match all my tunnels which have “VPN” tag in the name, so you must authenticate to be available to access them
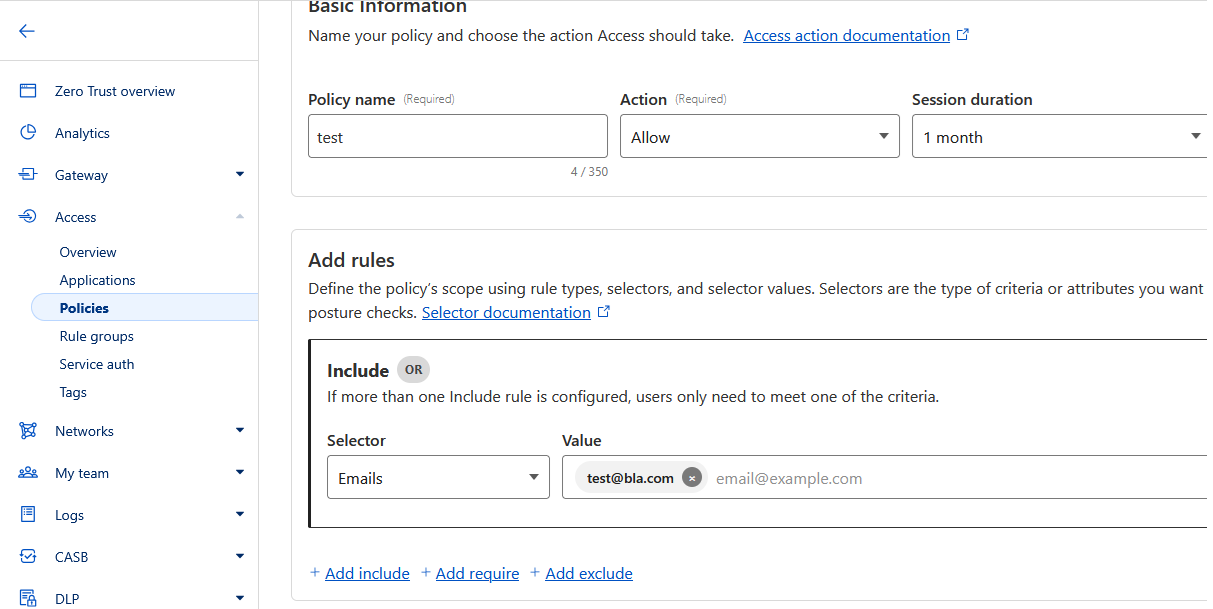
- Add allow policy
- Action: Allow
- Session duration: 1 month (you won’t have to reauthenticate to apps that often)
- Add Include -> Emails: Type in your email and save
You are now capable of connecting to your immich over CF tunnel with authentication over email! But this is not practical (or even possible i think) when using immich mobile app, so we need to add a few things or you will get error “Server is not reachable”.
How to CF tunnel + immich mobile app
We will continue on where we left off after creating “Allow policy”
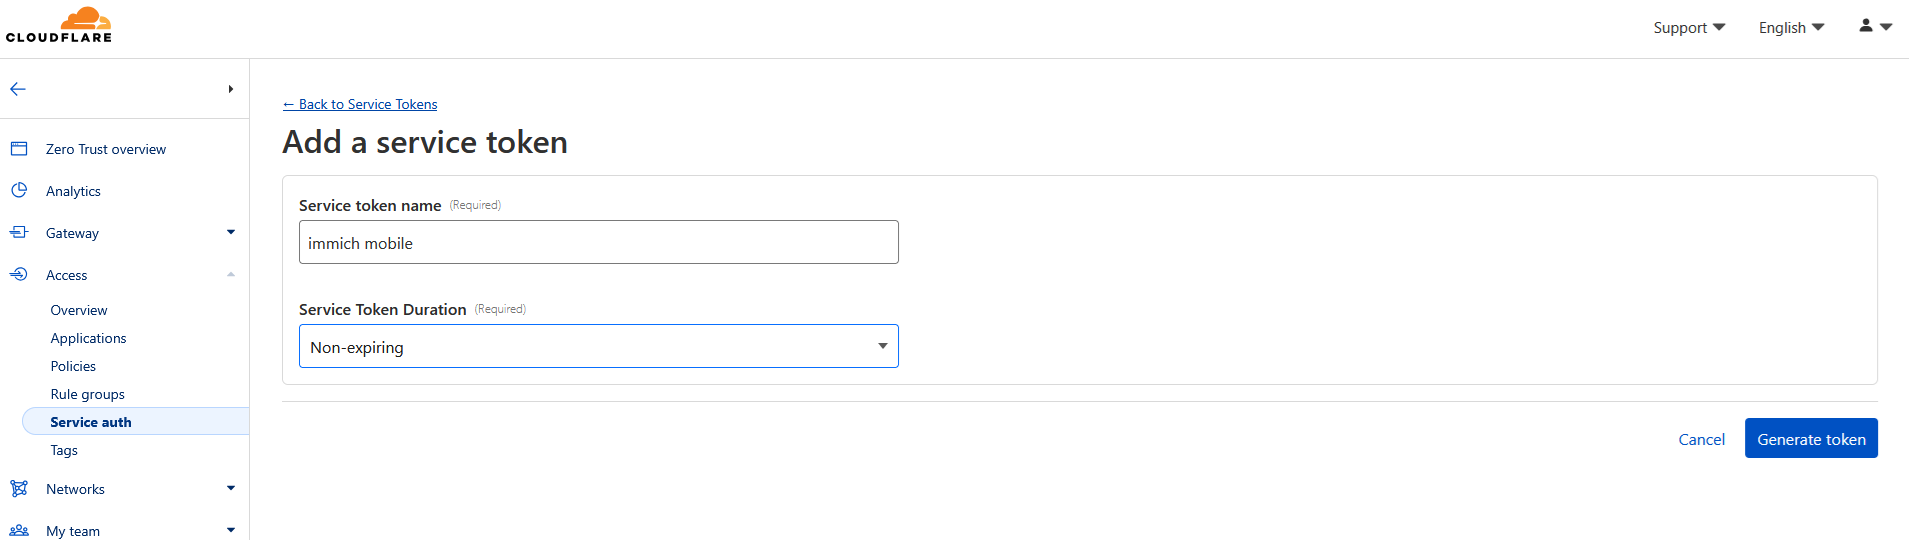
- Go to Zero trust CF website -> Access -> Service auth -> Create Service token
- Name: Immich mobile
- Service Token Duration: Non-expiring (it’s a good practice to rotate keys every now and then, I just don’t like the key to be automatically expired when I’m out somewhere and I need the access)
- Service Token Duration: Non-expiring (it’s a good practice to rotate keys every now and then, I just don’t like the key to be automatically expired when I’m out somewhere and I need the access)
- Copy Header and Client ID (CF-Access-Client-Id: xxxxxxxxxxxxxxxxxxx.access) to somewhere safe, because after hitting save you won’t be able to see it again
- Copy Header and Client secret (CF-Access-Client-Secret: xxxxxxxxxxxxxxxxxxxxxxxxxxxxxxxxxxxxxxxxxxxxxxxx) to somewhere safe, because after hitting save you won’t be able to see it again
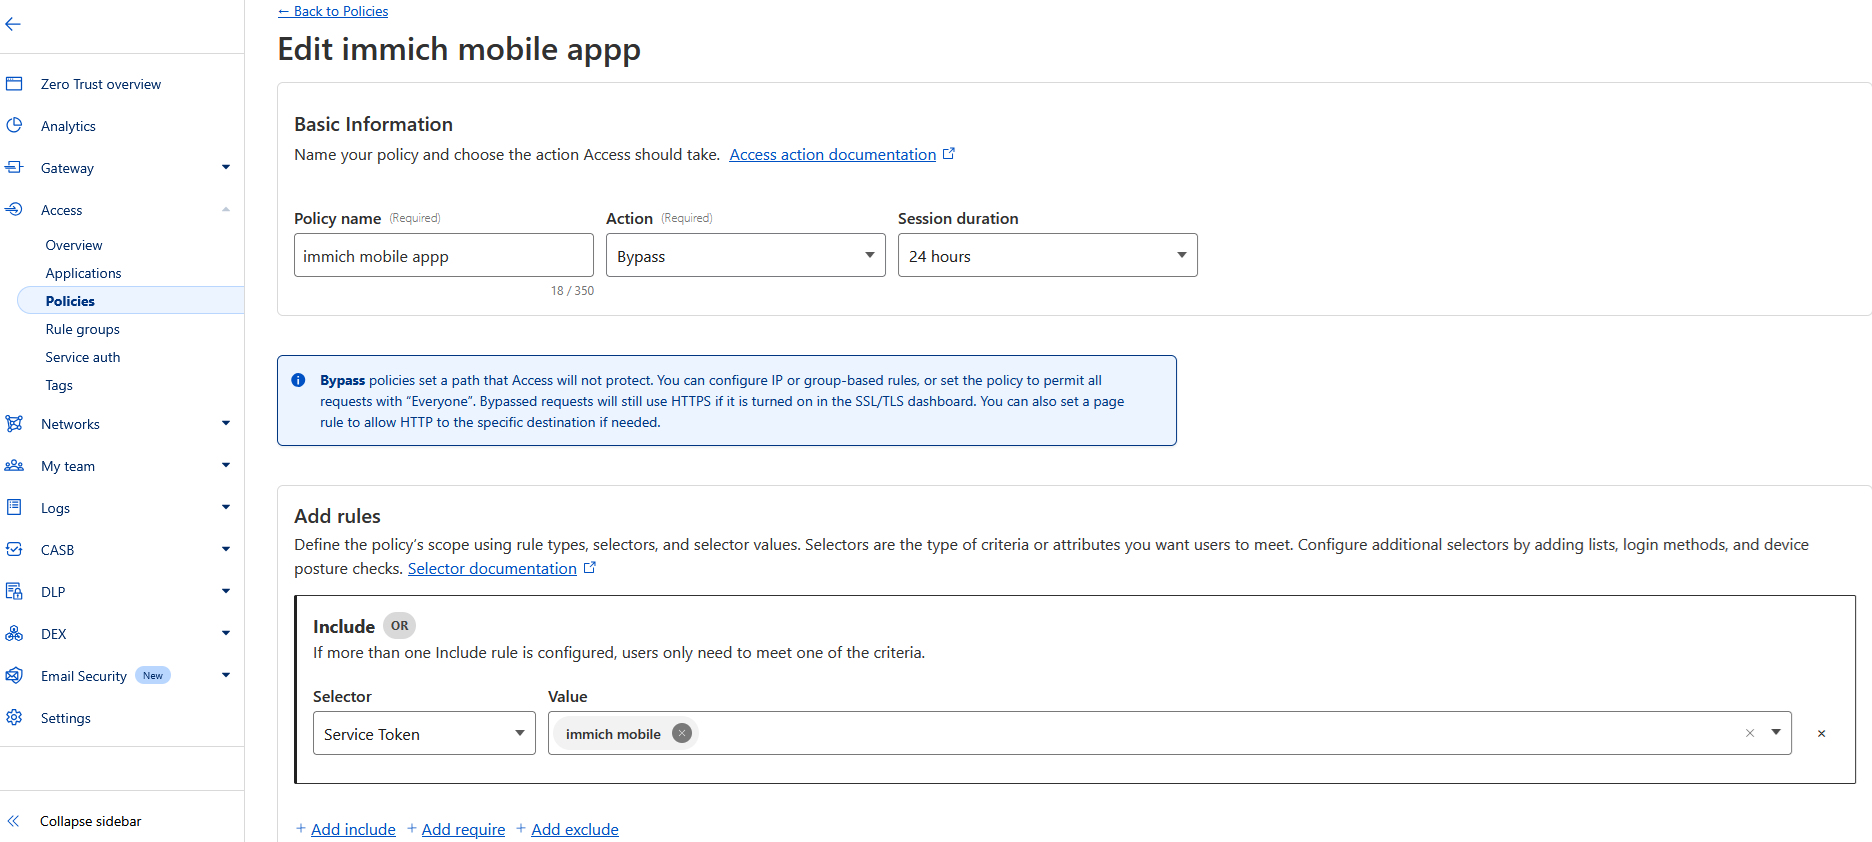
- Go to Zero trust CF website -> Access -> Policies -> Add a policy (new one)
- Name: Immich mobile app
- Action: Bypass
- Session duration: 24 hours (this will be done automatically so I don’t mind)
- Add Rules -> Include
- Selector: Service Token
- Value: immich mobile (Which we’ve created previously)
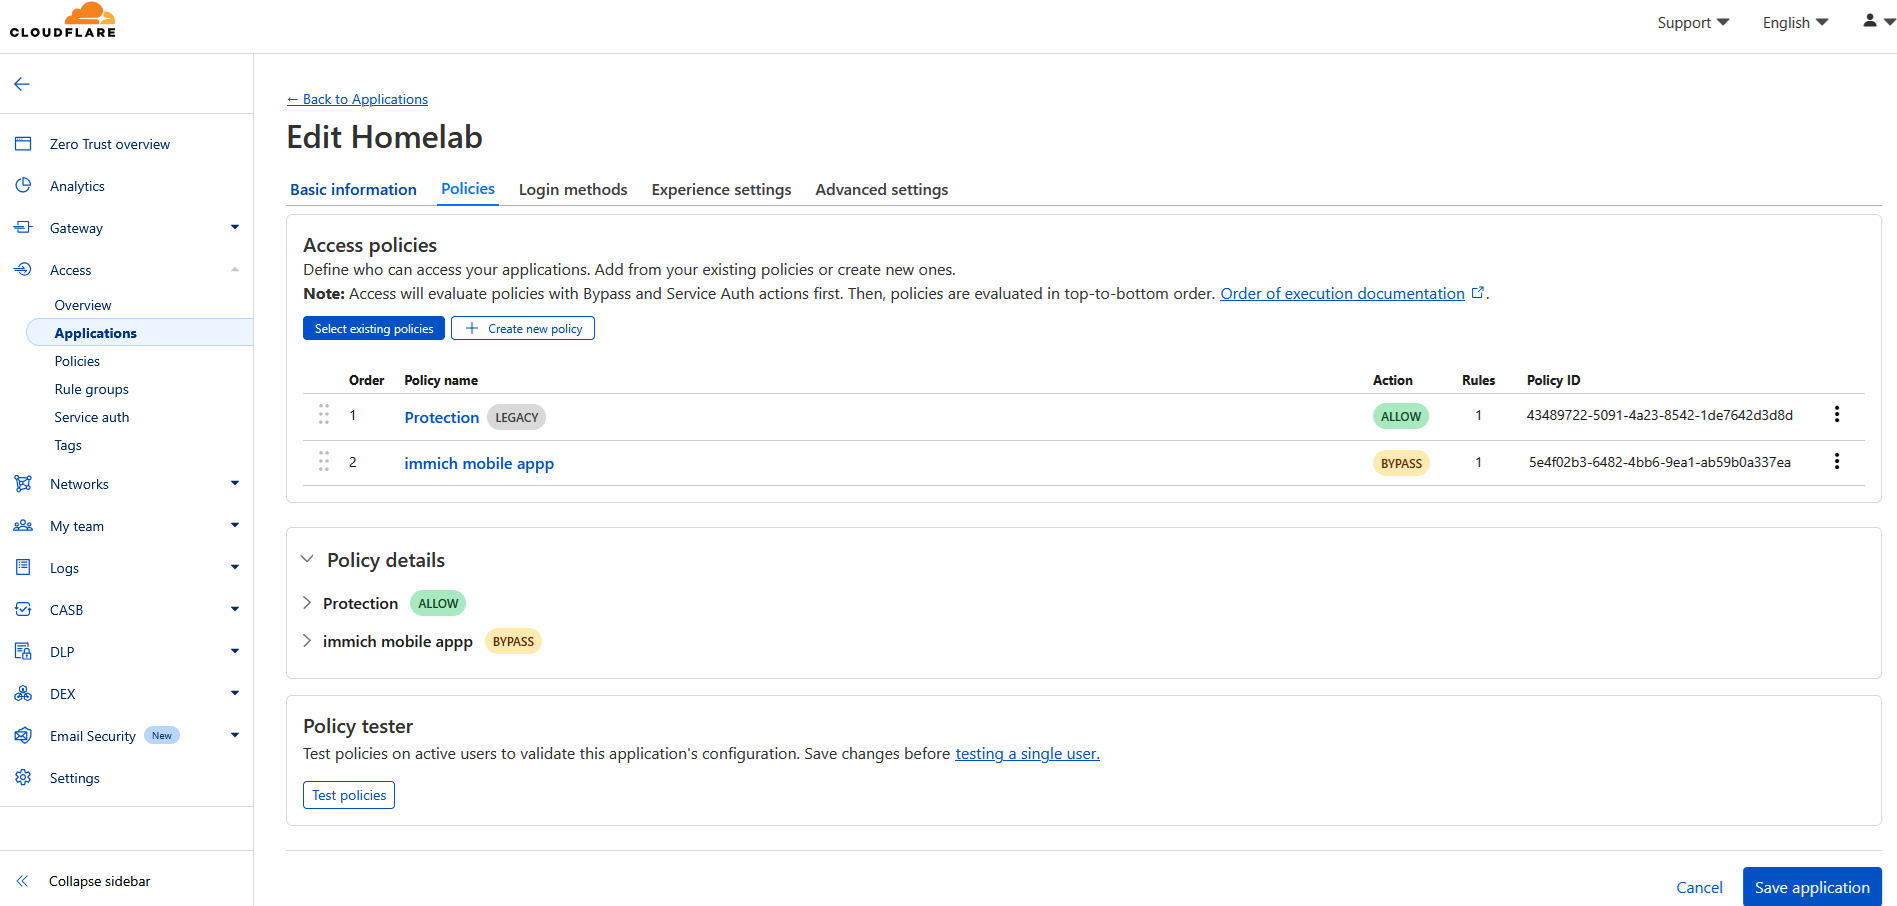
- Go to Zero trust CF website -> Access -> Applications -> Select our app where immich is running -> Edit policies -> -> Select existing policies -> And select newly created “Immich mobile app” -> save
Go to immich mobile app -> Settings -> Advanced -> Custom proxy headers -> Add new header with + icon
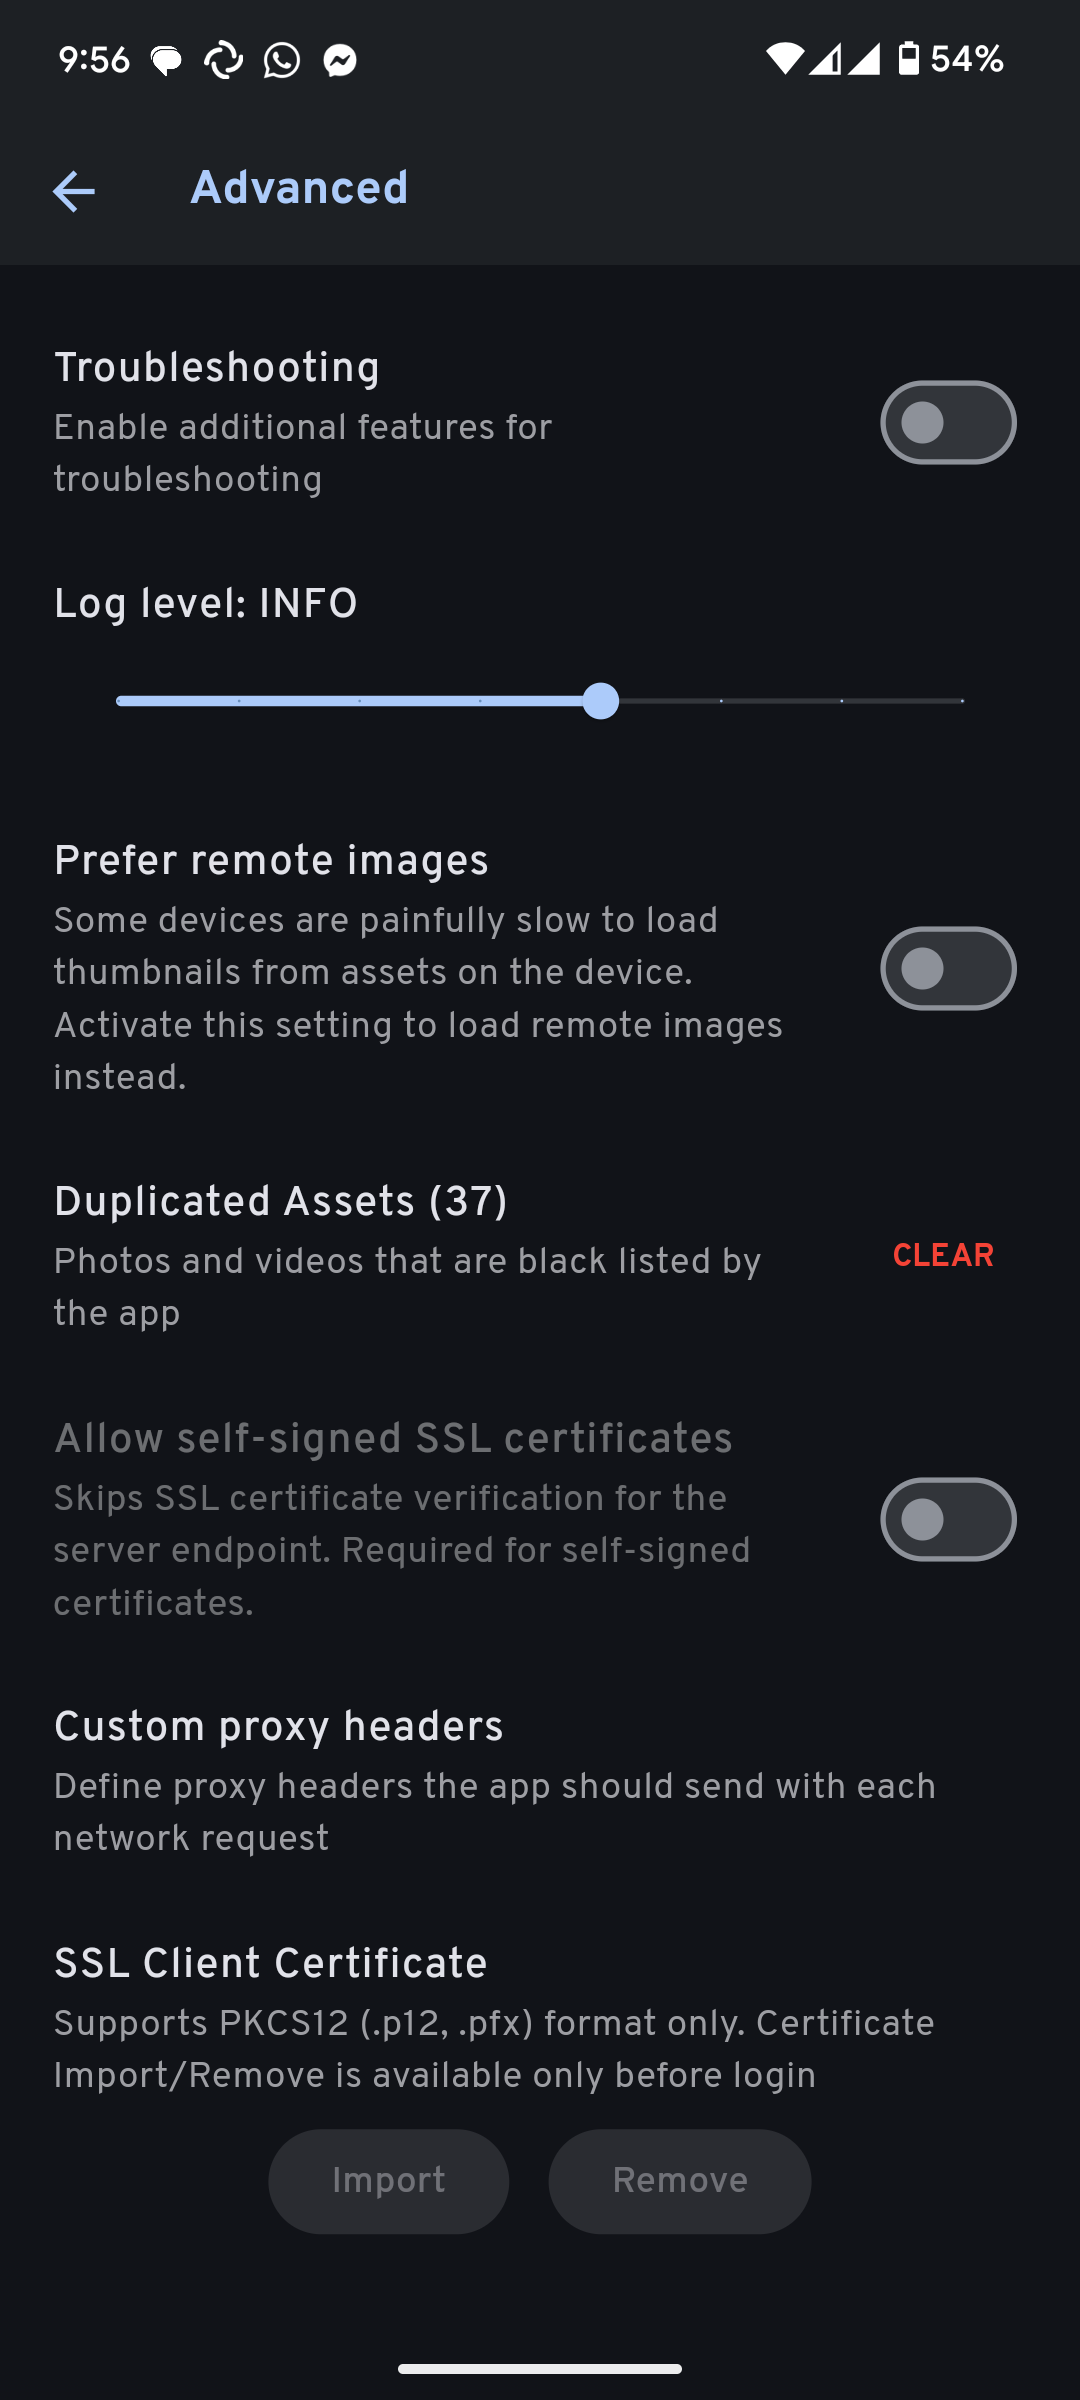
- 1 Header name: CF-Access-Client-Id
- 1 Header Value: xxxxxxxxxxxxxxxxxxx.access
- 2 Header name: CF-Access-Client-Secret
- 2 Header Value: xxxxxxxxxxxxxxxxxxxxxxxxxxxxxxxxxxxxxxxxxxxxxxxx
Like so (example) 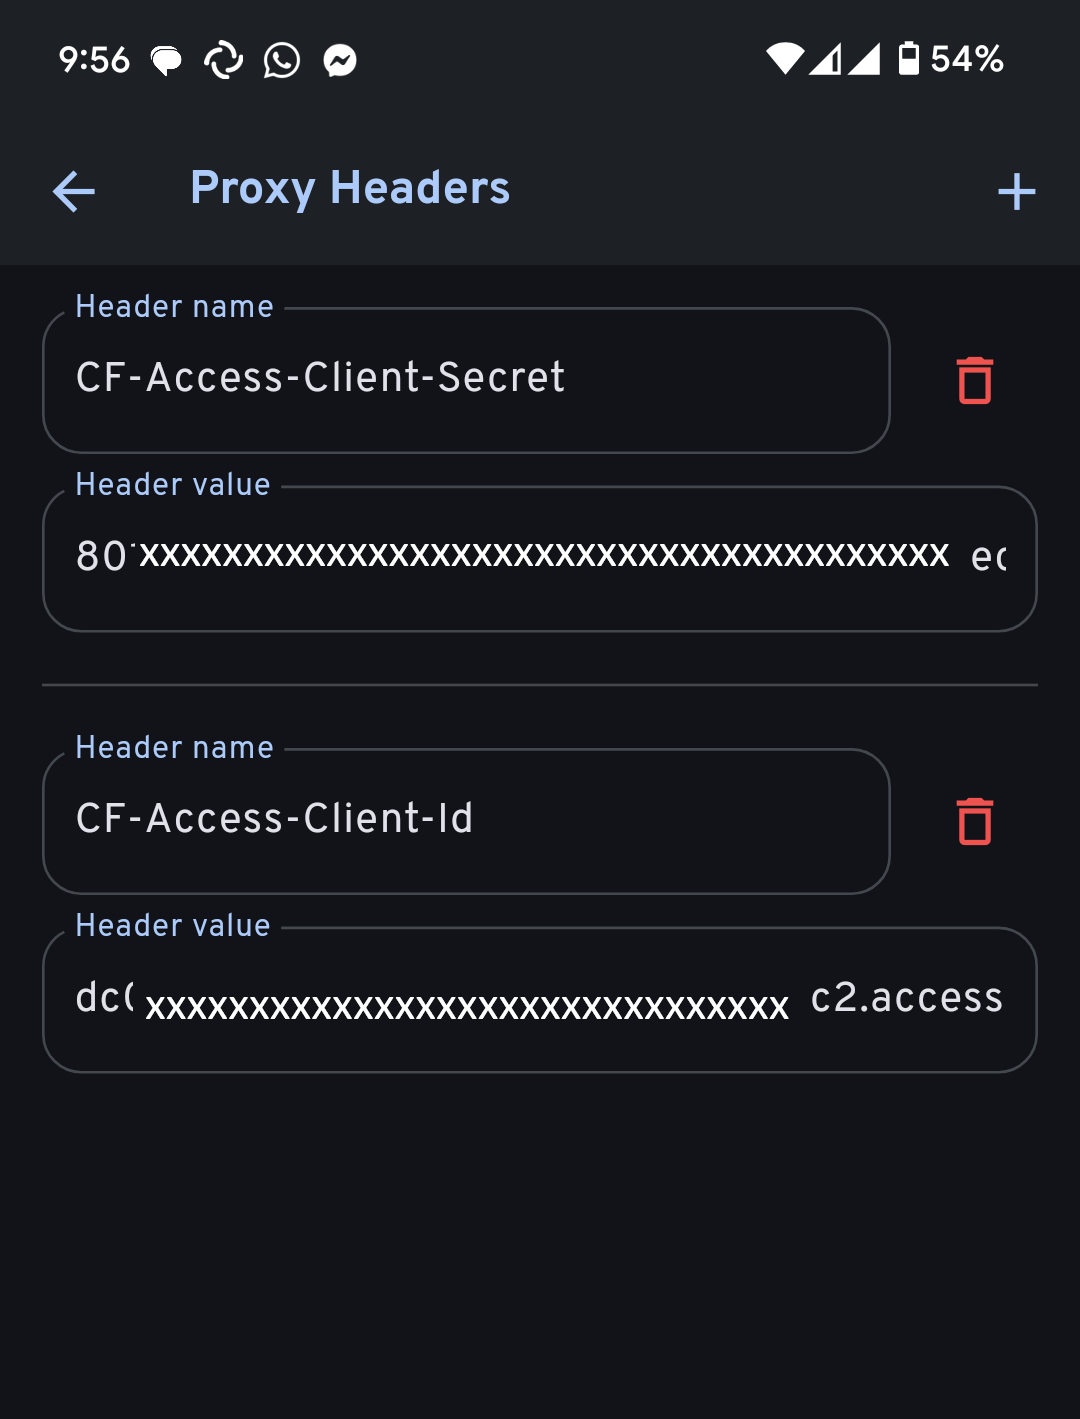
You should now be able to login to your immich app!!
* (C) Pangolin tunnel
Recently I’ve started using pangolin more and more and I’ve written post on how to set up pangolin tunnel, you can check that out here
The setup is pretty much the same as with the Cloudflare tunnel. The only difference is in a way we are going to generate CF-Access-Client-Id && CF-Access-Client-Secret
In version 1.2 pangolin introduced Access Token in Headers feature in shareable link, which allow us easily integrate tunnel with apps like immich. Source
How to Pangolin tunnel + immich
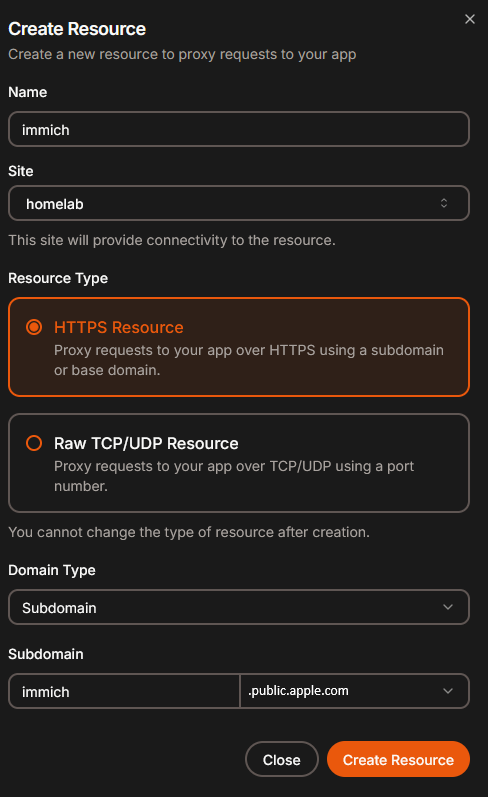
- Go to your pangolin administration panel -> Resources -> Add resource
- Name: immich
- Site: Choose your site
- Resource type: HTTPS Resource
- Domain Type: Subdomain
Subdomain: immich public.apple.com (or whatever you like)
- Immich Resource -> Connectivity -> Target Configuration
- Method: HTTP
- IP: Point this to your immich IP address
- Port: 2283 (default immich port)
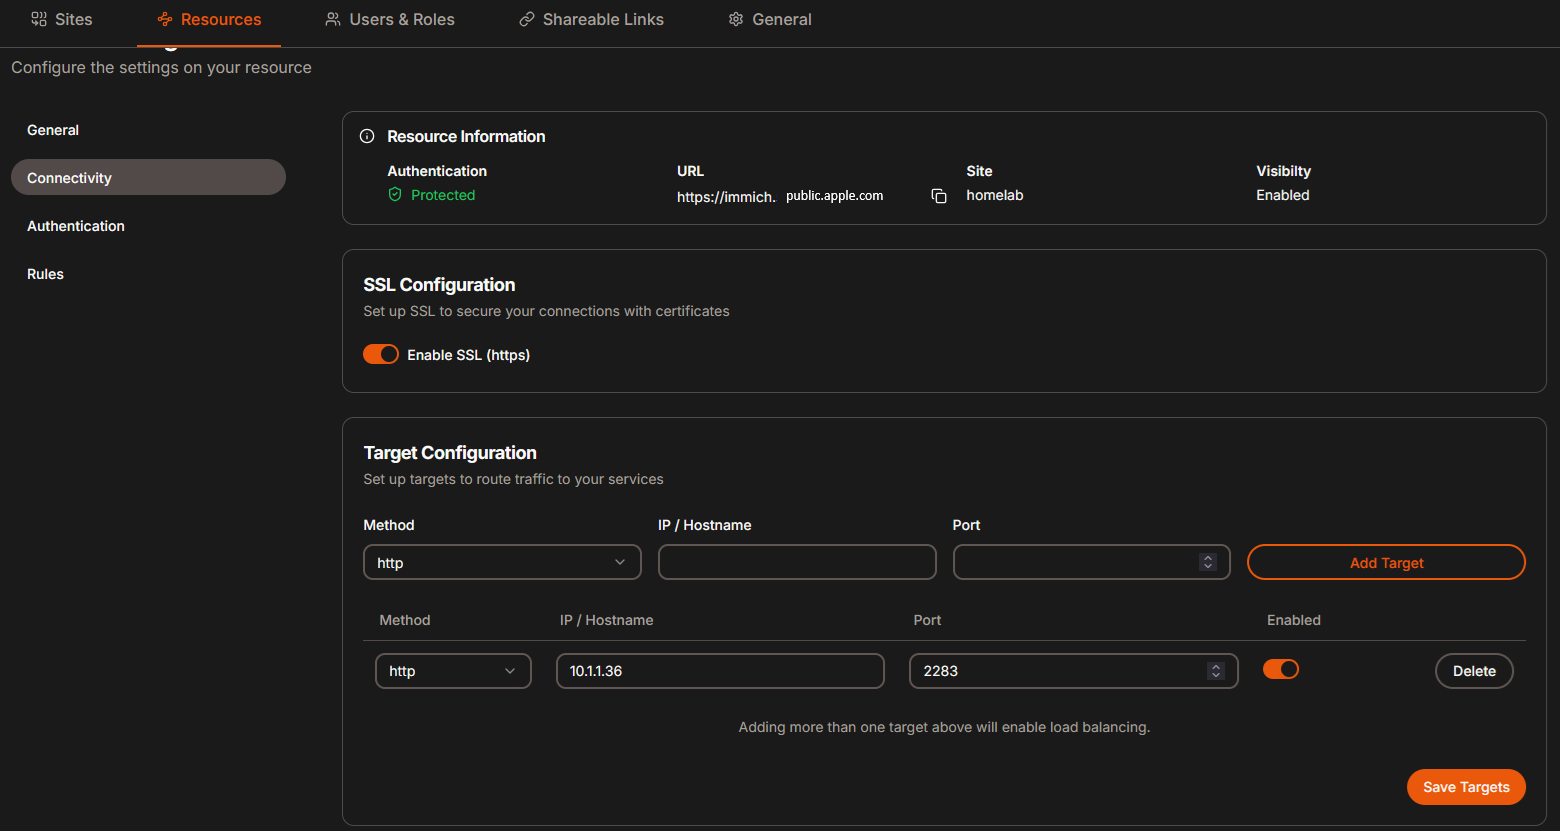
Make sure this link is protected and cannot just be freely accessed
- Immich resource -> Authentication -> Authentication method
- Add password
- Save
Now we need to create sharable link so we can obtain Access Tokens.
- Immich dashboard -> Sharable links -> Create Share link
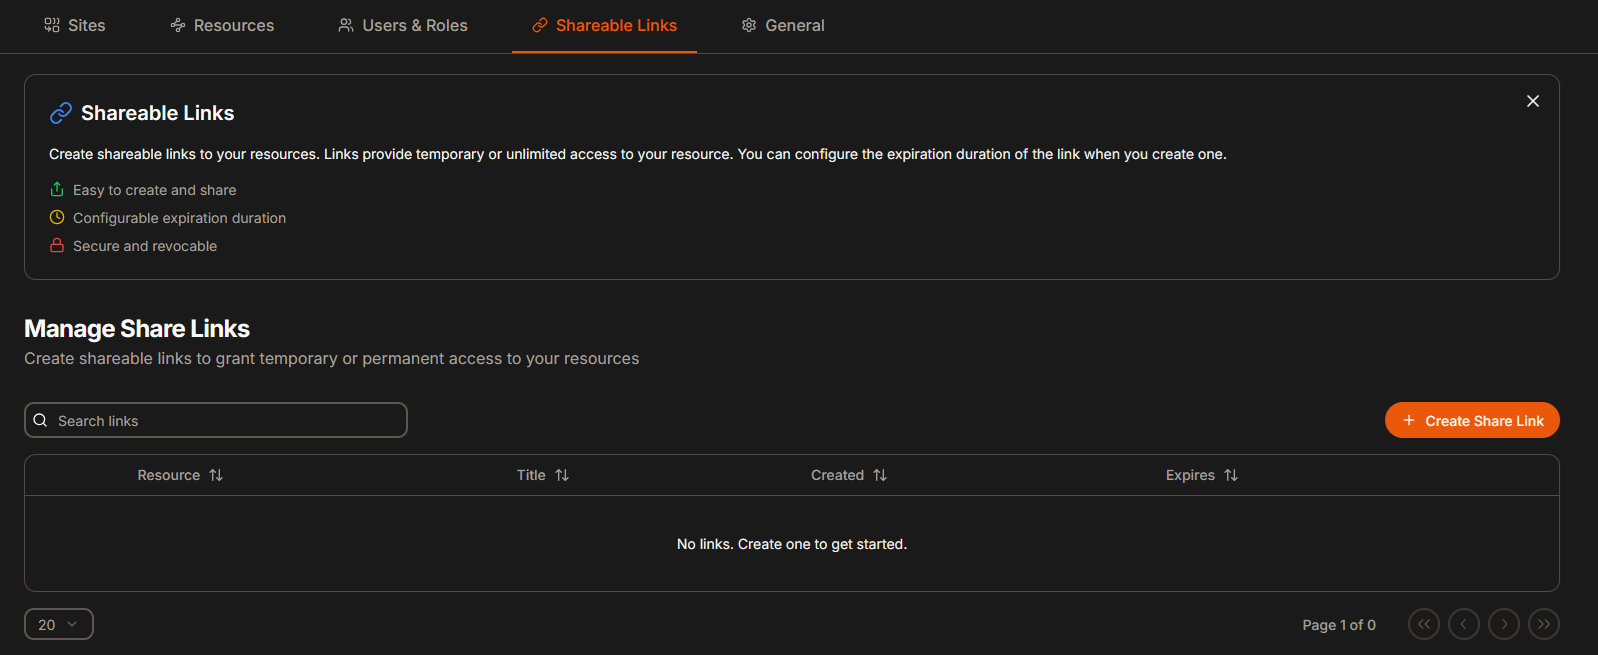
- Resource: Immich
- Title: Immich
- Expire in: Check never expire
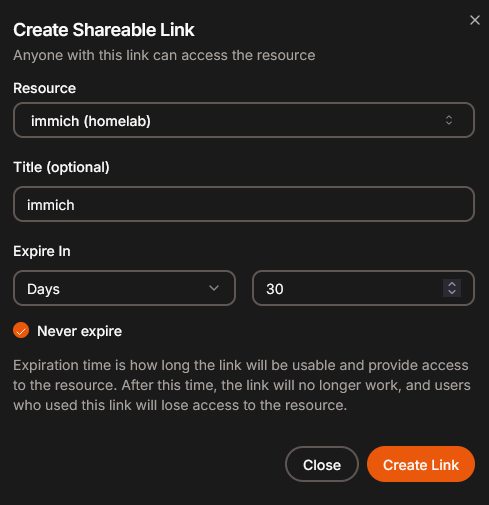
- Expire in: Check never expire
- Click Create link
- Roll out “See Access Token Usage” text on the bottom to see Token ID and secret
- Switch to usage Examples
- Copy URL value
- Copy Request headers
- Create link button is greyed out for some reason, but the link is already created so you don’t have to click it

- Create link button is greyed out for some reason, but the link is already created so you don’t have to click it
Don’t worry I’m not using these…
Go to immich mobile app -> Settings -> Advanced -> Custom proxy headers -> Add new header with + icon
- 1 Header name: P-Access-Token-Id
- 1 Header Value: xxxxxx
- 2 Header name: P-Access-Token
- 2 Header Value: xxxxxxxxxxxxxxxxxxxxxxxxx
Like so (example) 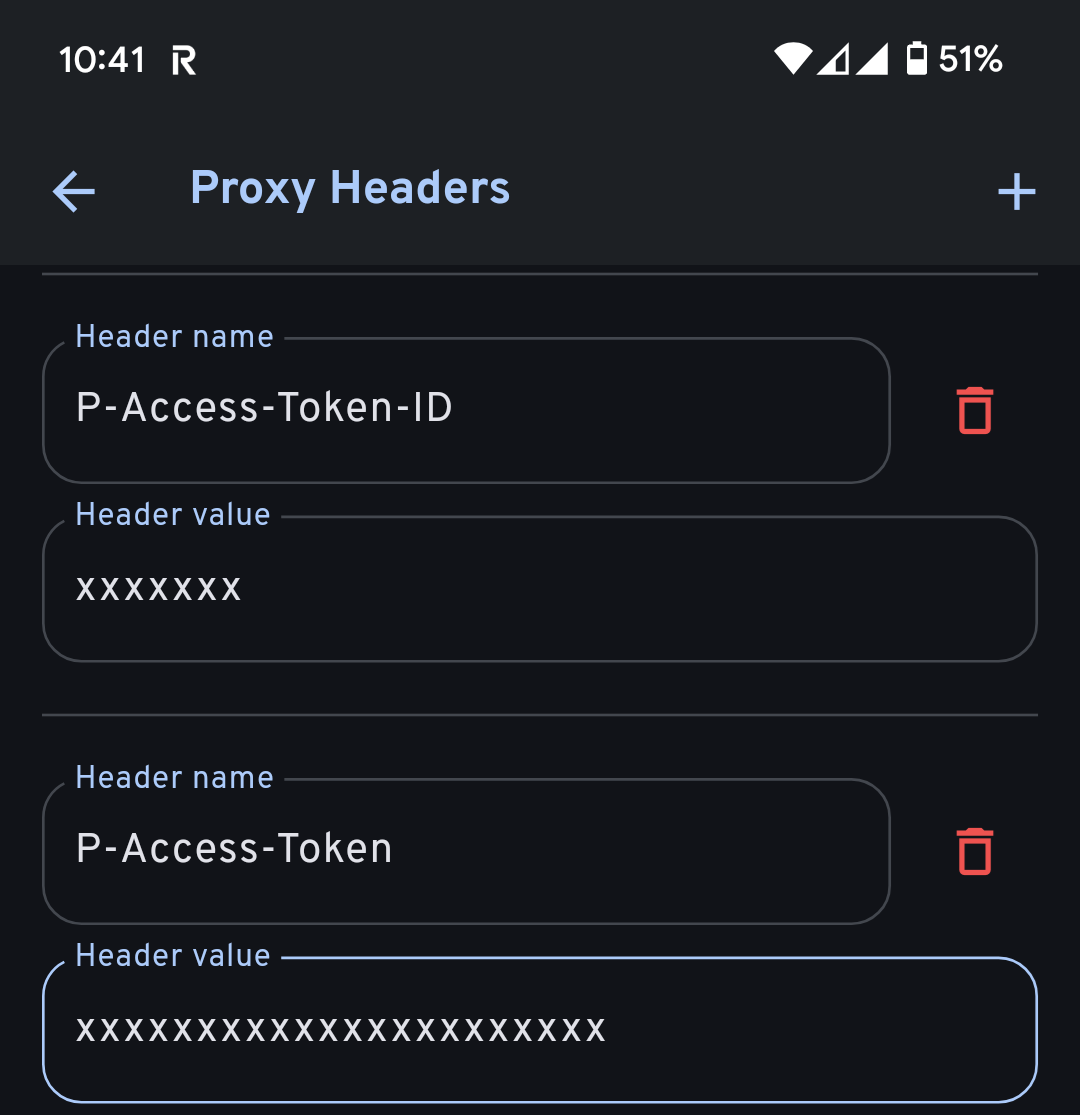
You should now be able to log in to your immich app over the internet!!
Migrate photos/videos from google photo
In case, you would like to migrate there is a great migration tool written in GO specifically for this purpose.
It’s called immich-go check out their docs for specific or up-to-date guide, best practices and special flags you may use
Installation and migration is very easy
1
2
3
4
5
6
7
8
9
10
11
12
13
14
15
16
17
18
19
20
21
22
23
24
25
26
27
28
29
30
31
32
33
34
35
36
37
38
39
40
41
#download the release specific to your OS
https://github.com/simulot/immich-go/releases


Windows: immich-go_Windows_amd64.zip
MacOS: immich-go_Darwin_amd64.tar.gz
Linux: immich-go_Linux_amd64.tar.gz
FreeBSD: immich-go_Freebsd_amd64.tar.gz
and more...


#extract the release folder
tar -xzf immich-go_*_amd64.tar.gz
cd immich-go*


#create API key in immich
Immich right corner -> click profile icon -> Account settings -> Api keys -> new api key


#create google photos takeout
https://takeout.google.com/settings/takeout/custom/photos?pli=1


#Select Google photos
#Select Export once, as ZIP, File Size 50Gb -> Create export


#examples immich-go
## Upload photos from a local folder to your Immich server
immich-go upload from-folder --server=http://your-ip:2283 --api-key=your-api-key /path/to/your/photos


## Archive photos from your Immich server to a local folder
immich-go archive from-immich --from-server=http://your-ip:2283 --from-api-key=your-api-key --write-to-folder=/path/to/archive


## Upload a Google Photos takeout to your Immich server
immich-go upload from-google-photos --server=http://your-ip:2283 --api-key=your-api-key /path/to/your/takeout-*.zip
Immich mobile app tips
Dual network access
Configure dual network access, so when you are home you can go over local network and not over the internet
- Go to immich mobile app settings -> Networking
- Automatic URL switching: Enable
- Local app network - Wifi Name: Set this to your wifi name (example: TheWifi)
- Local app network - Server endpoint: Set this to immich IP (example: http://10.1.1.20:2283/api)
- External network - Cloudflare/pangolin URL
Conclusion
In just a few steps—deploying Immich in Docker on your LXC, mounting your media, and securing access with Cloudflare or Pangolin tunnels—you can regain full control of your photos, keep costs low, and ensure privacy. Add Proxmox snapshots and Immich’s daily database dumps for backups, and enjoy a Google‑Photos‑like experience without the vendor lock‑in.
Happy self‑hosting!
Check out other posts in the series
- Hardware/software choices/alternatives [Homelab 2.0] Setting up Hardware && BIOS [Homelab 2.0] Install && Configure Proxmox [Homelab 2.0] UPS proxmox setup (+ disable UPS beeping) [Homelab 2.0] Combine NPM reverse proxy && Pi-hole DNS for Secure, seamless app local access [Homelab 2.0] Cloudflare | Pangolin - Access your homelab from the Internet over CGNAT with help of the tunnels [Homelab 2.0] Replace Google Photos with Immich and Pangolin/CF tunnels [Homelab 2.0] Qbittorrent LXC with ProtonVPN and port forwarding enabled Visualize Qbittorrent metrics in the Grafana Visualize Unifi metrics in the Grafana Self-hosted Rustdesk over pangolin tunnels