Self-hosted Rustdesk over pangolin tunnels
Introduction
If you are thinking about self-hosting rustdesk relay server, but you don’t have public IP or you just don’t want to port forward to your own network or you simply run and enjoy pangolin then look no further!
Because pangolin lets you send raw TCP/UDP traffic over tunnels this is pretty easy to set up.
What is pangolin? How do I setup it up?
I’ve previously created tutorial on this topic, you can check it out here
Short answer would be, it’s a Cloudflare tunnels alternative, which let you create tunnel from your network (without need of a public IP) to your VPS in the cloud.
Rustdesk
Install Rustdesk in your homelab
Rustdesk provides many insulation methods, I would suggest using docker and following their documentation here or LXC proxmox scripts
According to Rustdesk documentation, rustdesk works with following ports
1
2
3
4
5
6
7
8
    hbbs:
        21114 (TCP): used for web console, only available in Pro version.
        21115 (TCP): used for the NAT type test.
        21116 (TCP/UDP): Please note that 21116 should be enabled both for TCP and UDP. 21116/UDP is used for the ID registration and heartbeat service. 21116/TCP is used for TCP hole punching and connection service.
        21118 (TCP): used to support web clients.
    hbbr:
        21117 (TCP): used for the Relay services.
        21119 (TCP): used to support web clients.
We dont need 21114/21118 which are used for web console and web clients…
Pangolin
Add Pangolin Resources
We are going to add resources for following ports, we need to create one resource per port
- 21115 TCP
- 21116 TCP
21117 TCP
- 21116 UDP
Go to your pangolin dashboard -> Resources -> Public -> Add Resource
- Choose TCP/UDP Resource
- Name of your liking (you can description of what is port used for, checkout my image bellow)
- Add target -> Point to the IP and port of Rustdesk
These ports need to match, meaning when you are creating resource for 21115 you need to forward to rustdesk port 21115
Example 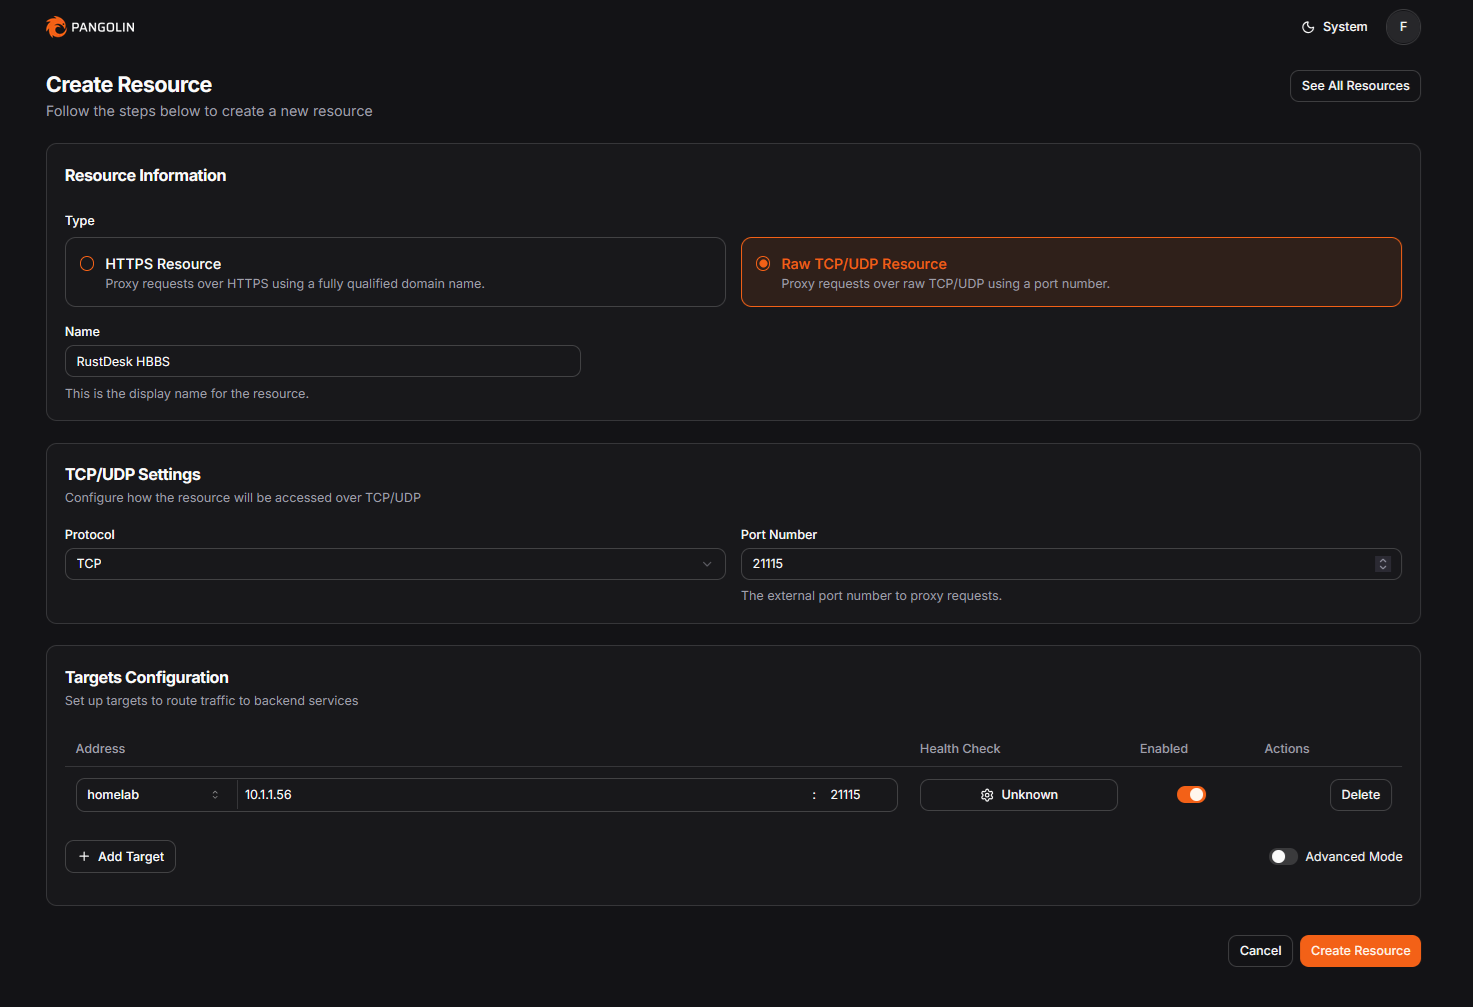
Repeat these until you have all following 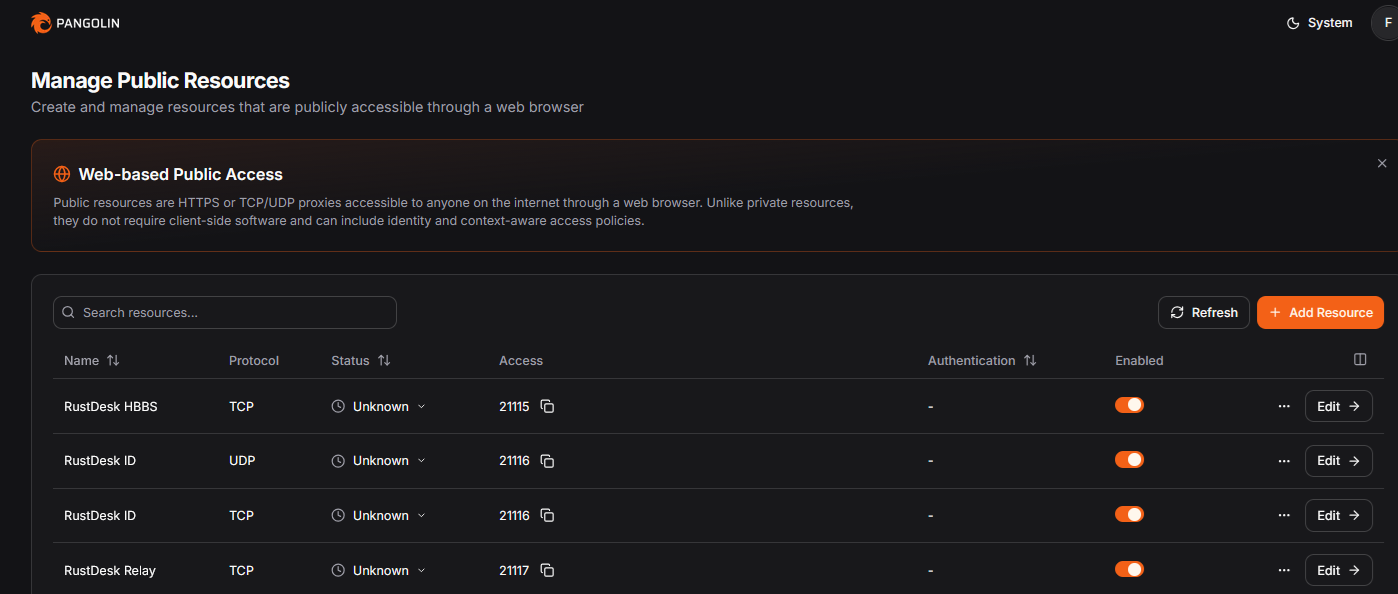
Configure gerbil/traefik
Gerbil
We need to add these ports to docker-compose file
1
vim docker-compose.yml
Add following section to gerbil
1
2
3
4
5
6
7
8
9
10
11
12
13
14
15
16
17
18
19
20
21
22
23
24
25
26
27
28
29
30
31
32
...
...
  gerbil:
    cap_add:
      - NET_ADMIN
      - SYS_MODULE
    command:
      - --reachableAt=http://gerbil:3003
      - --generateAndSaveKeyTo=/var/config/key
      - --remoteConfig=http://pangolin:3001/api/v1/gerbil/get-config
      - --reportBandwidthTo=http://pangolin:3001/api/v1/gerbil/receive-bandwidth
    container_name: gerbil
    depends_on:
      pangolin:
        condition: service_healthy
    image: fosrl/gerbil:latest
    ports:
      - 51820:51820/udp
      - 21820:21820/udp
      - 443:443
      - 80:80
      #rustdesk
      - 21115:21115     # HBBS (TCP)
      - 21116:21116     # HBBS (TCP)
      - 21116:21116/udp # HBBS (UDP)
      - 21117:21117     # HBBR (TCP)
    restart: unless-stopped
    volumes:
      - ./config/:/var/config
  pangolin:
  ...
  ...
Traefik
Again edit following yaml file. The path is relative of where you keep your compose files so keep that in mind
1
vim config/traefik/traefik_config.yml
Edit following section so it looks like this
1
2
3
4
5
6
7
8
9
10
11
12
13
14
15
16
17
18
19
20
21
22
23
24
25
26
27
28
29
30
31
...
...
entryPoints:
  web:
    address: ":80"
  websecure:
    address: ":443"
    http:
      tls:
        certResolver: letsencrypt
    transport:
      respondingTimeouts:
        readTimeout: 30m
  tcp-21115:
    address: ":21115/tcp"
  tcp-21116:
    address: ":21116/tcp"
  udp-21116:
    address: ":21116/udp"
  tcp-21117:
    address: ":21117/tcp"
experimental:
  plugins:
    badger:
      moduleName: github.com/fosrl/badger
      version: v1.2.0
    crowdsec:
      moduleName: github.com/maxlerebourg/crowdsec-bouncer-traefik-plugin
      version: v1.3.5
...
...
Load the new changes
1
docker compose up -d --force-recreate
Configure the Rustdesk
Now we need to tell our rustdesk, to accept connection from our pangolin URL
Depending on your setup, let’s say your pangolin URL for sharing is “pangolin.yamyam.com”, then we need to point it to pangolin.yamyam.com:21117
Stop and edit the rustdesk service
1
systemctl stop rustdesk-hbbs rustdesk-hbbr
1
vim /lib/systemd/system/rustdesk-hbbs.service
1
2
3
4
5
6
7
8
9
10
11
12
13
14
15
16
17
18
19
20
21
22
cat /lib/systemd/system/rustdesk-hbbs.service


[Unit]
Description=Rustdesk Signal Server


[Service]
Type=simple
LimitNOFILE=1000000
ExecStart=/usr/bin/hbbs -r pangolin.yamyam.com:21117 -k _  #CHANGE THIS ACCORDING TO YOUR URL
WorkingDirectory=/var/lib/rustdesk-server/
User=
Group=
Restart=always
StandardOutput=append:/var/log/rustdesk-server/hbbs.log
StandardError=append:/var/log/rustdesk-server/hbbs.error
RestartSec=10


[Install]
WantedBy=multi-user.target
Then hbbr services
1
vim /lib/systemd/system/rustdesk-hbbr.service
1
2
3
4
5
6
7
8
9
10
11
12
13
14
15
16
17
18
19
20
21


[Unit]
Description=Rustdesk Relay Server


[Service]
Type=simple
LimitNOFILE=1000000
ExecStart=/usr/bin/hbbr -k _
WorkingDirectory=/var/lib/rustdesk-server/
User=
Group=
Restart=always
StandardOutput=append:/var/log/rustdesk-server/hbbr.log
StandardError=append:/var/log/rustdesk-server/hbbr.error
RestartSec=10


[Install]
WantedBy=multi-user.target
Reload the daemon and the services
1
2
systemctl daemon-reload
systemctl start rustdesk-hbbs rustdesk-hbbr
Get they rustdesk auth key
This is the key used for authorization between our relay and clients, so not just everybody can use our relay for free!
Don’t worry this is the dummy key
1
2
cat /var/lib/rustdesk-server/id_ed25519.pub
Is1uf331yjs+333Ow1U8OxxnfX8RRi21PRxs
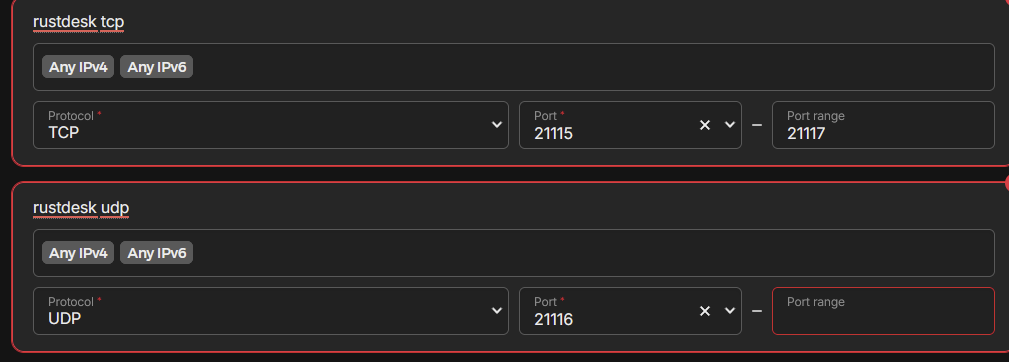
Allow port in VPS firewall
I was banning my head with this one when this setup wasn’t working, and then it hit me! I also have firewall in front of my VPS
So don’t forget to allow following ports against, if you don’t have allowed all as a maniac!
Rustdesk client
As a last step we need to add our new fresh relay to our rust client so it knows where to find it!
I’m running one on my Windows machine, so just open it up go to Settings -> network -> ID/relay server
- ID server: pangolin.yamyam.com
- Relay server: pangolin.yamyam.com
- API server: leave blank
- Key: Is1uf331yjs+333Ow1U8OxxnfX8RRi21PRxs
Again, just in case I’m going to say don’t forget to change these to your values! They will be all different.
Everything should work now and you should see green connected state!
BONUS alternative: Connect directly via tailscale
This one is much less difficult to setup, but you need to have tailscale installed on all your machines.
- Install tailscale client and write down the IP of client where you want to connect
- You have to install not just run the rustdesk, it didn’t work without it by just running go to version of rustdesk
- Edit the rustdesk settings -> Security -> Check Enable direct IP
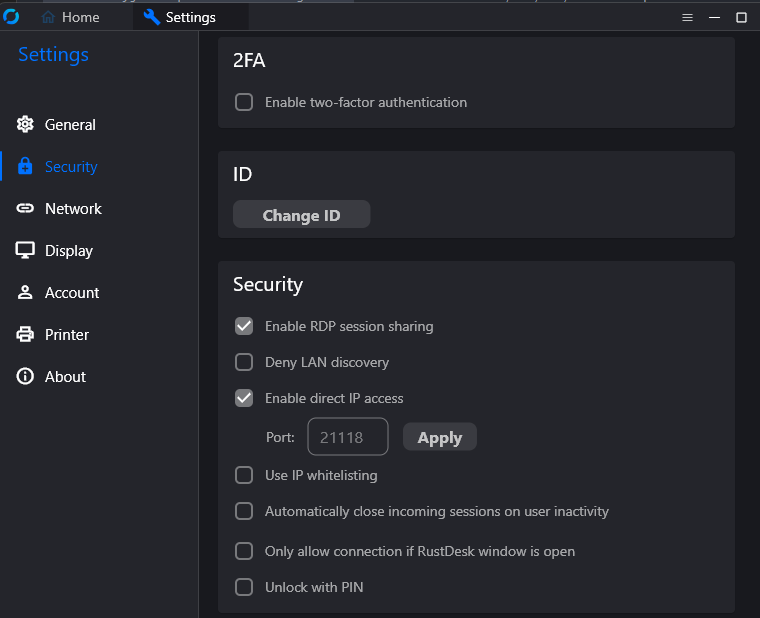
And that’s all you can now connect from the other client by typing in the tailscale IP of the target!
Check out other posts in the series
- Hardware/software choices/alternatives [Homelab 2.0] Setting up Hardware && BIOS [Homelab 2.0] Install && Configure Proxmox [Homelab 2.0] UPS proxmox setup (+ disable UPS beeping) [Homelab 2.0] Combine NPM reverse proxy && Pi-hole DNS for Secure, seamless app local access [Homelab 2.0] Cloudflare | Pangolin - Access your homelab from the Internet over CGNAT with help of the tunnels [Homelab 2.0] Replace Google Photos with Immich and Pangolin/CF tunnels [Homelab 2.0] Qbittorrent LXC with ProtonVPN and port forwarding enabled Visualize Qbittorrent metrics in the Grafana Visualize Unifi metrics in the Grafana Self-hosted Rustdesk over pangolin tunnels